How to Submit and Process Payment Request Through Payable Report
1. Overview
The Payment Request module in Inaya allows you to formally request payment for a Purchase Order (PO) once a bill has been recorded against it, and to route that request through an approval workflow before it is actually paid. This document explains how to submit a payment request directly from the Payable Aging Report, rather than from a specific PO. This method is useful when you want to review all outstanding vendor balances in one place and initiate payment requests for multiple vendors efficiently.
The process follows the same workflow as submitting a payment request from a specific PO, with the key difference being the starting point: instead of opening an individual PO, you begin from the Payable Aging Report, select the vendor and aging category, and then submit the payment request from there.
2. Why Is It Important to Submit Payment Requests Through the Payable Report?
Aspect | Importance |
|---|---|
Centralized Overview | View all vendor payables in one place with aging categories (0-30, 31-60, 61-90, >90 days) |
Aging Management | Prioritize overdue payments by submitting requests for aging debts first |
Separation of Duties | The person requesting payment is not necessarily the person who pays it |
Approval Control | Payments only go out after being approved through a configured approval strategy |
Payment Accuracy | Ensures requests are only made against POs that actually have a recorded bill |
Centralized Processing | All approved requests, from any PO or vendor, can be paid from one report |
Audit Trail | Full record of who requested, who approved, and who processed the payment |
3. Requirements Before You Start
Prerequisites Checklist
Procurement Setting Enabled: The "Require payment request before payment" option must be enabled in Configure → Advanced → Finance → Procurement.
Purchase Order: A Purchase Order must exist. Study how to create a purchase order for details.
Bill Recorded: A bill must be recorded against the PO. Study how to record a bill for a PO for details.
Payment Request Approval Strategy Configured: An approval strategy for payment requests must be set up in the system. Study approval management for details.
Payment Method & Cash Box: A valid payment method must be available, and the related cash box must have enough balance to cover the request when it is time to pay.
User Permissions: The user must have the correct role/permission to access Procurement configuration, submit payment requests, approve them, and/or process payments, depending on which step they are performing.
4. Step-by-Step Guide
Part A — One-Time Setup: Enable Payment Requests
Step 1 — Open Configure
From the top menu, click the Configure (gear) icon, then go to Advanced.
Under the Finance column, click Procurement.
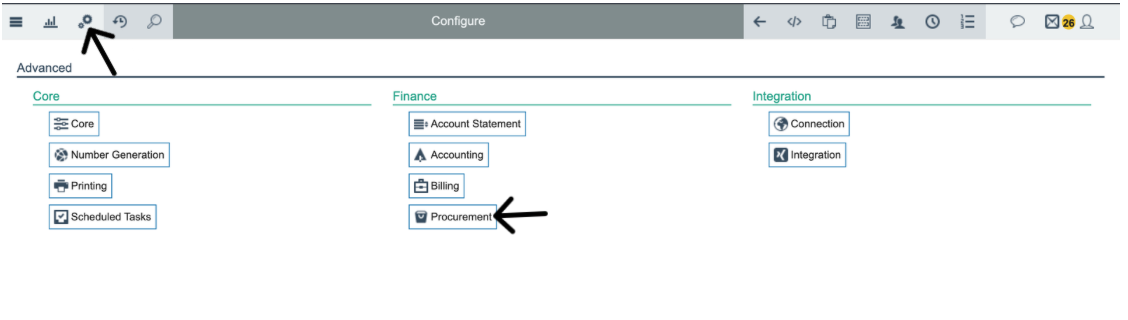
Alternative: Click the Search icon, type
Procurement, and select Procurement (Configure → Advanced → Finance) from the results.
Step 2 — Enable 'Require Payment Request Before Payment'
On the Procurement configuration page, scroll down to the Payments section.
Tick the checkbox for "Require payment request before payment."
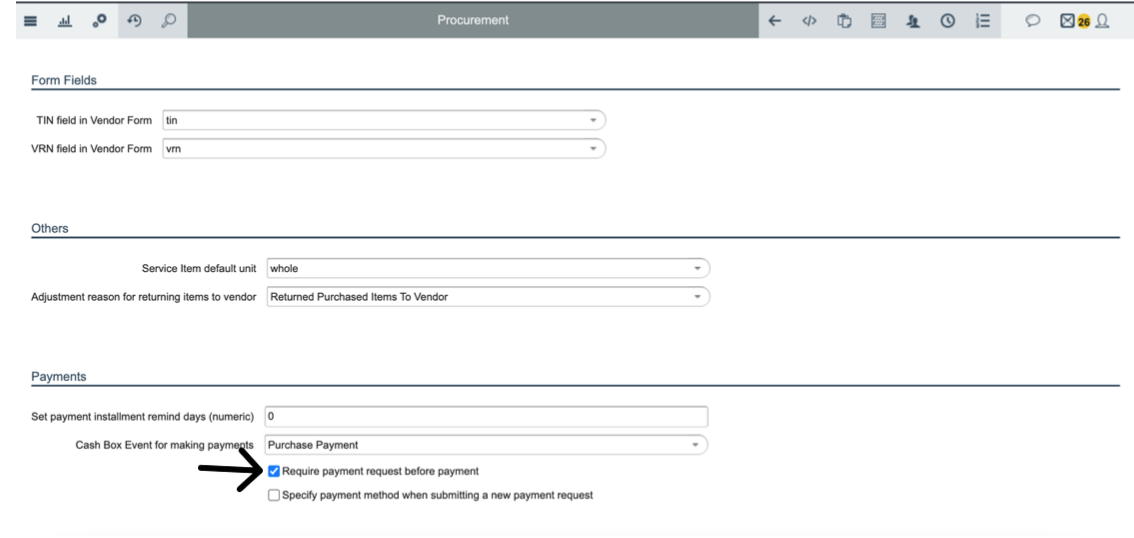
Once this is ticked, the system will require a payment request (instead of a direct payment) before any PO can be paid.
Part B — Submitting a Payment Request From a PO
Step 1 — Navigate to Purchase Orders
Open the Main Menu from the sidebar.
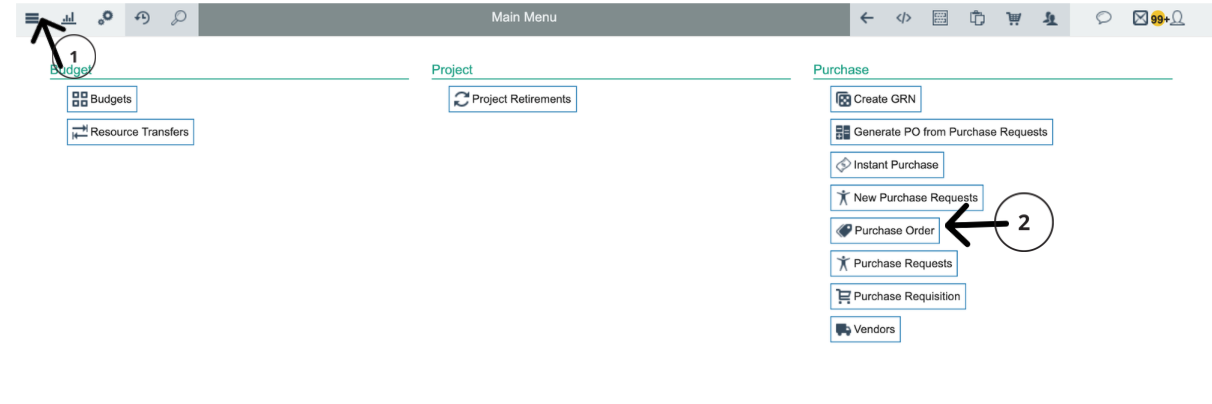
Scroll down to Purchase, then select Purchase Order to open the Purchase Orders page.
Alternatively, click the Search icon in the top-left corner, type
Purchase Orderinto the search box, and select Purchase Order from the results.
Step 2 — Locate the PO with 'Not Paid' Status
In the Purchase Orders list, examine the Payment Status column.
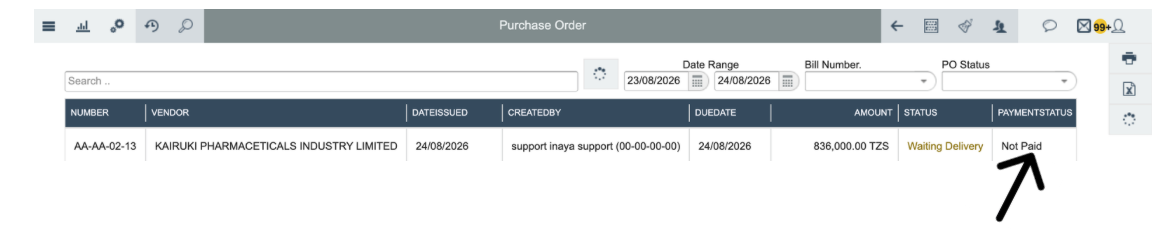
Look for the PO with Payment Status = "Not Paid or Not Billed"
Example: PO Number AA-AA-02-13 for KAIRUKI PHARMACEUTICALS INDUSTRY LIMITED with amount 836,000.00 TZS and Payment Status = "Not Paid".
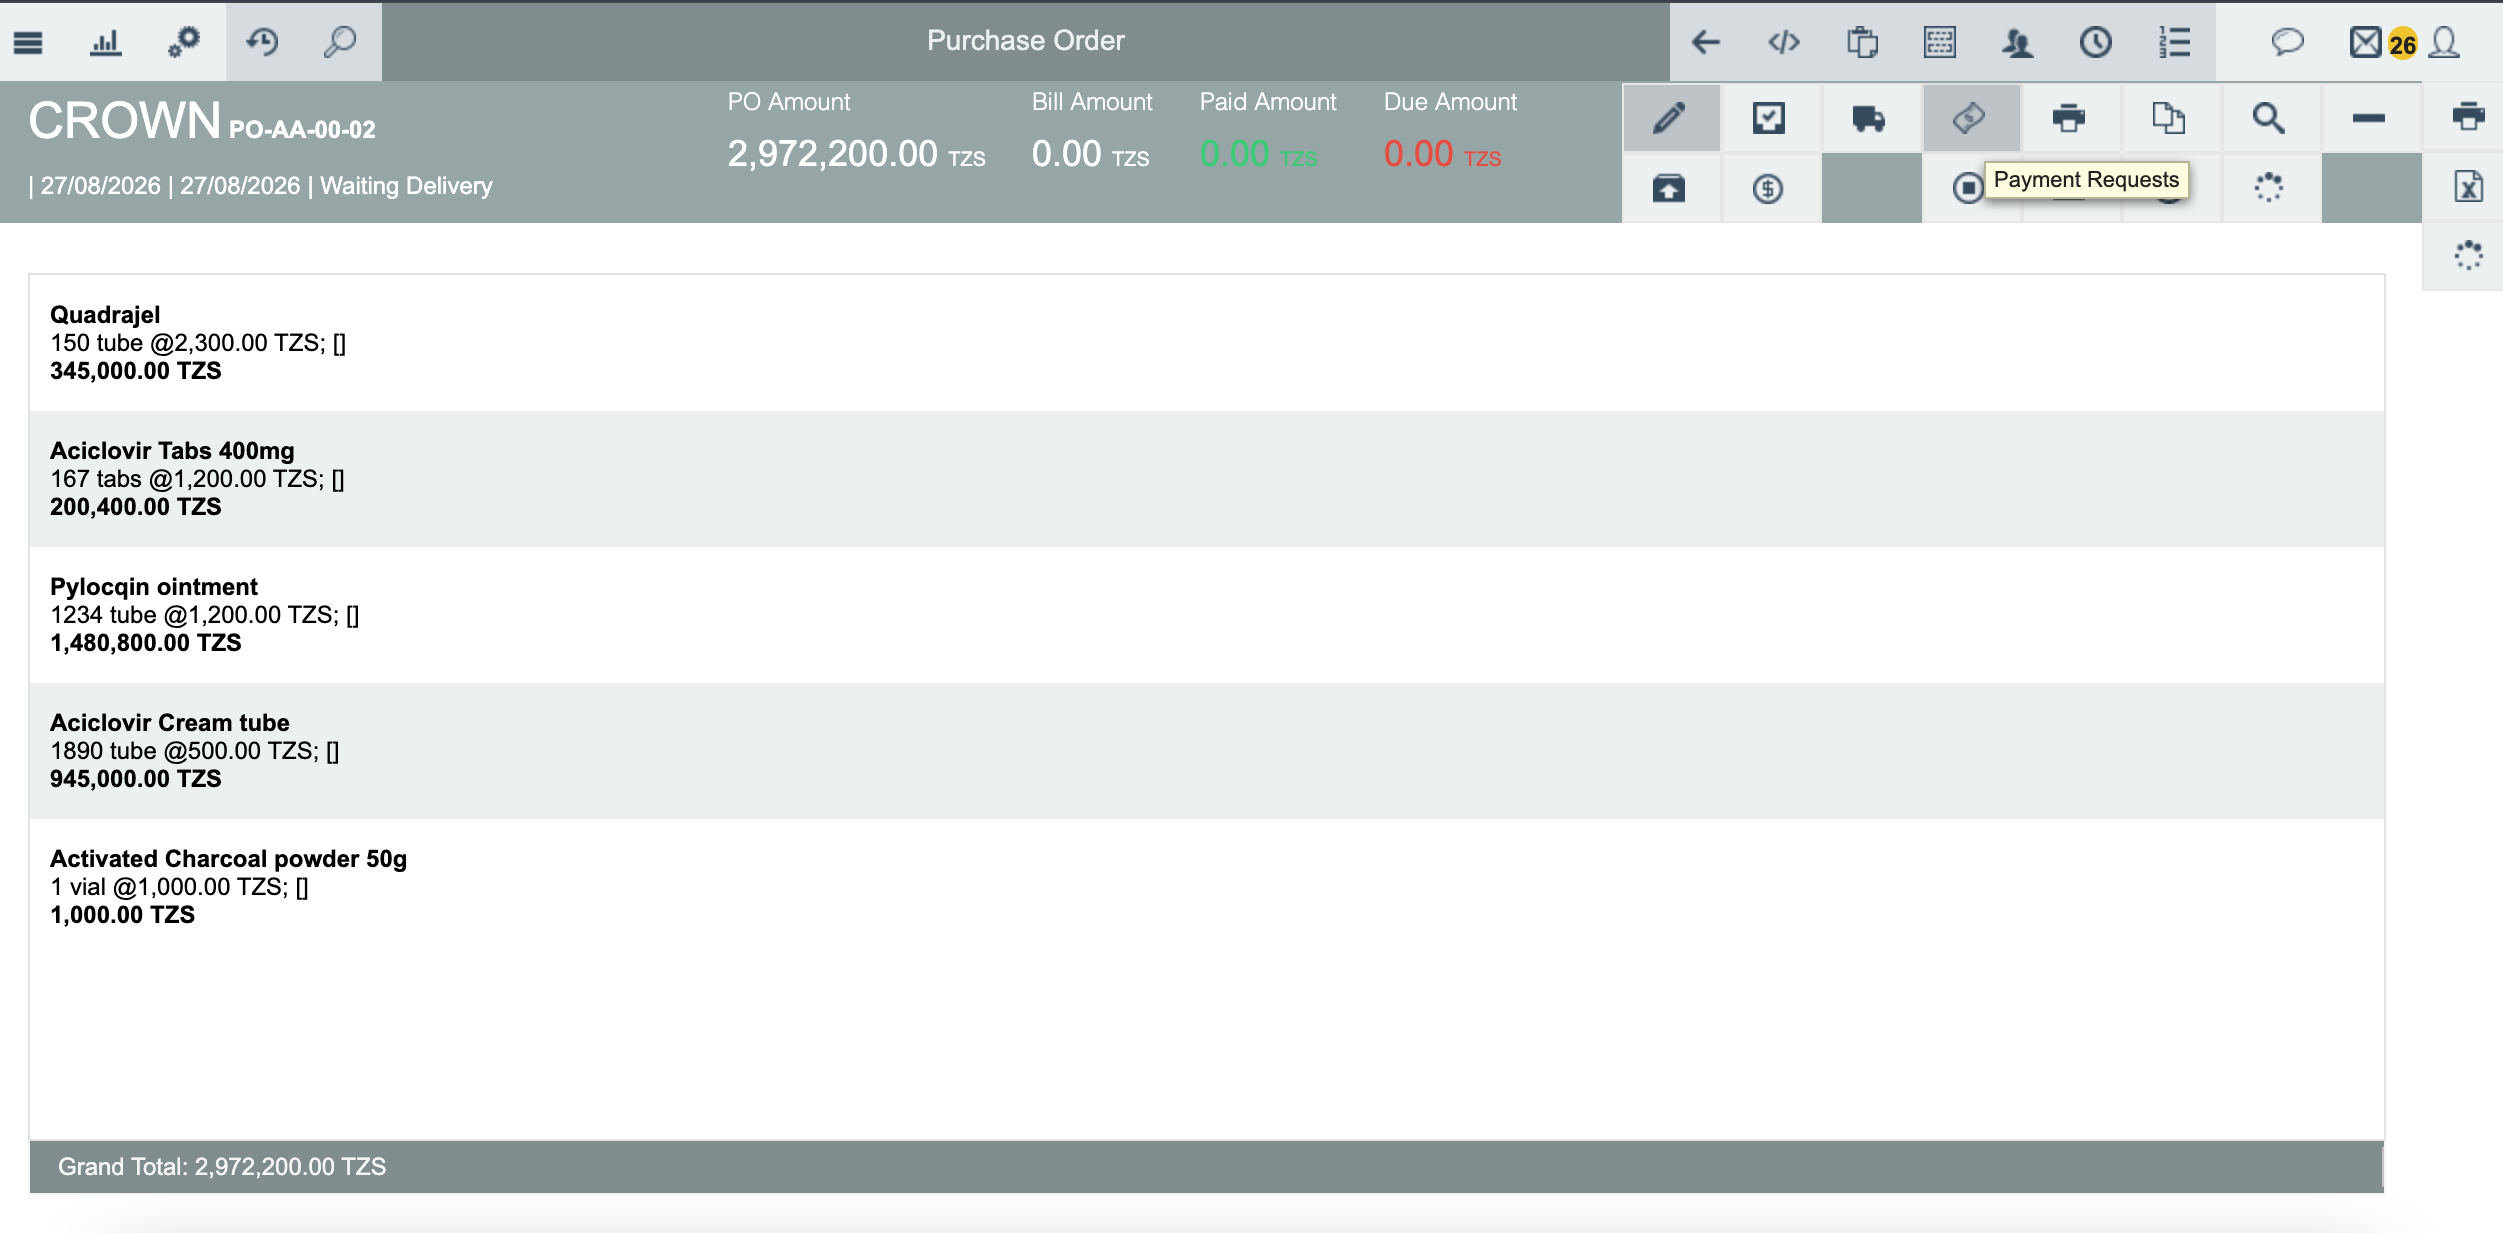
Step 3 — Open the Purchase Order
Open the PO you want to request payment for.
If the PO has no bill recorded yet, clicking the Payment Requests
And then clicking New payment request will show "There is no bill for this purchase order. Please create and submit a bill first."
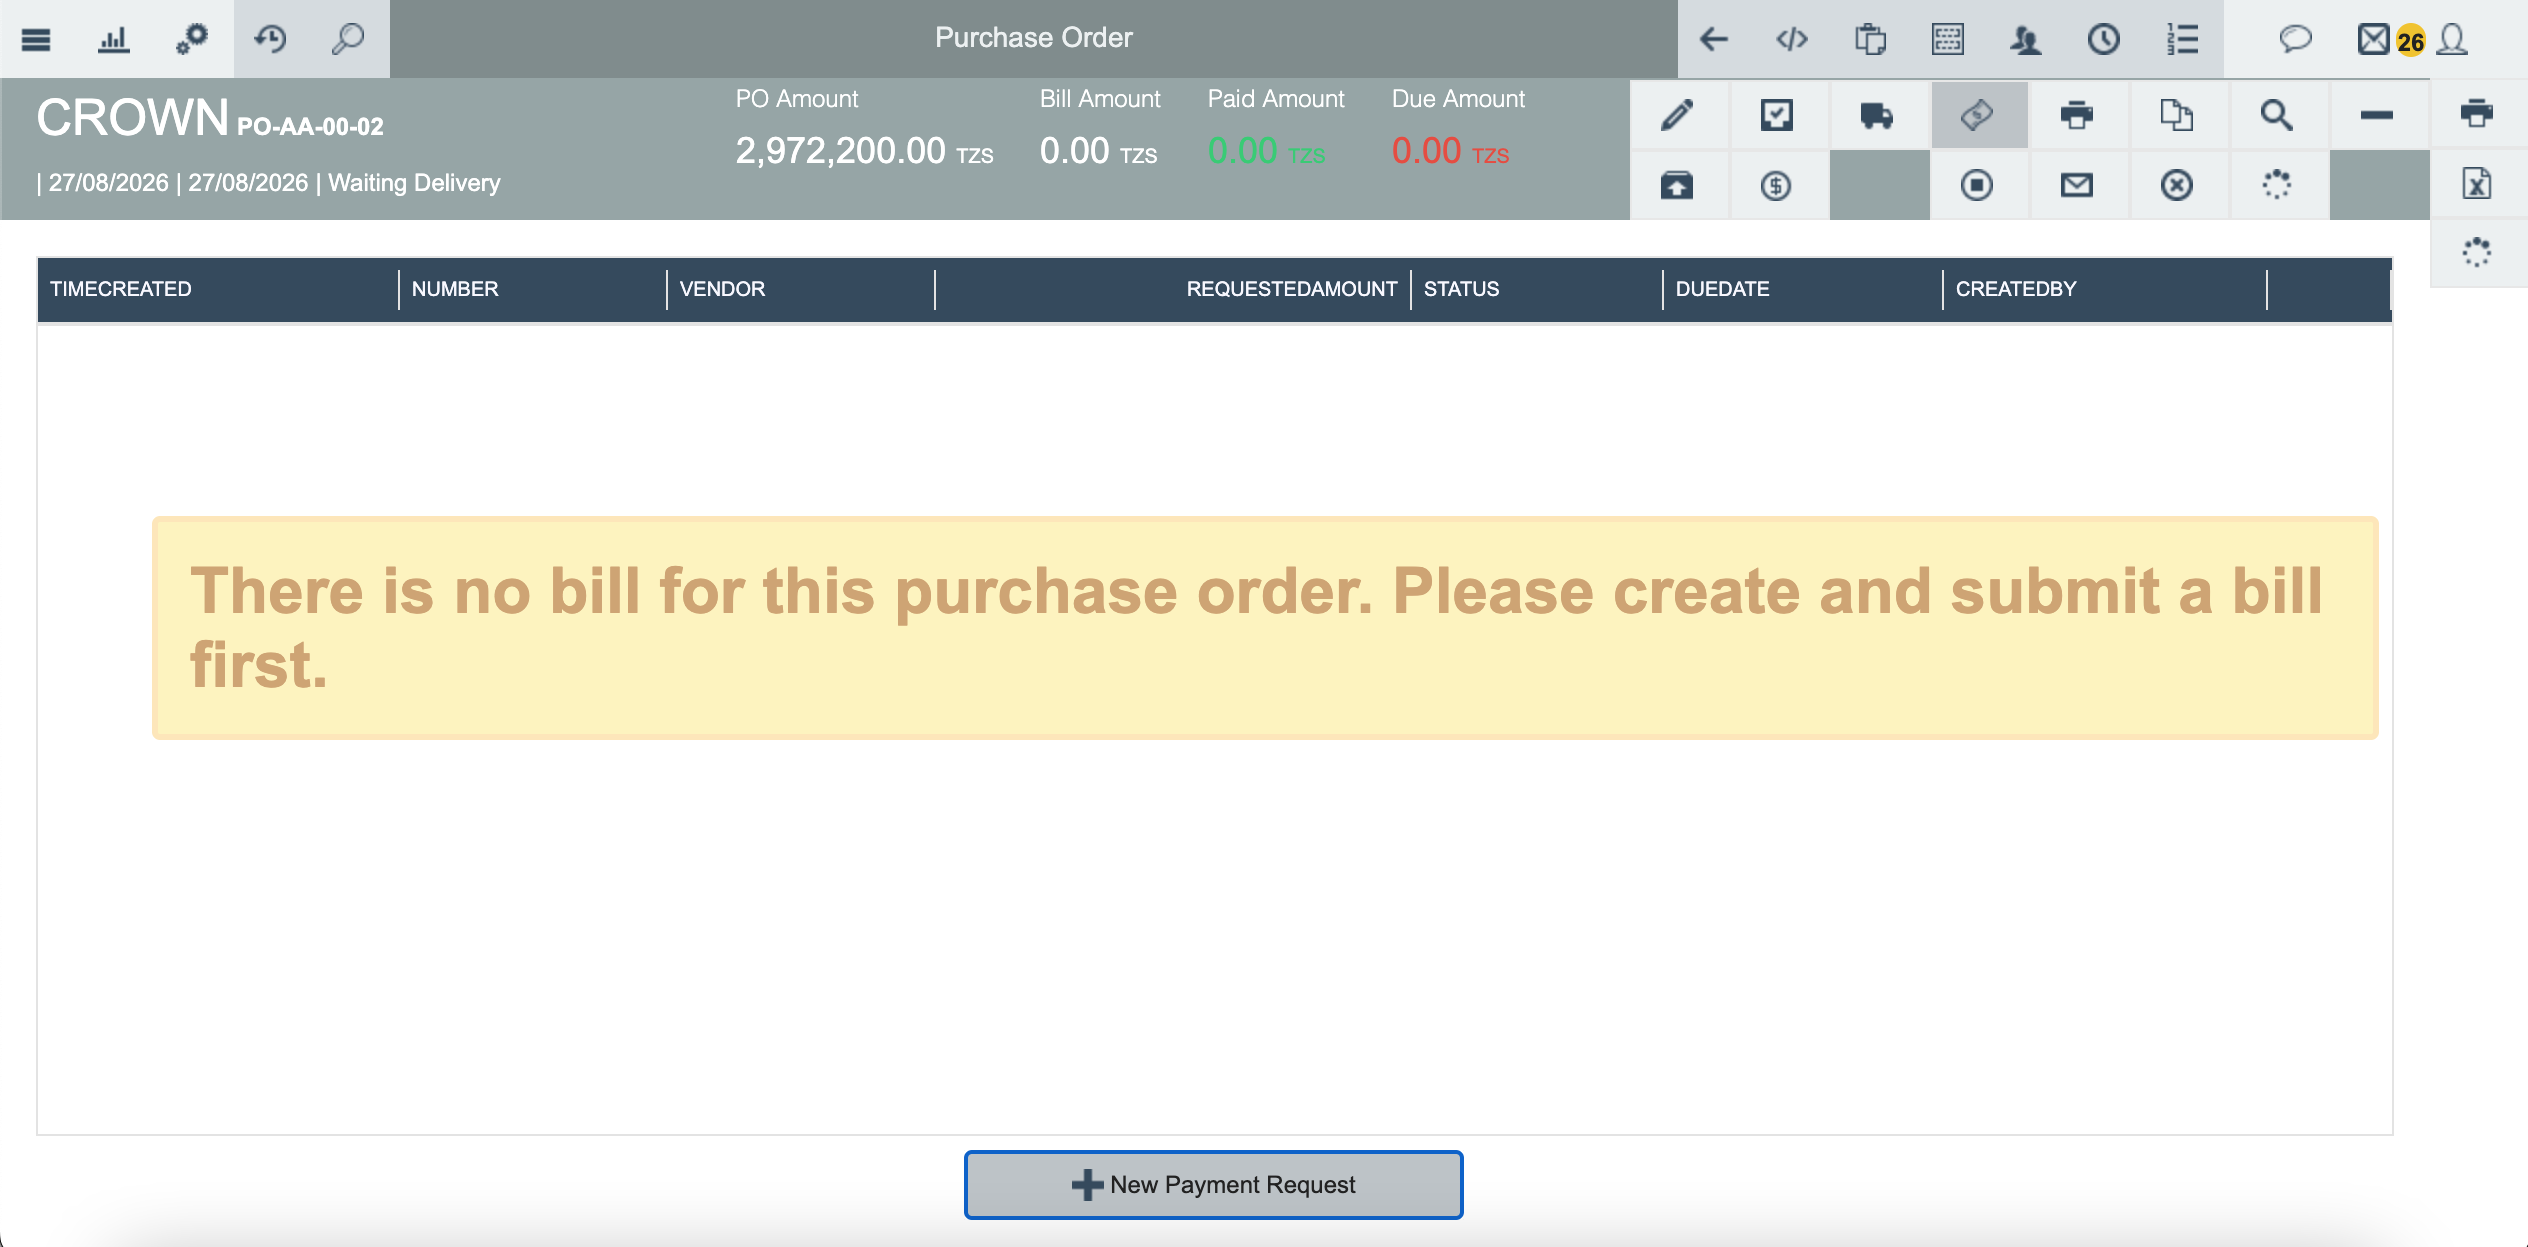
Solution: You cannot request payment for a PO with no bill. Study how to record a bill for a PO to record and submit a bill for that PO first. Once the bill is recorded successfully, the PO will show a Bill Amount and Due Amount, and you can proceed.
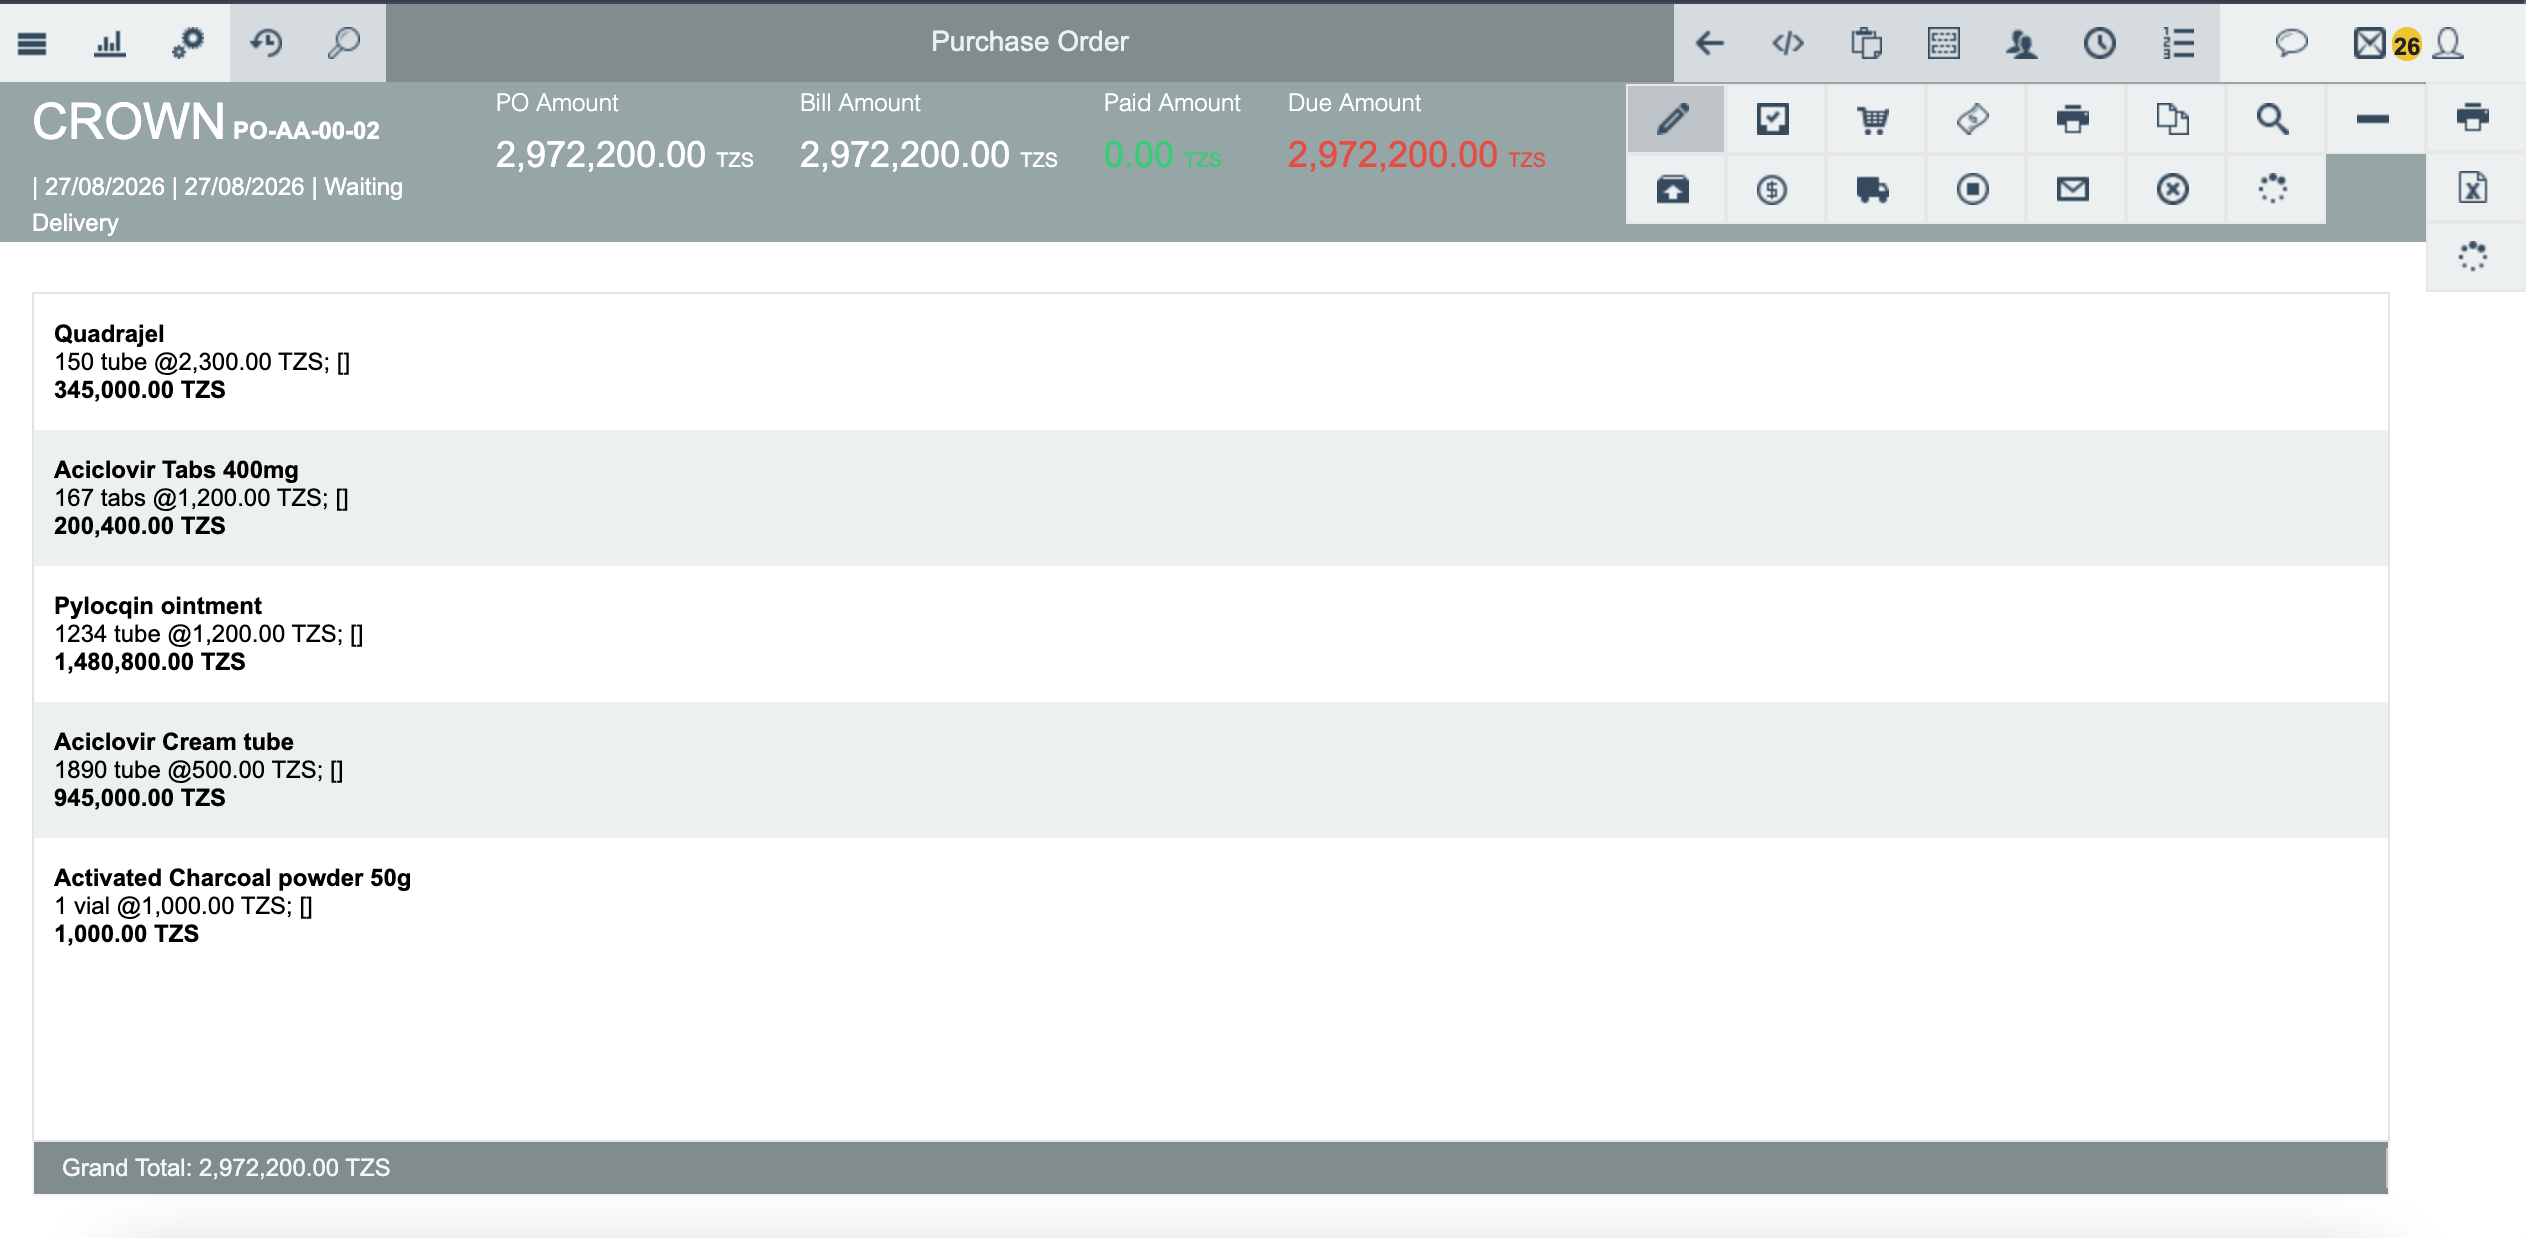
Part C — Submitting a Payment Request From the Payable Aging Report
Step 1 — Navigate to Payable Aging Report
Click on Reports from the Menu options.
Scroll down to Aging Reports, then select Payable Aging Report to open the report page.
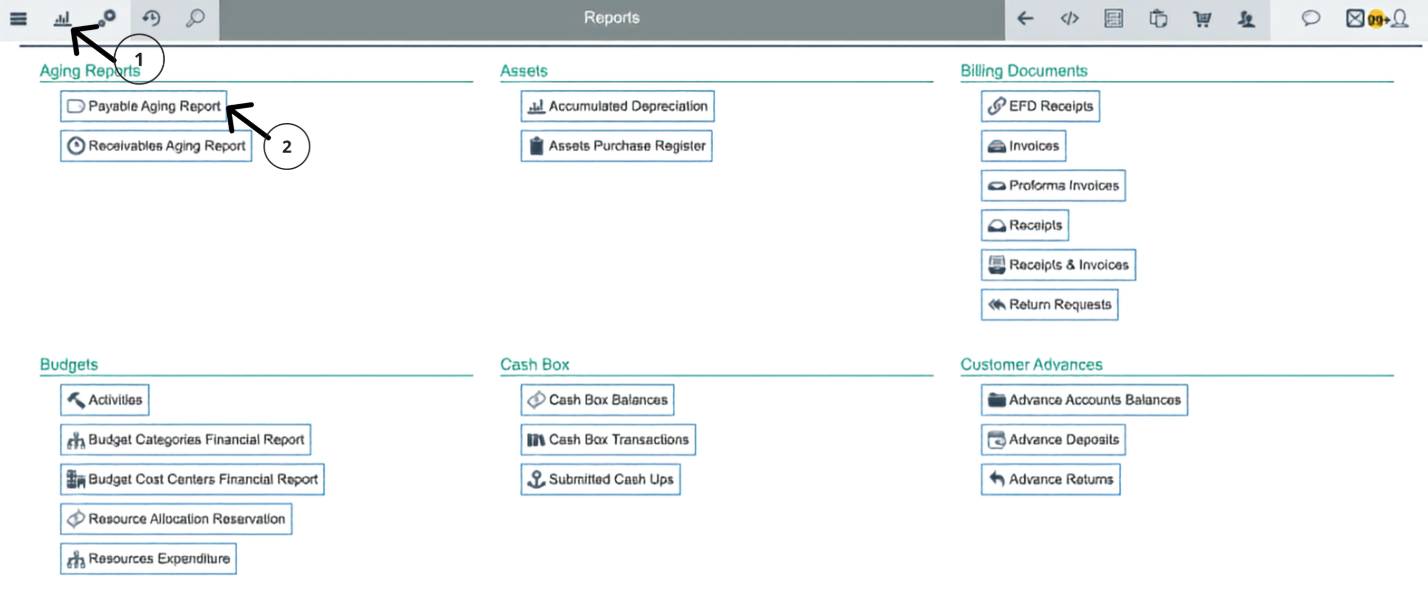
Alternatively, click the Search icon in the top-left corner, type
Payable Aging Reportinto the search box, and select Payable Aging Report from the results.
Step 2 — Set the 'As Of' Date
Once the Payable Aging Report opens, locate the "As Of" date field at the top of the report.

Set the "As Of" date to the end of the month when the bill was created. For example, if the PO was generated in August, set the "As Of" date to 31/08/2026 or later.
If Bill Was Created In | Set "As Of" Date To |
|---|---|
January 2026 | 31/01/2026 or later |
July 2026 | 31/07/2026 or later |
August 2026 | 31/08/2026 or later |
September 2026 | 30/09/2026 or later |
Step 3 — Review the Payable Aging Report
After setting the correct "As Of" date, review the list of all vendors with outstanding balances.
Check the aging columns to identify which vendors have outstanding payments:
0 - 30 DAYS: Current payables (not yet overdue) — bills created within the last 30 days
31 - 60 DAYS: Payables that are 1-2 months overdue
61 - 90 DAYS: Payables that are 2-3 months overdue
> 90 DAYS: Payables that are over 3 months overdue — HIGHEST PRIORITY
Use the Search bar to find a specific vendor by name, or scroll through the list.
Aging Category | Description | Priority Level |
|---|---|---|
0 - 30 DAYS | Bill created within last 30 days | Low — Not yet overdue |
31 - 60 DAYS | Bill created 31-60 days ago | Medium — Consider paying soon |
61 - 90 DAYS | Bill created 61-90 days ago | High — Prioritize payment |
> 90 DAYS | Bill created over 90 days ago | CRITICAL — Pay immediately |
Step 4 — Select the Vendor and Click the Correct Aging Column
Find the vendor you want to pay in the report.
⚠️ VERY IMPORTANT — Click the Correct Aging Column:
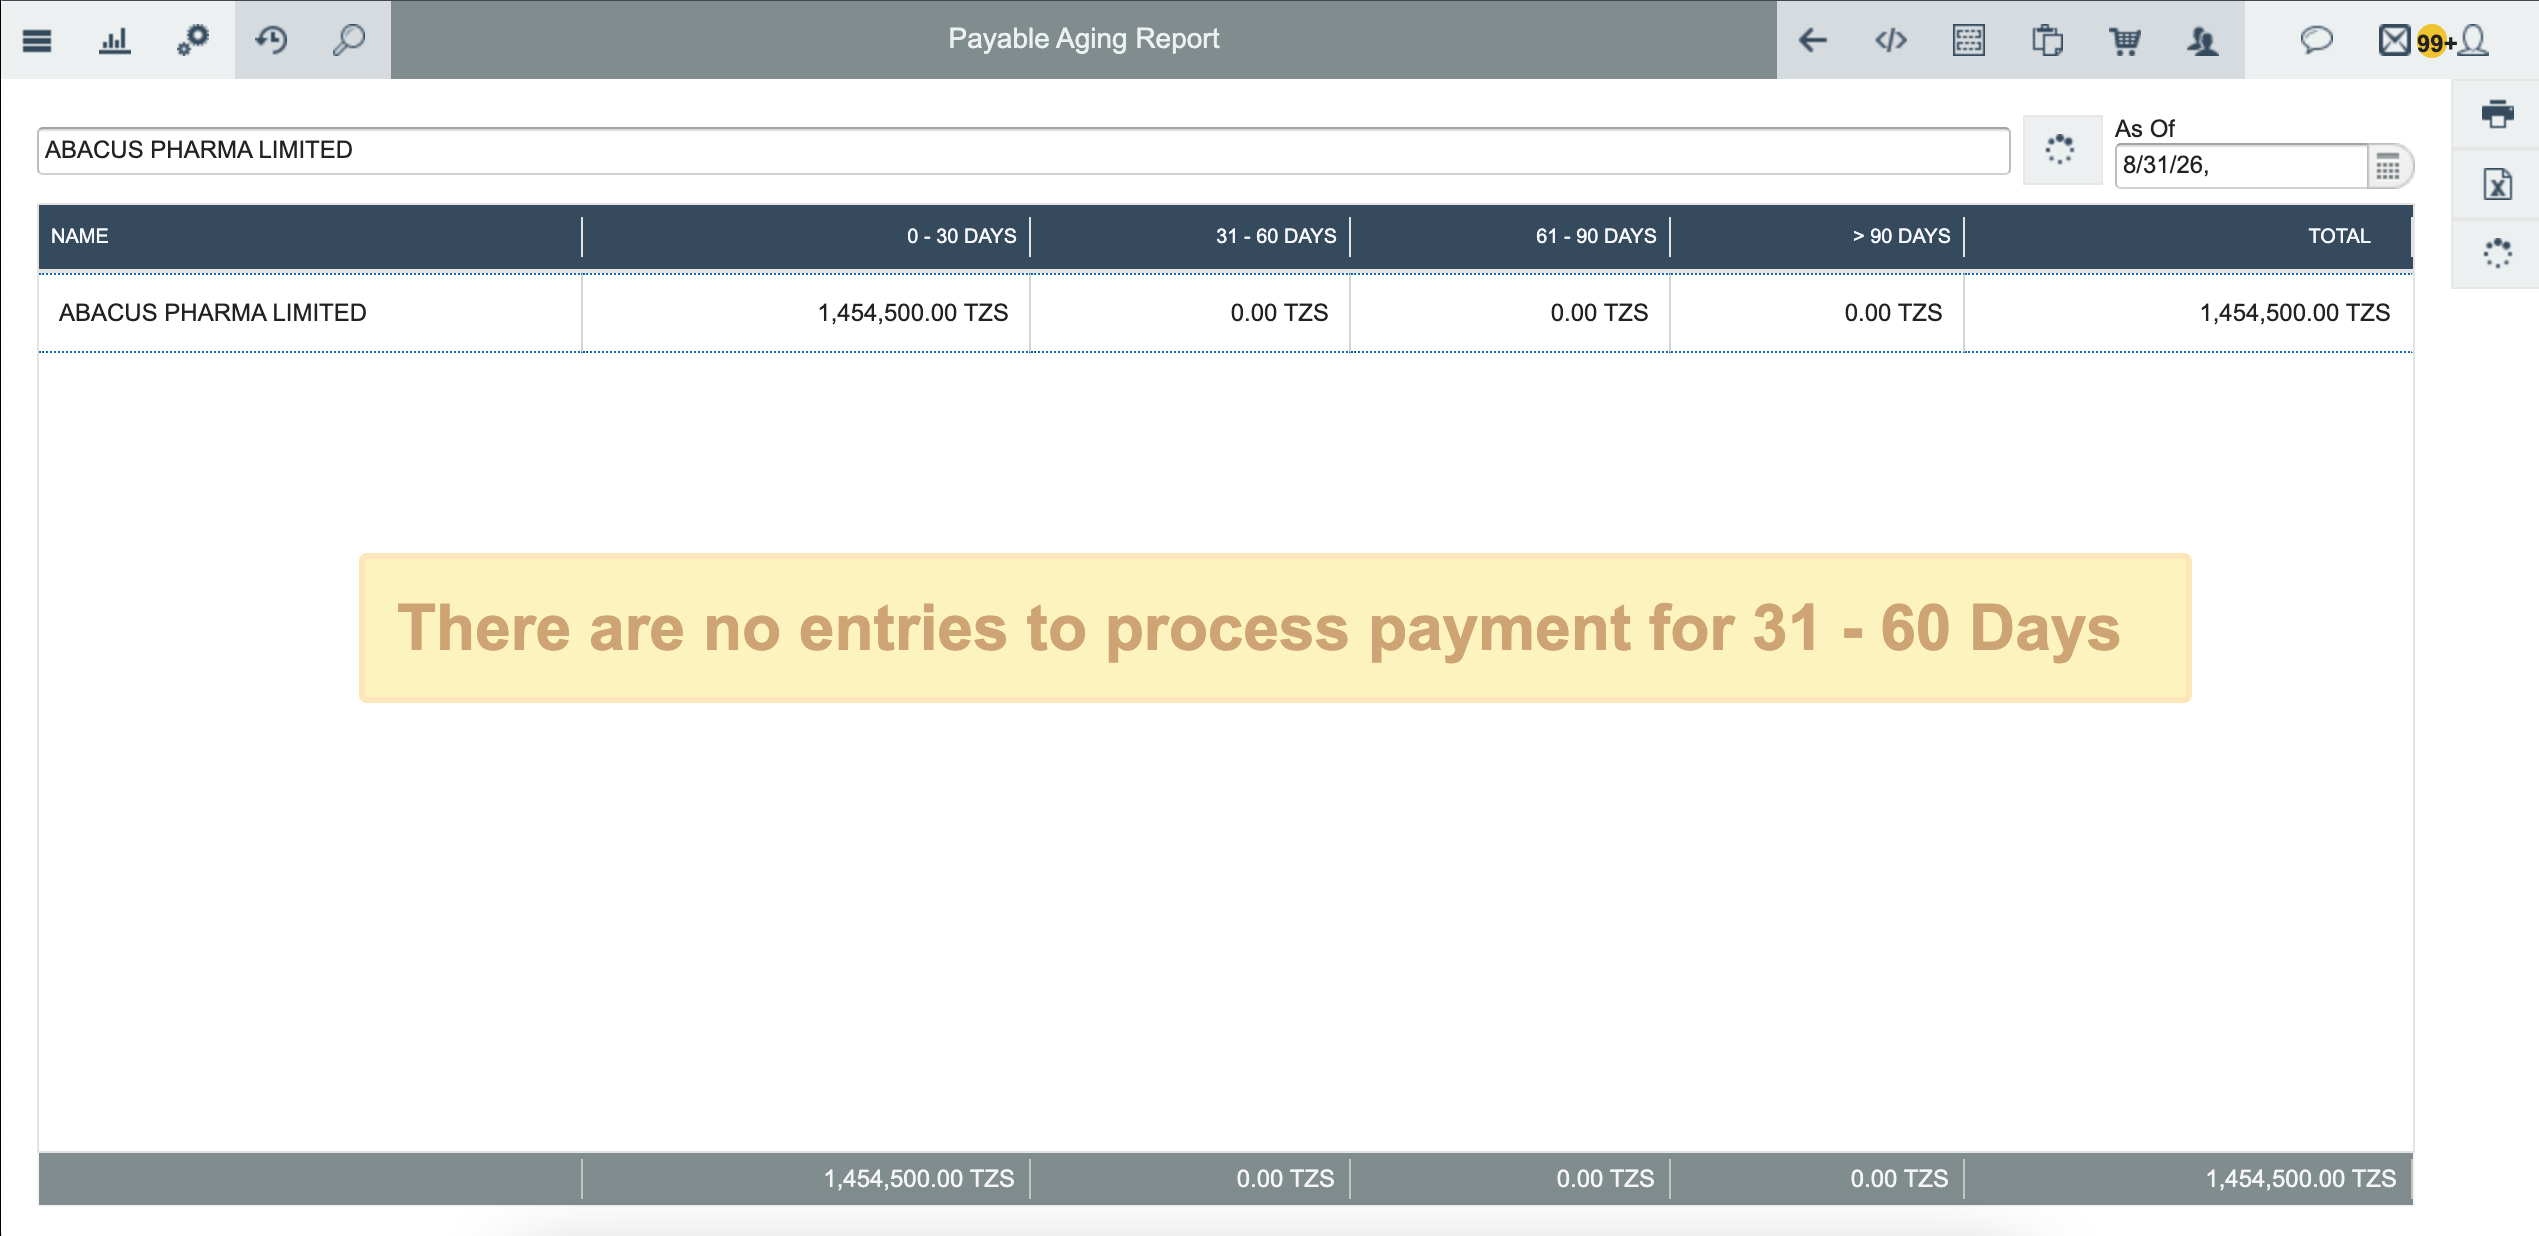
Click on the aging column that contains the amount for that vendor. A screen will appear showing the bill details for that vendor.
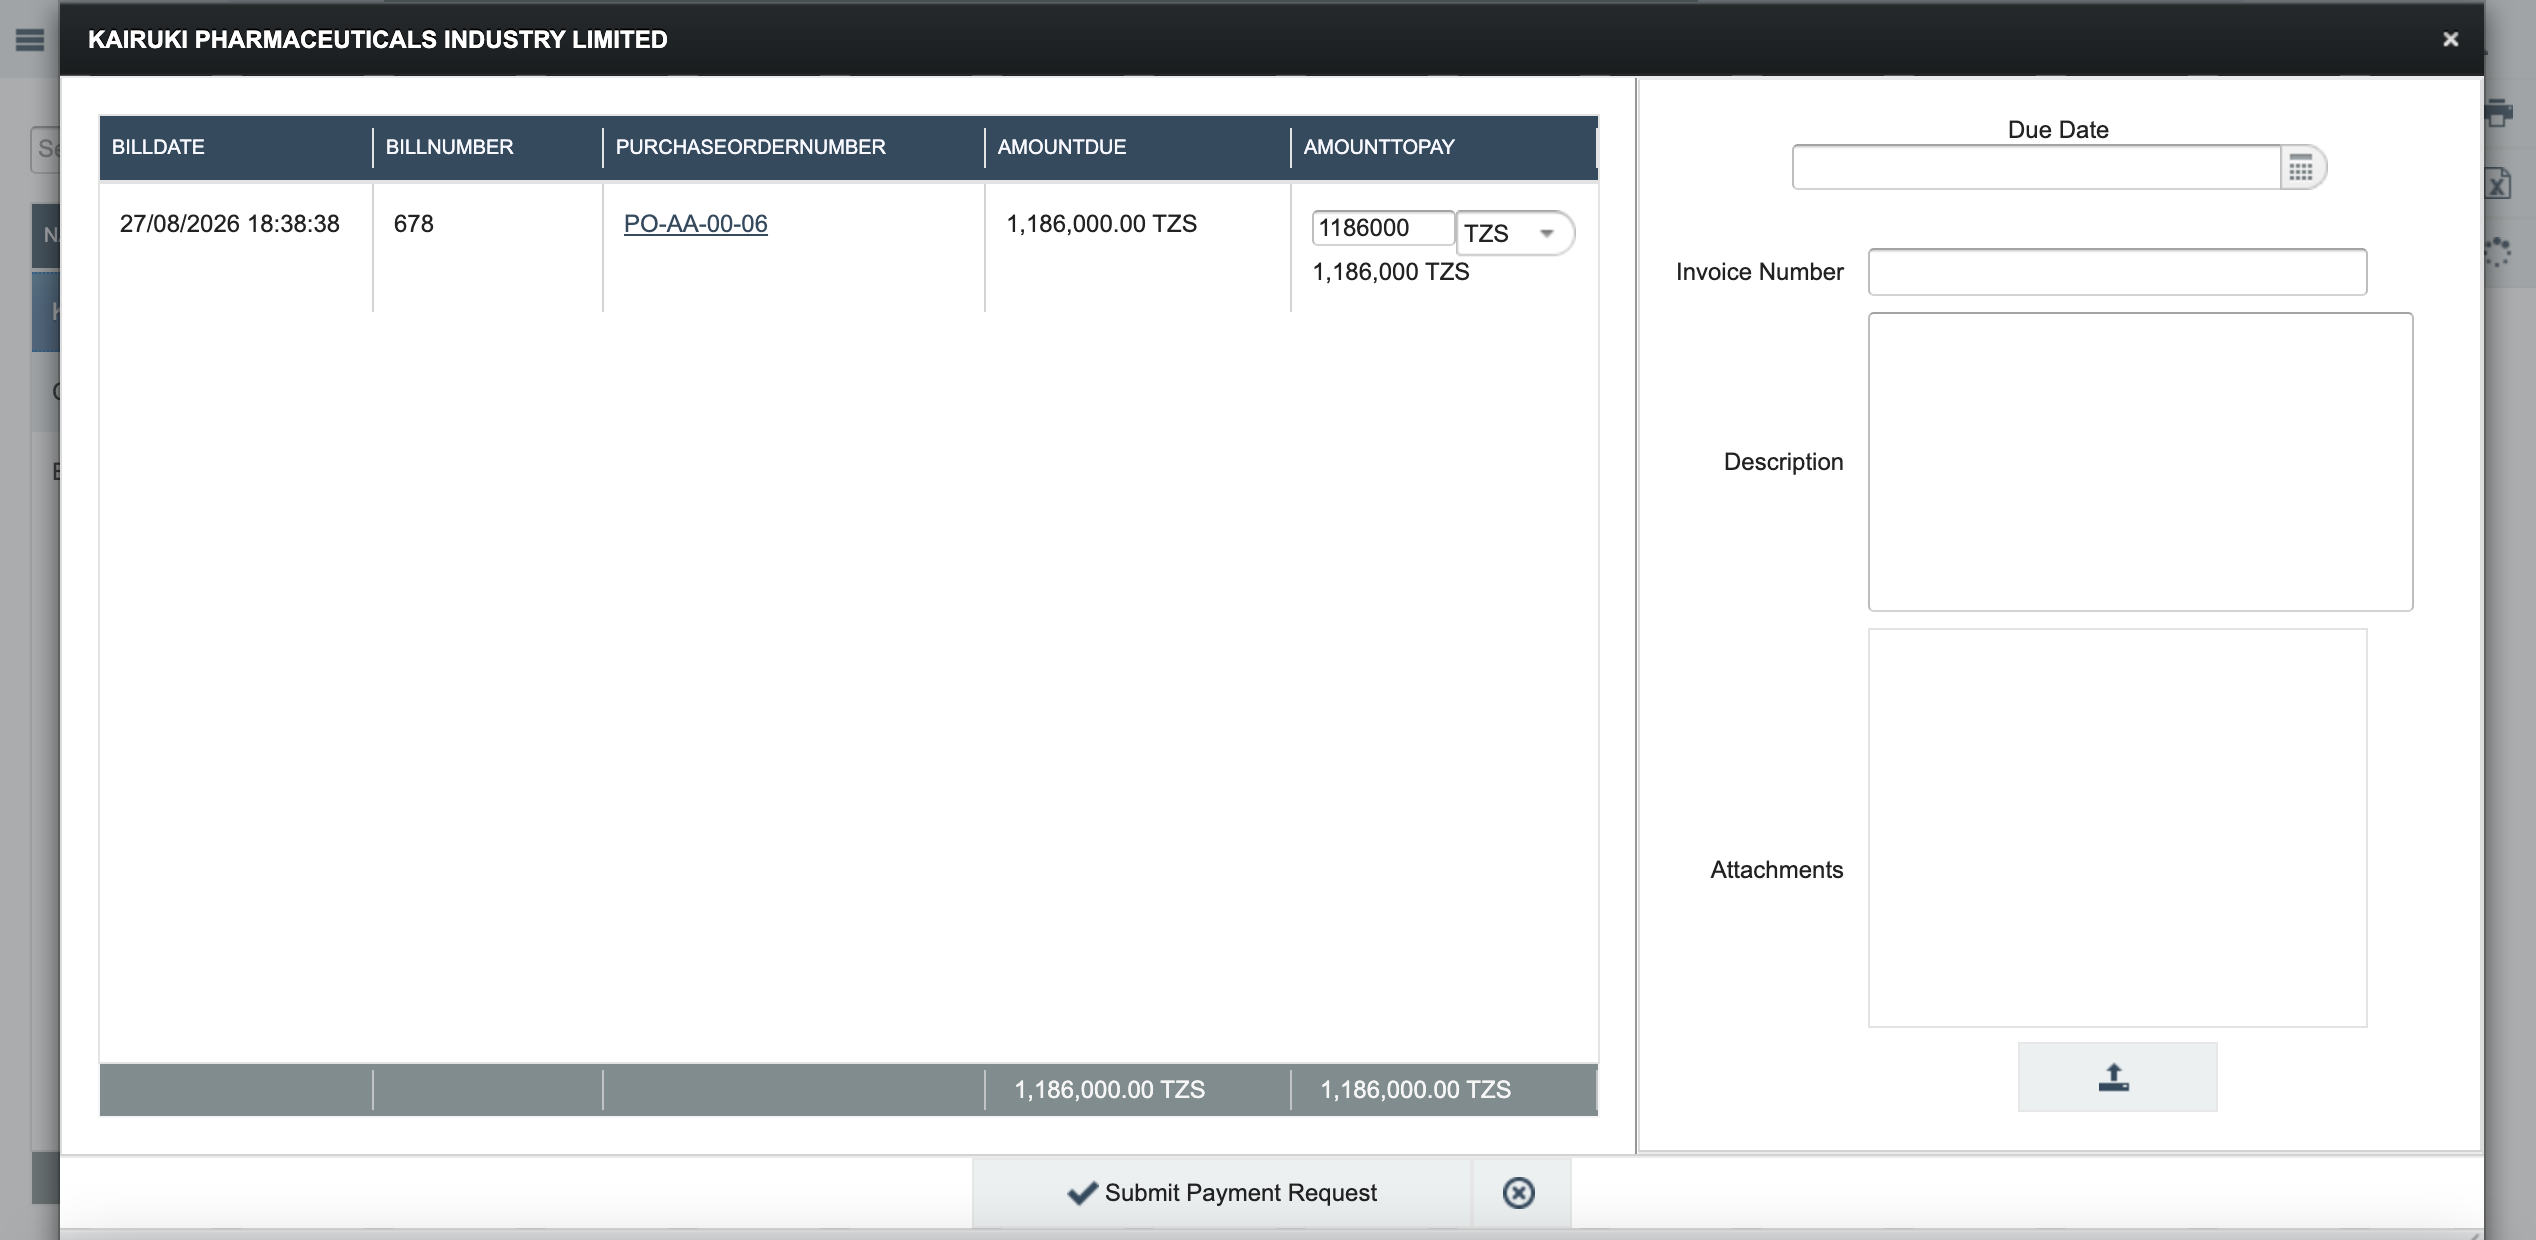
Step 5 — Payment Request Form Appears
After clicking the correct Aging category the Payment Request form opens, showing the bill(s) tied to the PO with the Bill Date, Bill Number, PO Number, Amount Due, and Amount to Pay.
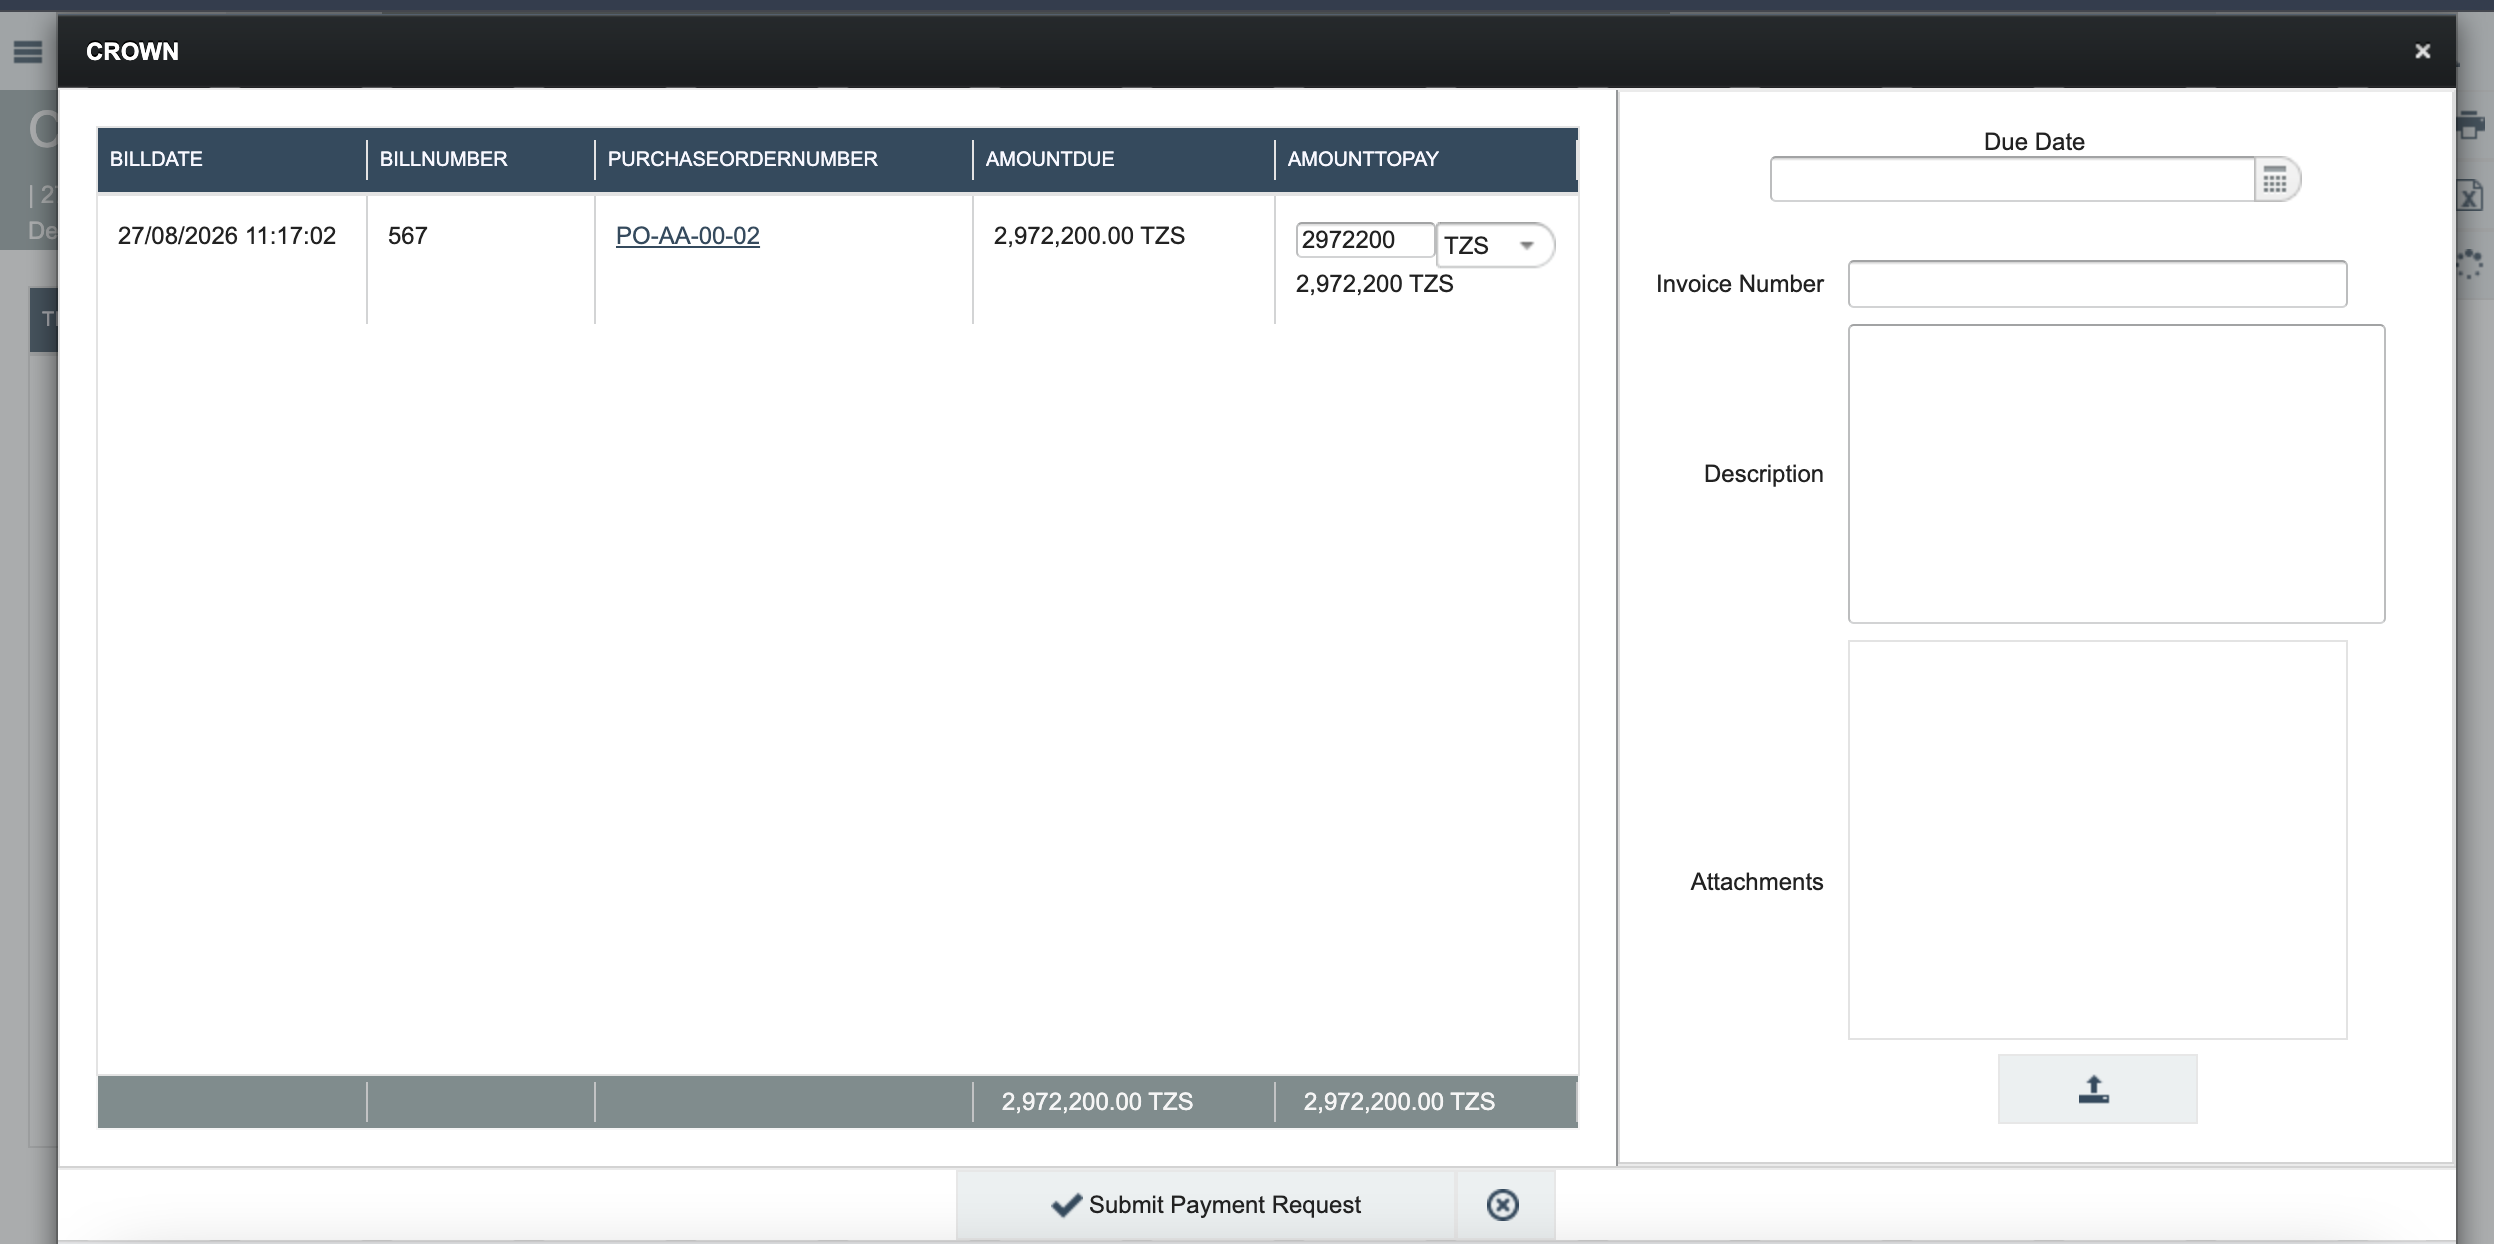
Fill in the following fields:
Due Date: The date by which the payment should be made
Invoice Number: The vendor's invoice reference
Description: Optional notes about the payment (not mandatory)
Attachments: Optional supporting documents for reference (not mandatory)
Click Submit Payment Request at the bottom of the form.
Step 7 — Confirm the Request Was Submitted
Once a Payment Request Approval Strategy is properly configured, click Submit Payment Request. Submitting the form will succeed and the system will confirm the request was created.
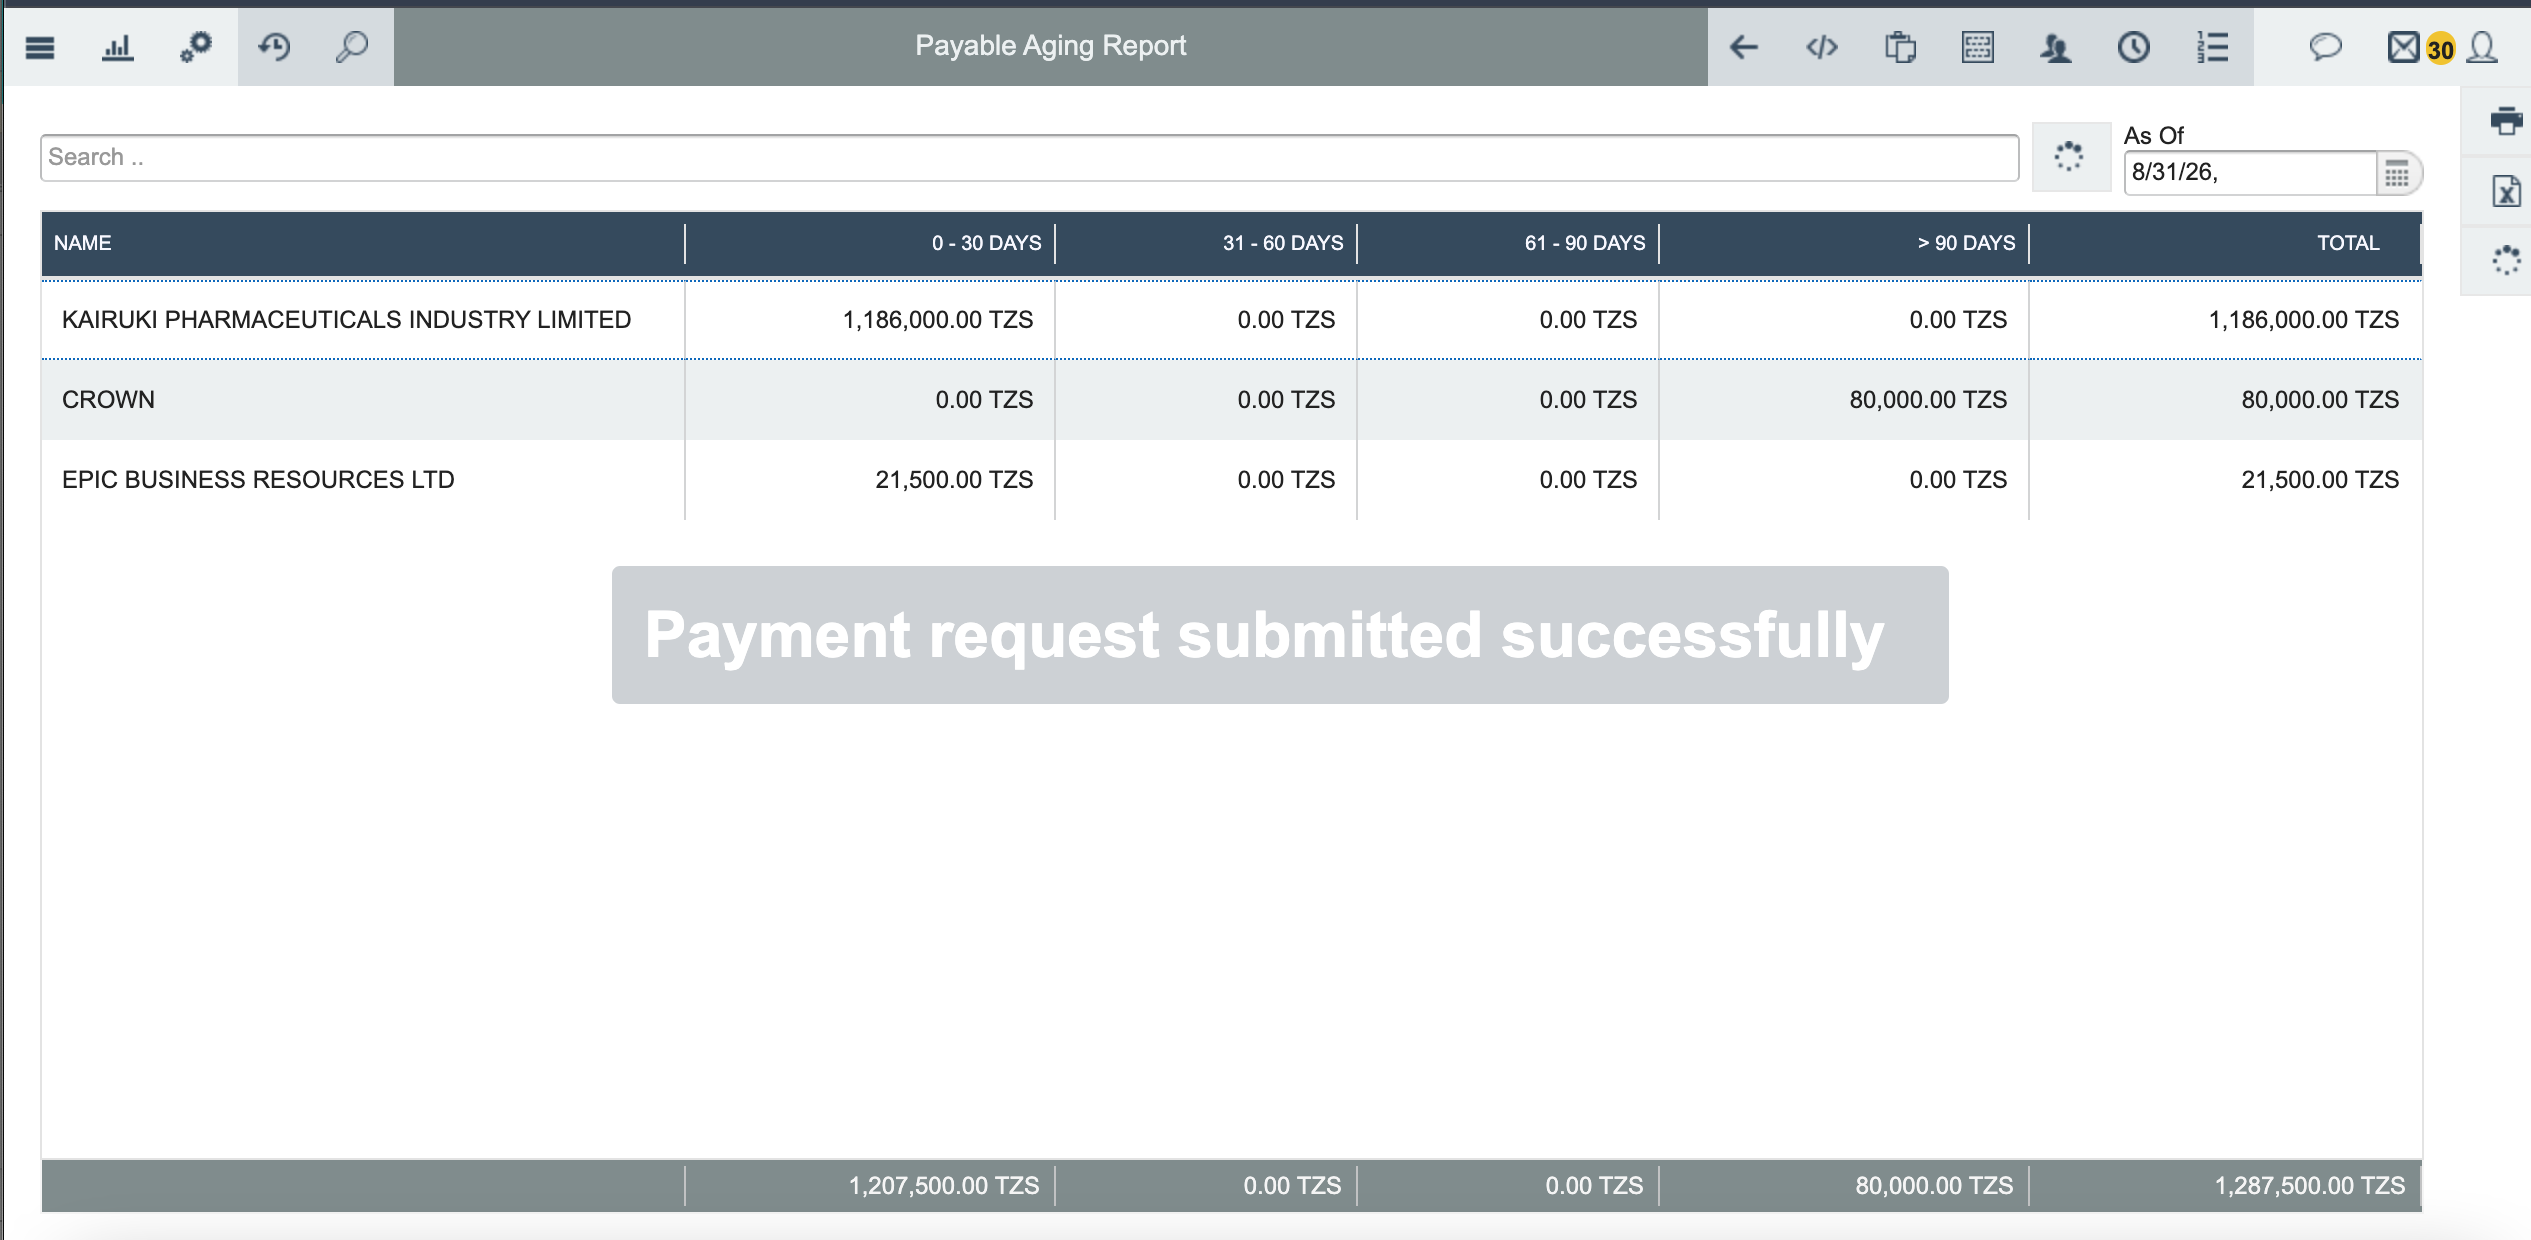
The new request now has a STATUS of "Pending." This means it must be approved before it can be paid.
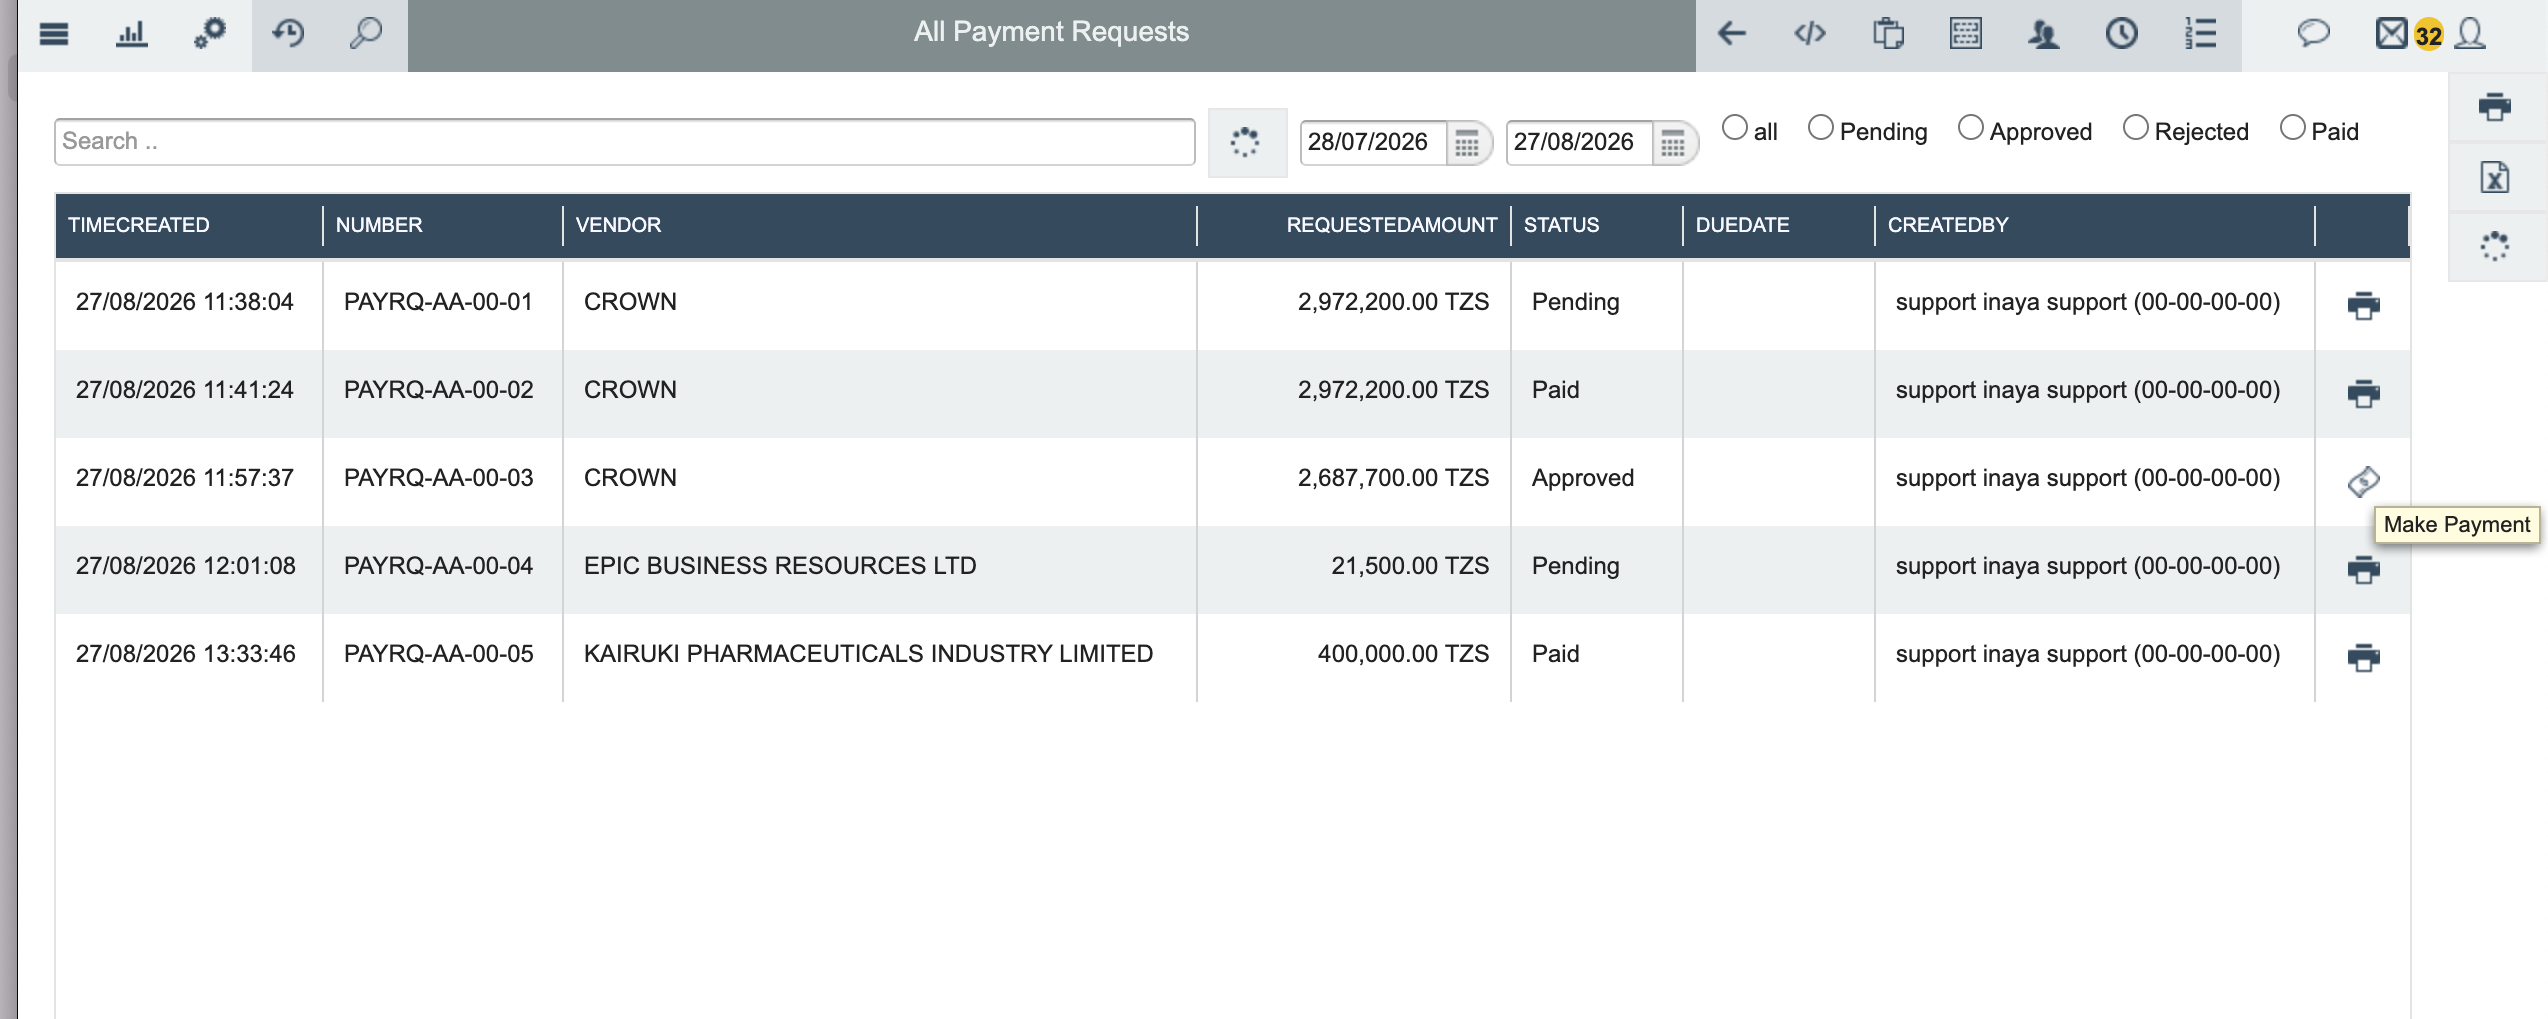
Study approval management to learn more about setting up approvals.
Part C — Approving the Payment Request
Step 8 — Review and Approve the Request
The person responsible for approvals opens the Approval Requests document, which displays the vendor, request number, bill details, and amount, stamped "WAITING."
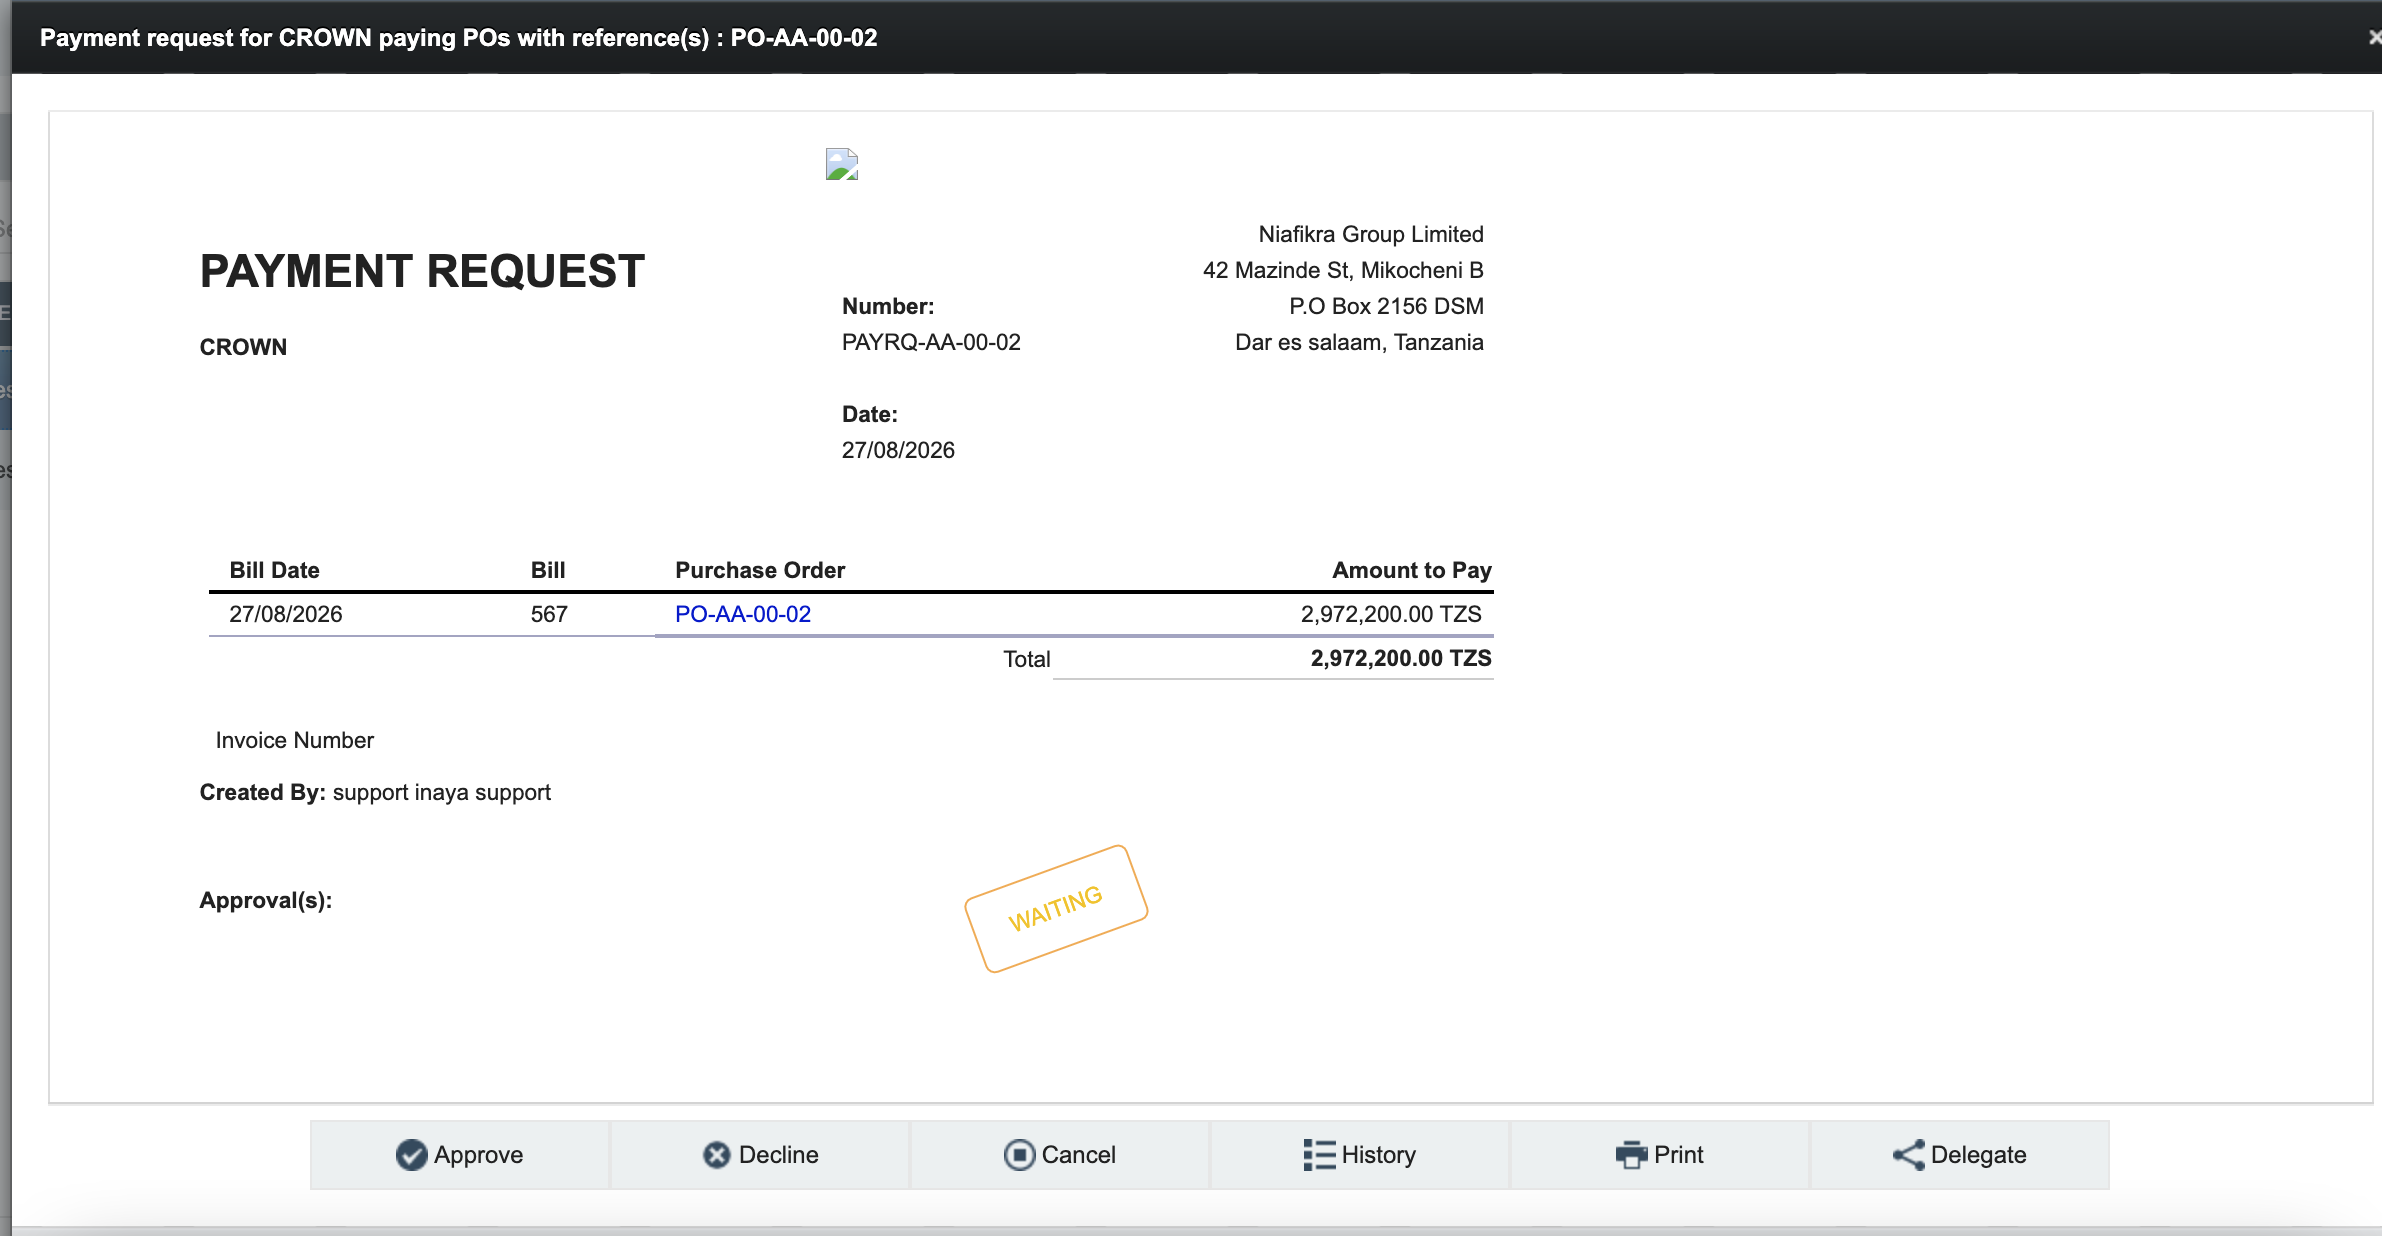
The approver can choose Approve, Decline, Cancel, view History, Print, or Delegate the request to someone else.
Study approval management to learn more about setting up approvals.
After the request is approved, its status changes from "Pending" to "Approved."
Part D — Processing (Paying) the Approved Payment Request
Step 9 — Navigate to All Payment Requests
The person responsible for processing payments navigates to Reports → Finance → Purchase Documents → All Payment Requests.
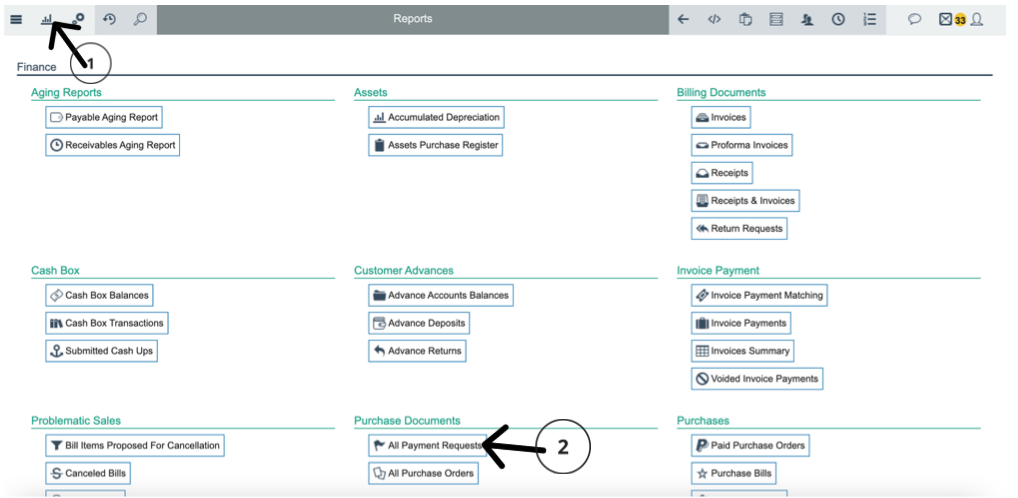
Step 10 — Locate the Approved Request
The All Payment Requests report lists every payment request in the system, with filters for All, Pending, Approved, Rejected, and Paid.
Search by vendor name to find the request you need to pay, or click the Approved filter to narrow the list.
Only requests with STATUS = "Approved" show the money/payment icon. Requests that are Pending, Rejected, or not yet approved will not show this icon, and cannot be paid.
Step 11 — Pay the Request
Click the PO you need to process payment to open the payment screen.
Confirm the Date, Amount, selected payment method, and Cash balance shown, and check that the cash box has enough balance to cover the Payable amount.
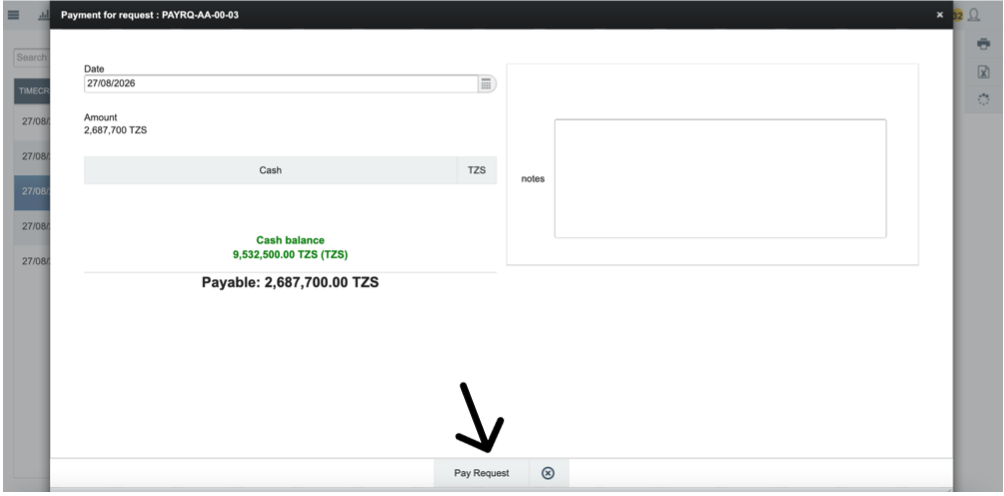
Click Pay Request to process the payment.
Step 12 — Confirm Payment and View Voucher
The system displays a confirmation message: "Payment Voucher Processed Successfully."
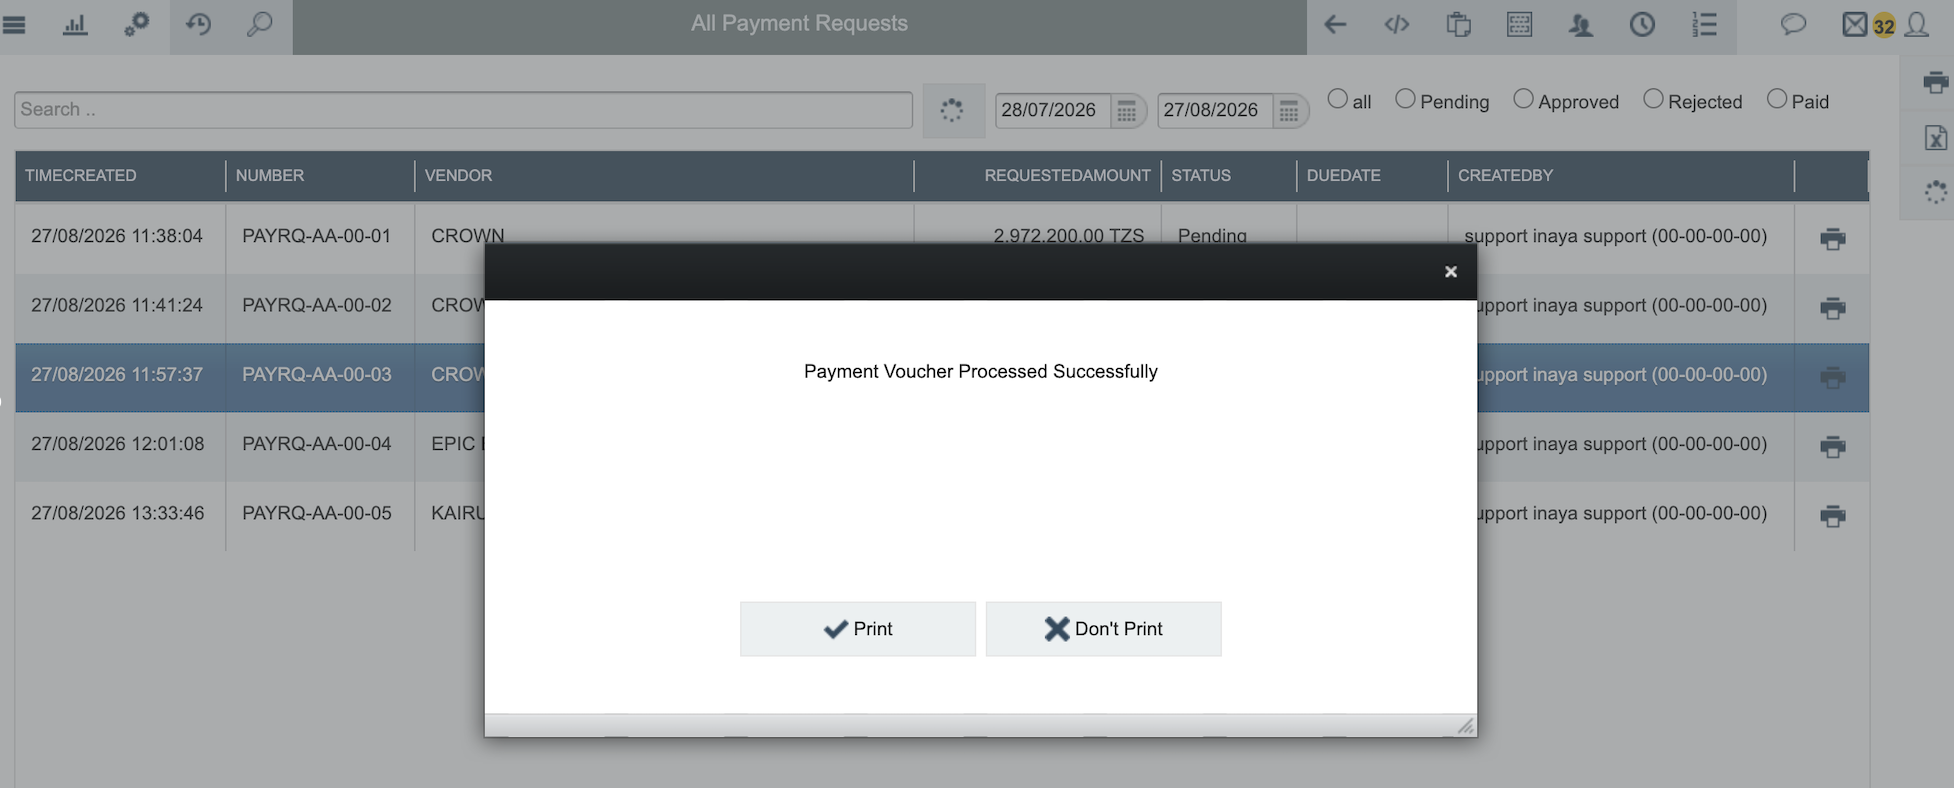
Choose Print to print the payment voucher, or Don't Print to skip printing.
The request's status in the All Payment Requests list changes from "Approved" to "Paid."
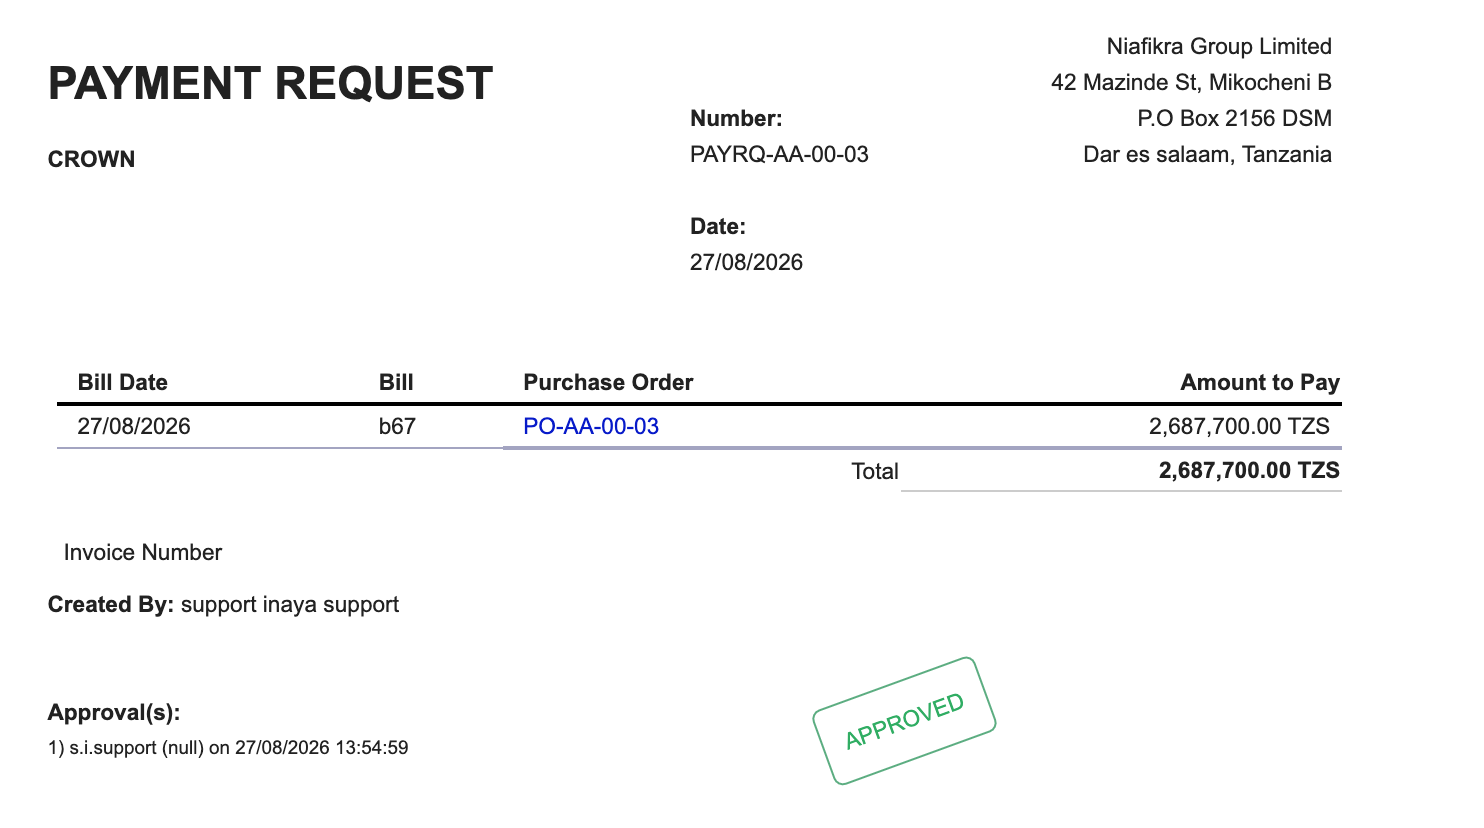
You can view and print the completed voucher at any time, showing the APPROVED stamp and full approval history.
5. What Happens After Processing?
SN | Action | Result | Impact |
|---|---|---|---|
1 | Payment Request Created | A new payment request is generated with a unique number (PAYRQ-...) | Formal request initiated |
2 | Approval Routed | The request enters the configured approval workflow | Control before payment |
3 | Request Approved | Status changes from "Pending" to "Approved" | Ready for payment |
4 | Payment Voucher Generated | A payment voucher is created when the request is paid | Financial record established |
5 | Request Status Updated | Status changes from "Approved" to "Paid" | Request lifecycle complete |
6 | Cash Box / Payment Method Reduced | The selected payment method balance decreases | Cash/Bank balance updated |
7 | Vendor Balance Reduced | The vendor's outstanding balance decreases by the payment amount | Accounts payable updated |
8 | Aging Report Updated | The vendor is removed from the aging report (if fully paid) | Report refreshed |
9 | Audit Trail Created | Complete record of requester, approver, and payer is logged | Full audit trail established |
6. Common Problems and Solutions
Troubleshooting
Vendor not showing in Payable Aging Report — Cause: "As Of" date is before the bill creation date. Solution: Set "As Of" date to the end of the month when the bill was created (e.g., if bill was in August, set to 31/08/2026).
Error when clicking a column — Error: "There are no entries to process payment for 31 - 60 Days." Cause: Clicked on the wrong aging category (e.g., clicked 0-30 DAYS when the amount is actually in 31-60 DAYS). Solution: Click on the specific aging column where the amount appears (reqstPOpayment4.png / processPO4_2.png).
Clicking the vendor balance goes straight to a Pay screen instead of a payment request — Cause: "Require payment request before payment" has not been enabled. Solution: Enable it in Configure → Advanced → Finance → Procurement (reqstPOpayment3.png).
"Failed to submit payment request" error — Cause: No Payment Request Approval Strategy has been configured in the system. Solution: Contact your system administrator to set up an approval strategy (see approval management) (reqstPOpayment9.png).
Request stuck on "Pending" — Cause: The request has not yet been approved. Solution: Ask the designated approver to review and approve it (reqstPOpayment11.png).
No Make Payment icon on a request in All Payment Requests — Cause: The request is not yet approved, or was rejected. Solution: Only "Approved" requests can be paid; check and follow up on its status (reqstPOpayment14.png).
Insufficient balance when paying — Cause: The selected cash box/payment method does not have enough funds to cover the Payable amount. Solution: Top up the cash box or select a different, sufficiently funded payment method before clicking Pay Request (reqstPOpayment15.png).
7. Quick Reference
7.1 Quick Step Reference
Payment Request Processing Through Payable Report at a Glance
Enable "Require payment request before payment" (Configure → Advanced → Finance → Procurement).
Navigate to Reports → Aging Reports → Payable Aging Report.
Set the "As Of" date to the end of the month when the bill was created.
Locate the vendor you want to pay in the report.
Click on the aging column where the amount appears for that vendor.
Click Make Payment to open the Payment Request form.
Fill in Due Date, Invoice Number, and optional Description/Attachments.
Click Submit Payment Request.
Confirm status is "Pending."
Ask the approver to review and click Approve.
Confirm status is "Approved."
Go to Reports → Finance → Purchase Documents → All Payment Requests.
Find the approved request and click the Make Payment icon.
Confirm balance, then click Pay Request.
Confirm "Payment Voucher Processed Successfully," choose Print or Don't Print.
Verify status changed to "Paid" and view the approved voucher.
Verify vendor is removed from the Payable Aging Report (if fully paid).
7.2 Key Terms
SN | Term | Definition |
|---|---|---|
1 | Payable Aging Report | Report showing vendor payables categorized by age of debt (0-30, 31-60, 61-90, >90 days) |
2 | As Of Date | The cutoff date used to determine which bills appear in the aging report |
3 | Aging Categories | Time periods: 0-30 DAYS, 31-60 DAYS, 61-90 DAYS, and >90 DAYS |
4 | Payment Request | A formal request to pay a bill against a PO, routed through approval before payment |
5 | Require Payment Request Before Payment | Procurement setting that forces requests to go through approval instead of direct payment |
6 | Payment Request Approval Strategy | The configured workflow that determines who must approve a payment request |
7 | Pending | Payment request status meaning it has been submitted but not yet approved |
8 | Approved | Payment request status meaning it has passed approval and is ready to be paid |
9 | Rejected | Payment request status meaning it was declined during approval |
10 | Paid | Payment request status meaning the payment has been processed |
11 | All Payment Requests | The report (Reports → Finance → Purchase Documents) listing every payment request |
12 | Payment Voucher | Official document recording a completed payment transaction |
13 | Cash Box | Physical or virtual cash account used to make payments |
14 | Withholding Tax (WHT) | Tax deducted at source from certain types of payments (5% or 10% for rent) |