How to record bill for PO
1. Overview
The Bill Recording module in Inaya is designed to capture vendor invoices (bills) against Purchase Orders (POs) after goods have been delivered or services rendered. Recording a bill is a critical step in the accounts payable process that creates a financial obligation to the vendor. This feature allows you to record the bill amount, set up installment payment plans, attach supporting documents, and submit for approval. Once recorded, the bill appears in the Payable Aging Report for payment processing.
2. Why Is It Important to Record Bills for Purchase Orders?
Aspect | Importance |
|---|---|
Financial Accuracy | Records the exact amount owed to the vendor, ensuring accurate financial statements |
Accounts Payable Tracking | Creates a payable that appears in the Payable Aging Report for timely payment |
Payment Planning | Allows for installment planning to manage cash flow effectively |
Audit Trail | Creates a complete record of all vendor obligations for compliance |
Approval Workflow | Ensures bills are reviewed and approved before payment |
Vendor Relationship | Maintains good vendor relations by ensuring accurate and timely payments |
3. Requirements Before You Start
Prerequisites Checklist
Vendor Records: Vendors must be registered in the system. Study How to Create a Vendor for details.
Purchase Orders: Purchase orders must be created and approved. Study How to Create a Purchase Order for details.
Vendor Invoice: You must have the physical or electronic invoice from the vendor with the bill number and amount.
User Permissions: The user performing the transaction must have permission to create bills. Configure via System Administrator.
4. Scenarios and Examples
Scenario 1 — Recording a Bill with Full Payment in One Installment
Field | Value |
|---|---|
Vendor | KAIRUKI PHARMACEUTICALS INDUSTRY LIMITED |
PO Number | AA-AA-02-12 |
PO Amount | 440,392.00 TZS |
Bill Number | V1234 |
Bill Date | 24/08/2026 |
Installments | 1 installment (full amount: 440,392.00 TZS) |
Due Date | 24/08/2026 |
Remind Before | 0 days |
Context: KAIRUKI PHARMACEUTICALS INDUSTRY LIMITED has delivered goods worth 440,392.00 TZS. The company has agreed to pay the full amount on 24/08/2026 in one installment.
Scenario 2 — Recording a Bill with Multiple Installments
Field | Value |
|---|---|
Vendor | KAIRUKI PHARMACEUTICALS INDUSTRY LIMITED |
PO Number | AA-AA-02-12 |
PO Amount | 440,392.00 TZS |
Bill Number | V1234 |
Bill Date | 24/08/2026 |
Installments | 2 installments: 240,392.00 TZS due 24/08/2026, 200,000.00 TZS due 24/09/2026 |
Remind Before | 0 days for first, 3 days for second |
Context: KAIRUKI PHARMACEUTICALS INDUSTRY LIMITED has agreed to receive payment in two installments. The first payment of 240,392.00 TZS is due on 24/08/2026, and the second payment of 200,000.00 TZS is due on 24/09/2026. The system will send a reminder 3 days before the second due date.
Scenario 3 — Recording a Bill with Installment Validation Error
Field | Value |
|---|---|
Vendor | KAIRUKI PHARMACEUTICALS INDUSTRY LIMITED |
PO Number | AA-AA-02-12 |
PO Amount | 440,392.00 TZS |
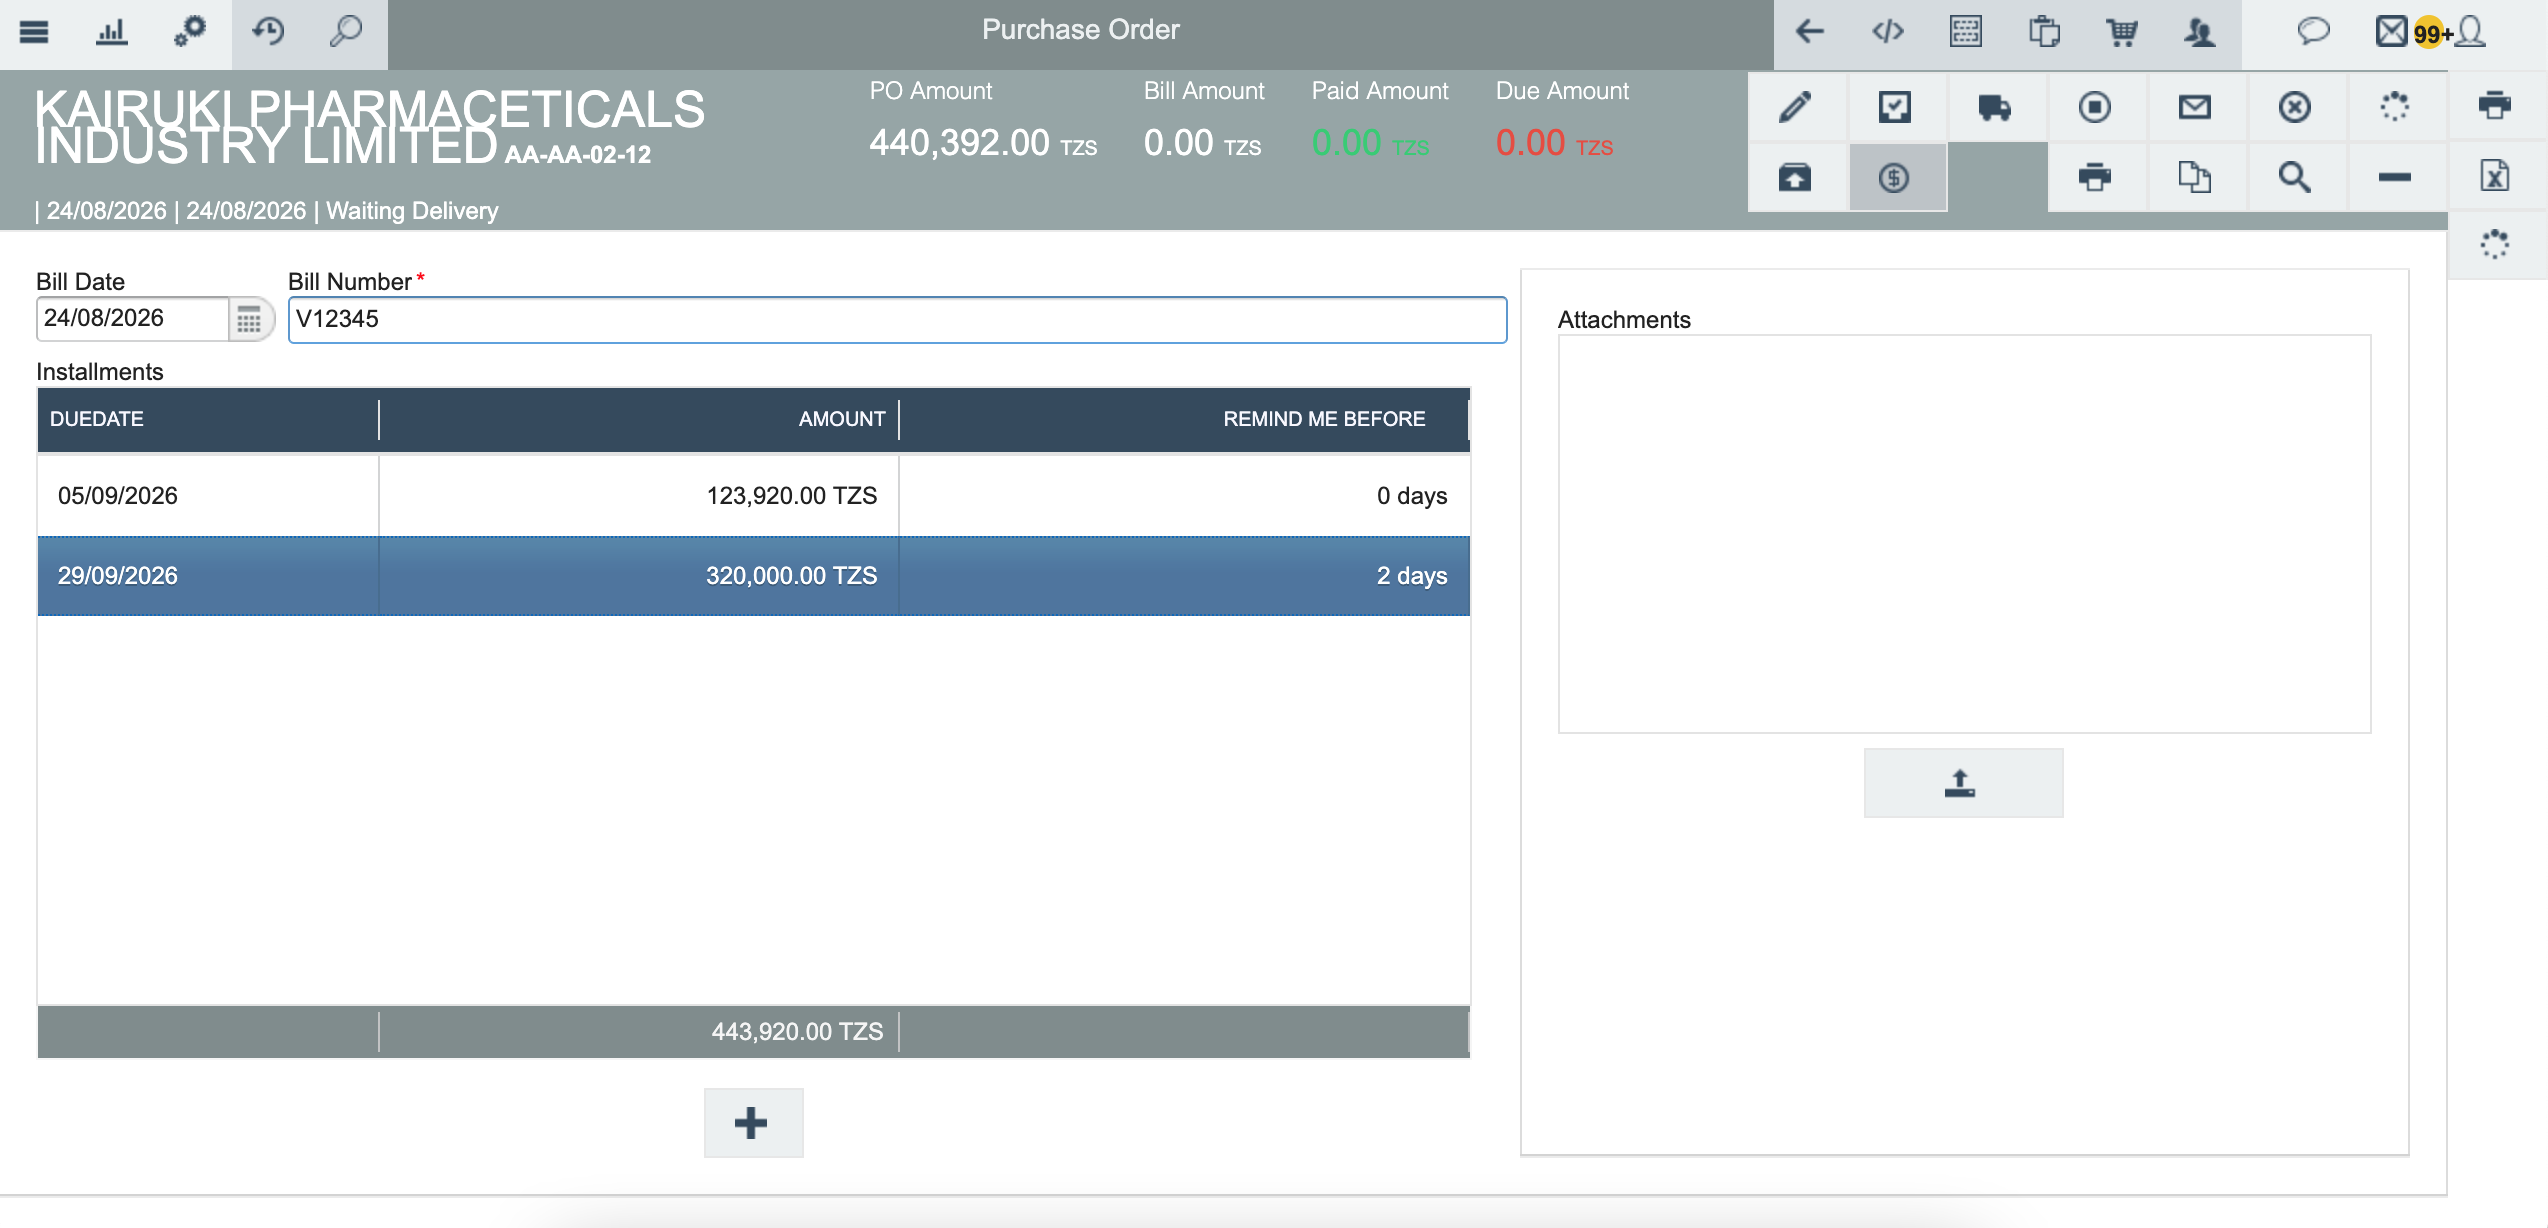
Installments Entered | 123,920.00 TZS + 320,000.00 TZS = 443,920.00 TZS |
Result | Save Bill button does NOT appear because total exceeds PO amount |
Context: The user entered installment amounts that do not match the PO amount. The system validates that the sum of all installments must equal the PO amount. If the total does not match, the Save Bill button will not appear.
5. Step-by-Step Guide: Recording a Bill for Purchase Order
Step 1 — Navigate to Purchase Orders
Open the Main Menu from the sidebar.
Scroll down to Purchase, then select Purchase Order to open the Purchase Orders page.
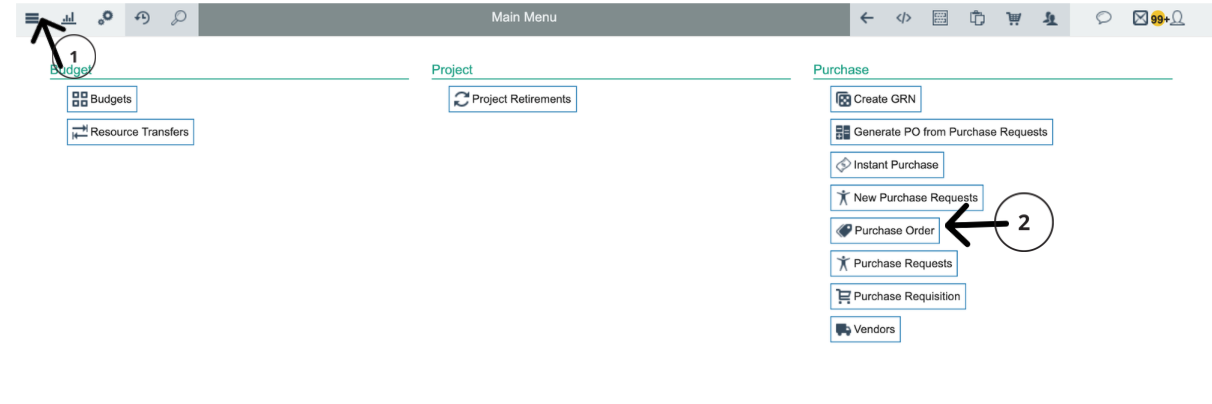
Alternatively, click the Search icon in the top-left corner, type
Purchase Orderinto the search box, and select Purchase Order from the results.
Step 2 — Understand PO Status and Payment Status
In the Purchase Orders list, examine the STATUS and Payment Status columns:
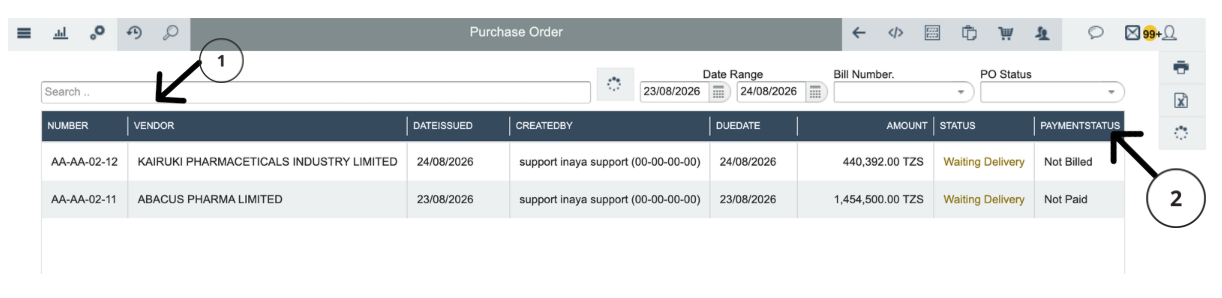
Understanding these statuses is critical:
STATUS
Payment Status
Meaning
Action Required
Waiting Delivery
Not Billed
PO created but goods not yet received and NO bill created
Receive goods FIRST, then create bill
Delivered
Not Billed
Goods received but NO bill created yet
✅ Create bill now
Delivered
Not Paid
Bill created but payment NOT processed yet
Process payment via Payable Aging Report
Delivered
Full Paid
Bill created and PAID in full
No action needed — transaction complete
Delivered
Partial Paid
Bill created and PARTIALLY paid
Process remaining payment
Search for the PO: Use the search bar to find the PO by:
Vendor Name: Type the vendor name (e.g., "KAIRUKI")
PO Number: Type the PO number (e.g., "AA-AA-02-12")
Look for the PO with Payment Status = "Not Billed". This means no bill has been created yet for this PO.
Step 3 — Open the Purchase Order
Click on the Purchase Order number (e.g., AA-AA-02-12) to open its details.
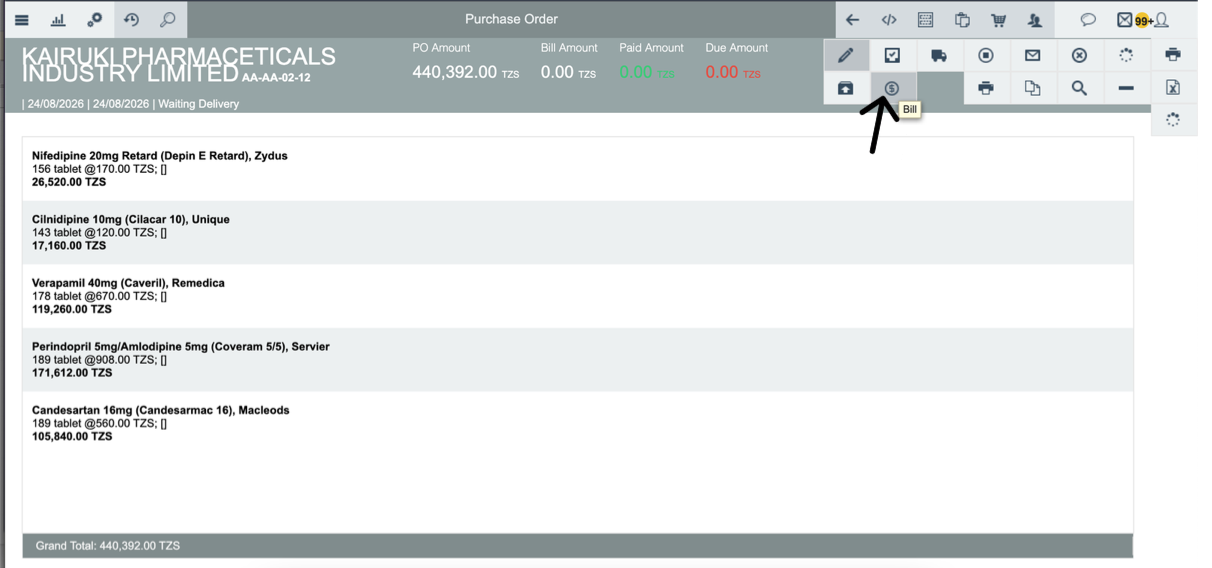
The PO details page displays:
Vendor Name: KAIRUKI PHARMACEUTICALS INDUSTRY LIMITED
PO Number: AA-AA-02-12
PO Amount: 440,392.00 TZS
Bill Amount: 0.00 TZS (no bill created yet)
Paid Amount: 0.00 TZS
Due Amount: 0.00 TZS
Status: Waiting Delivery
Click the Bill button to start recording the bill.
Step 4 — Bill Creation Screen
After clicking the Bill button, the bill creation screen will appear.
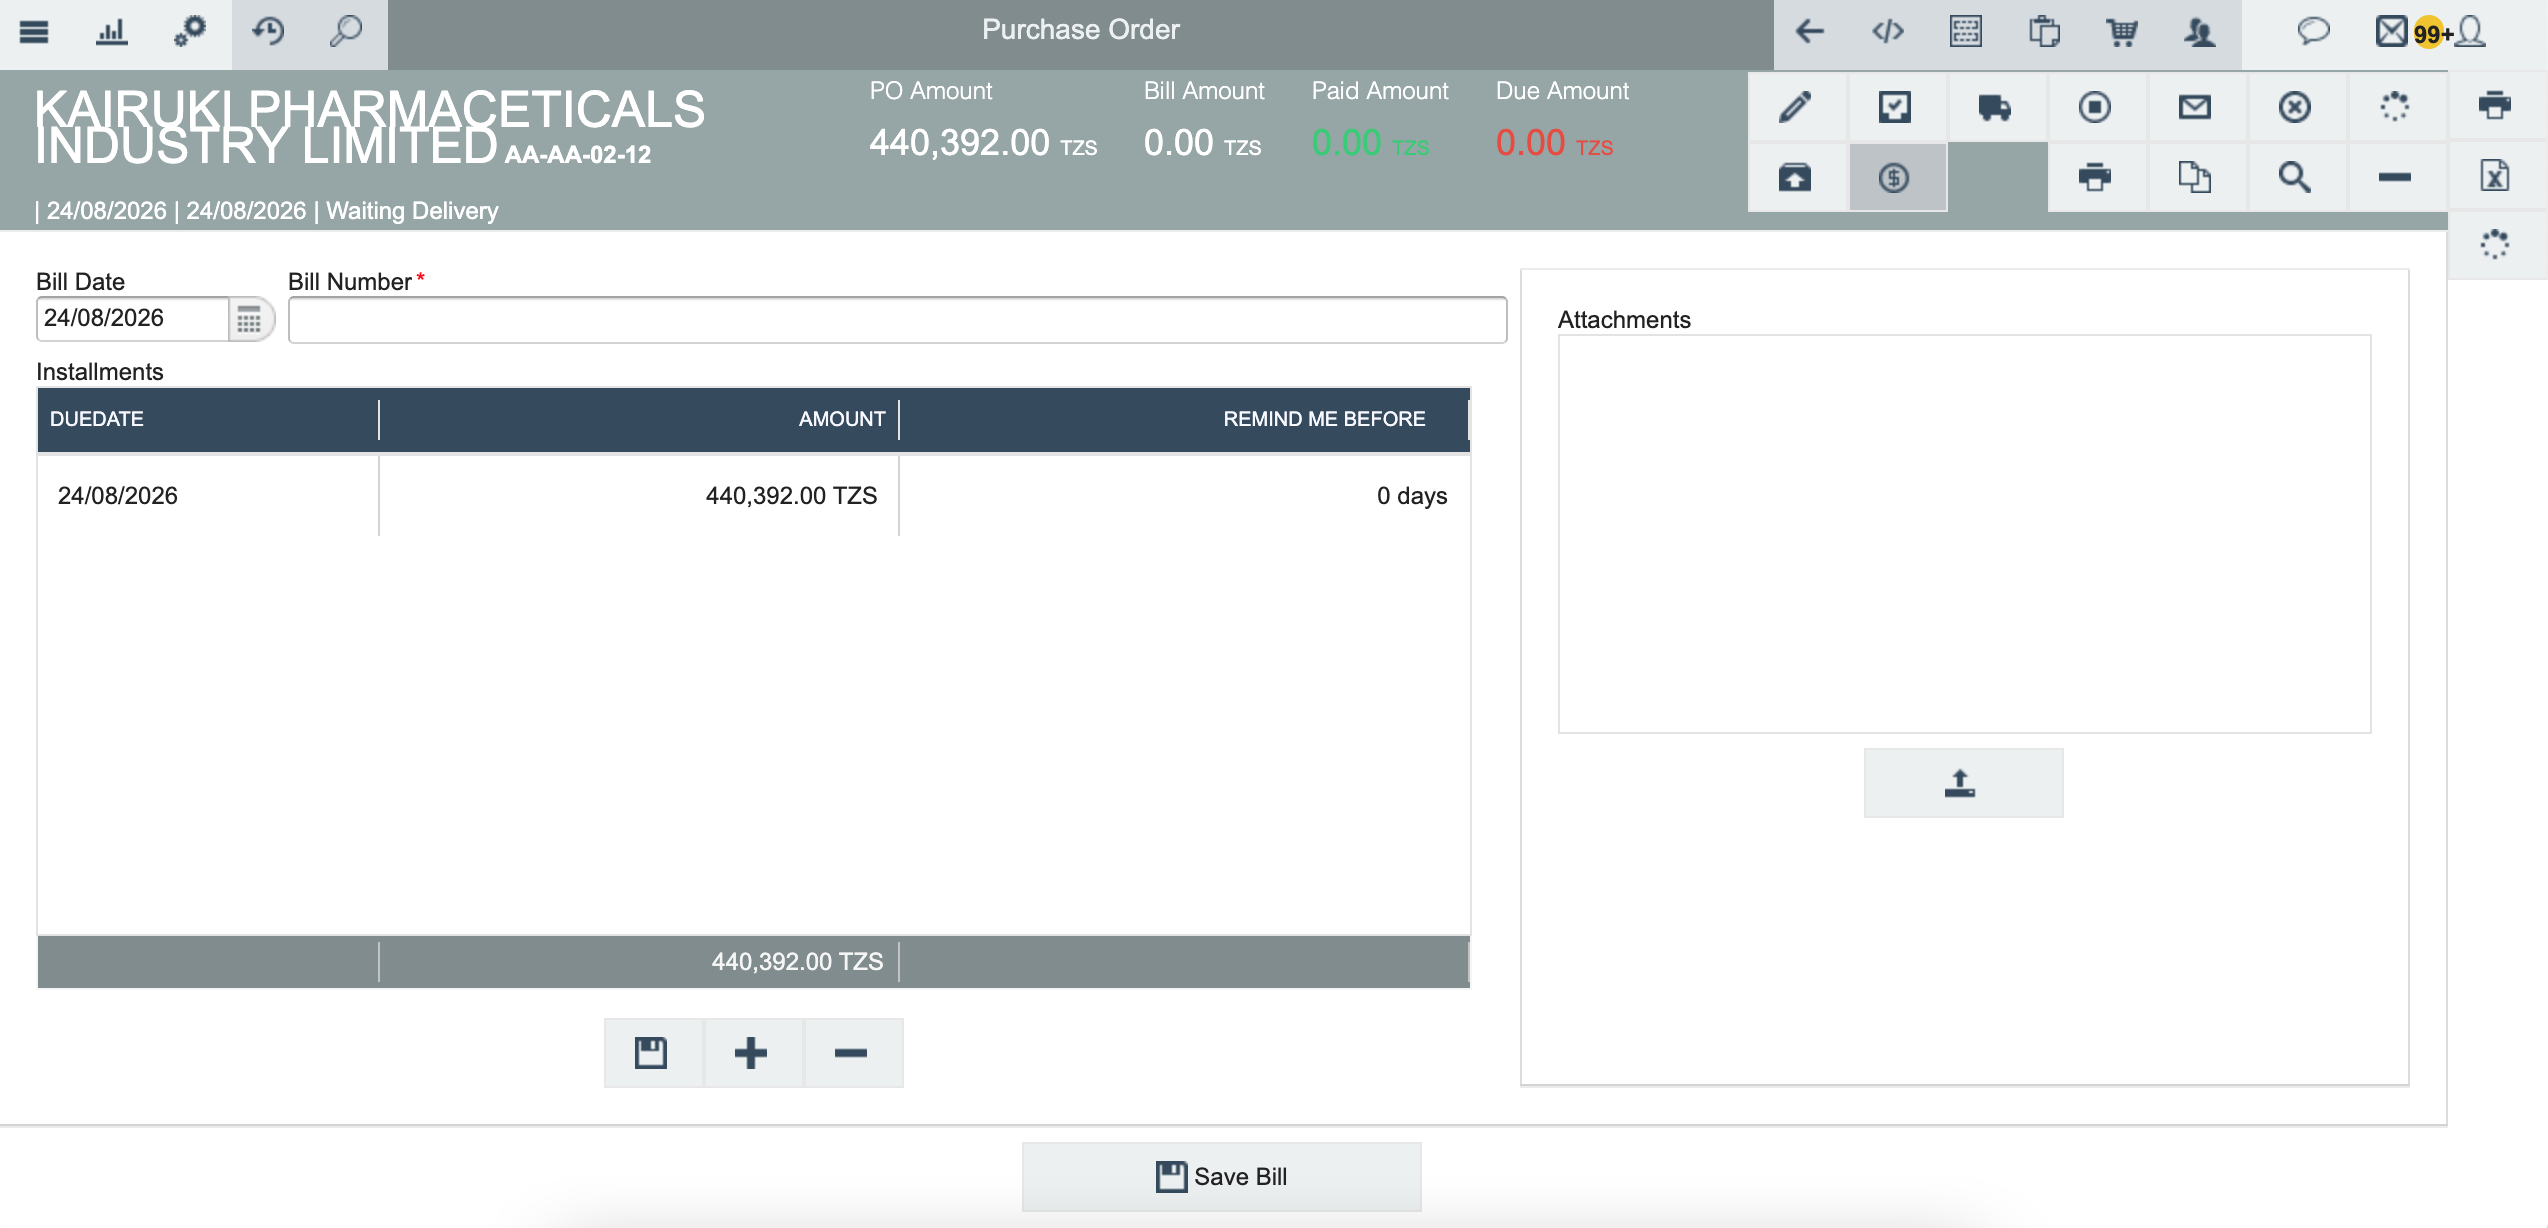
The bill creation screen displays:
PO Amount: 440,392.00 TZS (total value of the PO)
Bill Amount: 0.00 TZS (amount to be recorded)
Paid Amount: 0.00 TZS
Due Amount: 0.00 TZS
Enter the following information:
Bill Date: The date the vendor issued the invoice (e.g., 24/08/2026)
Bill Number: The vendor's invoice number (e.g., V1234)
Step 5 — Set Up Installments
In the Installments section, you can set up how the bill will be paid.
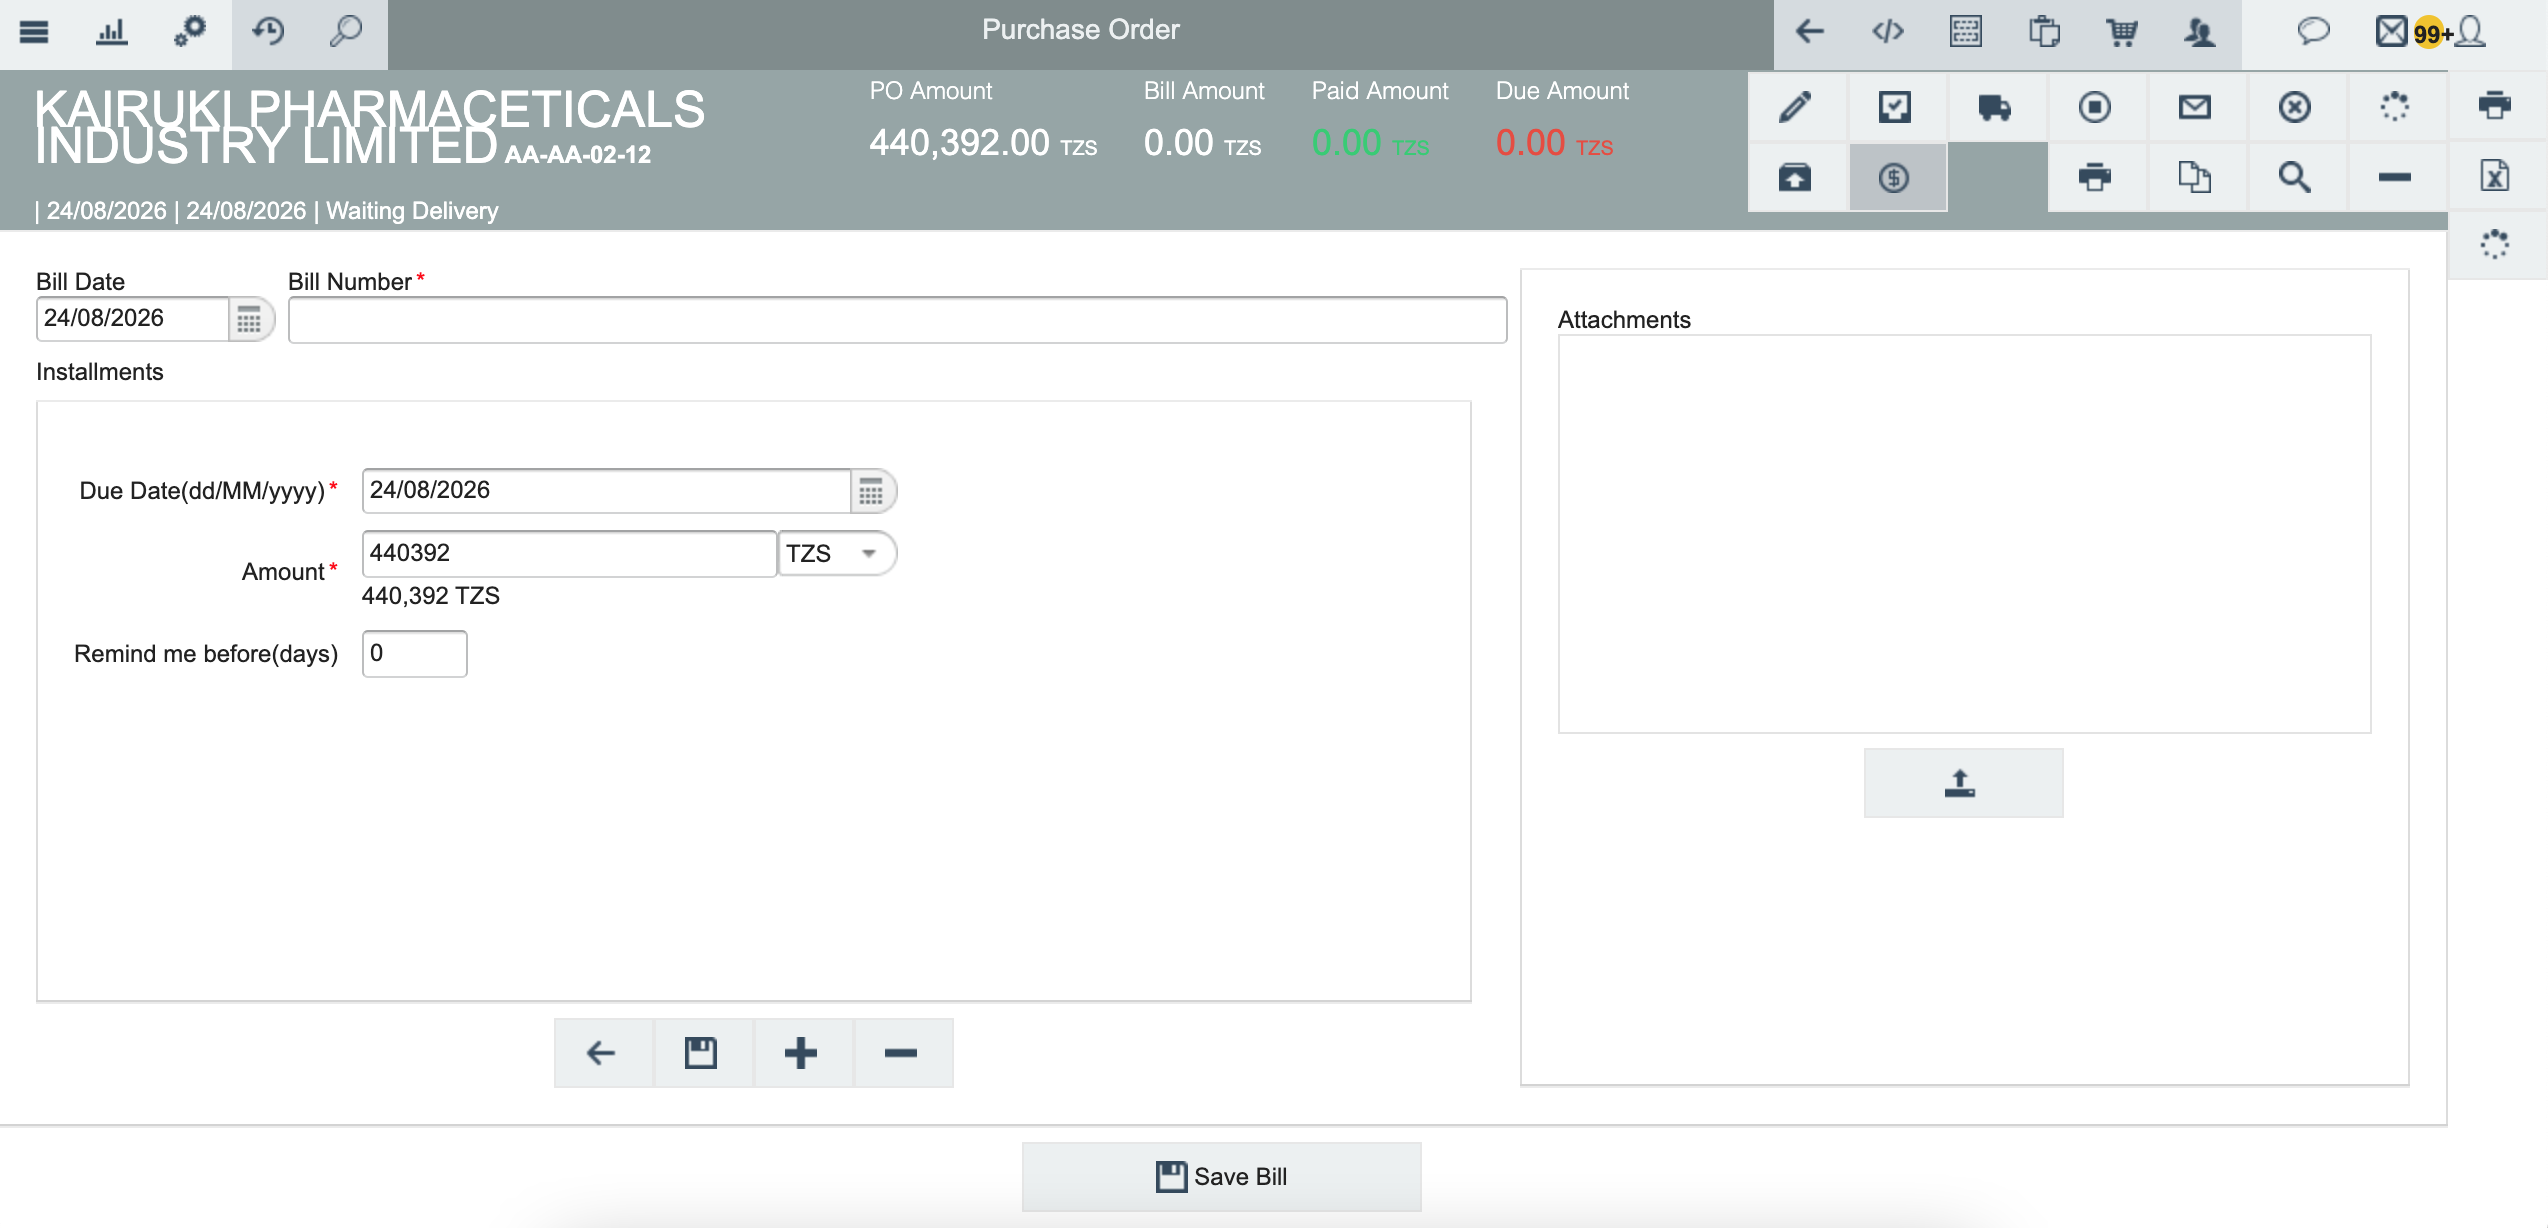
Option A — Single Installment (Full Payment):
Set Due Date: The date the full payment is due
Set Amount: The full PO amount (440,392.00 TZS)
Set Remind Me Before: Number of days before due date to receive notification (e.g., 0 days for immediate due date)
Option B — Multiple Installments:
Click on the + or Add button to add more installments
Enter each installment with its own Due Date, Amount, and Remind Before days
Important: The sum of all installment amounts must equal the total PO amount
Step 6 — Add Additional Installments
To add more installments, click the Add or + button in the Installments section.
For each new installment, enter:
Due Date: When the payment is due (e.g., 24/09/2026)
Amount: The amount to be paid in this installment (e.g., 200,000.00 TZS)
Remind Me Before: Days before due date to send notification (e.g., 3 days)
Example with 2 installments:
Installment 1: Due 24/08/2026, Amount 240,392.00 TZS, Remind 0 days
Installment 2: Due 24/09/2026, Amount 200,000.00 TZS, Remind 3 days
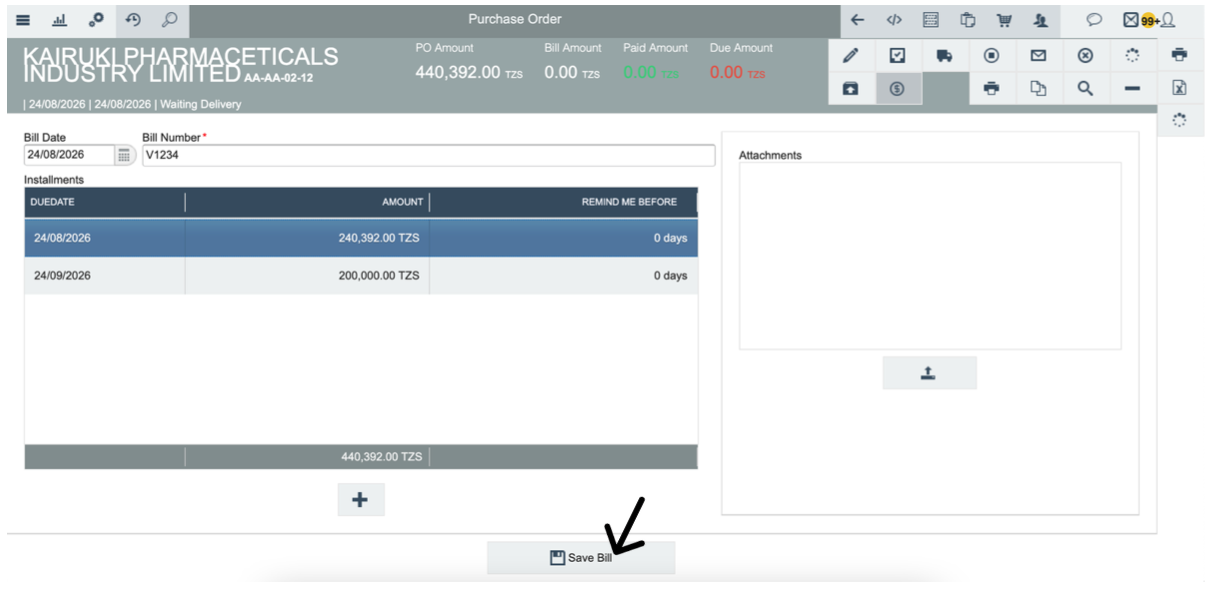
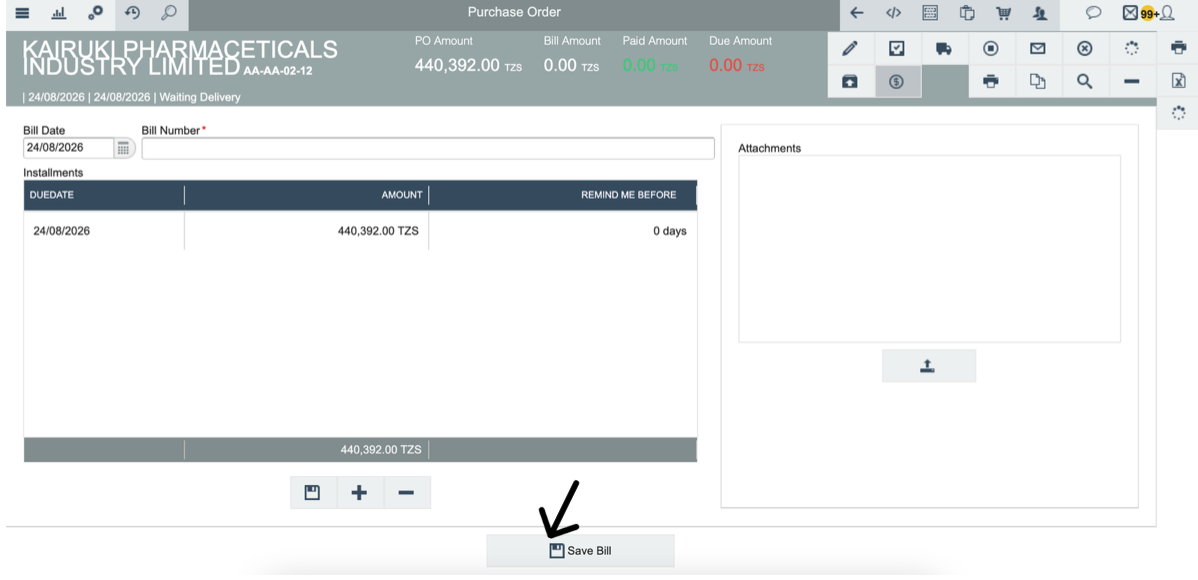
Step 7 — Save the Bill
After entering all installment details and ensuring the total matches the PO amount, click the Save Bill button.
The system saves the bill and updates the PO details:
PO Amount: 440,392.00 TZS (unchanged)
Bill Amount: 440,392.00 TZS (now shows the bill amount)
Paid Amount: 0.00 TZS (no payment made yet)
Due Amount: 440,392.00 TZS (total amount due)
The Payment Status in the Purchase Orders list will change from "Not Billed" to "Pending Approval".
Step 8 — Submit for Approval
After saving the bill, click the Submit for Approval button.
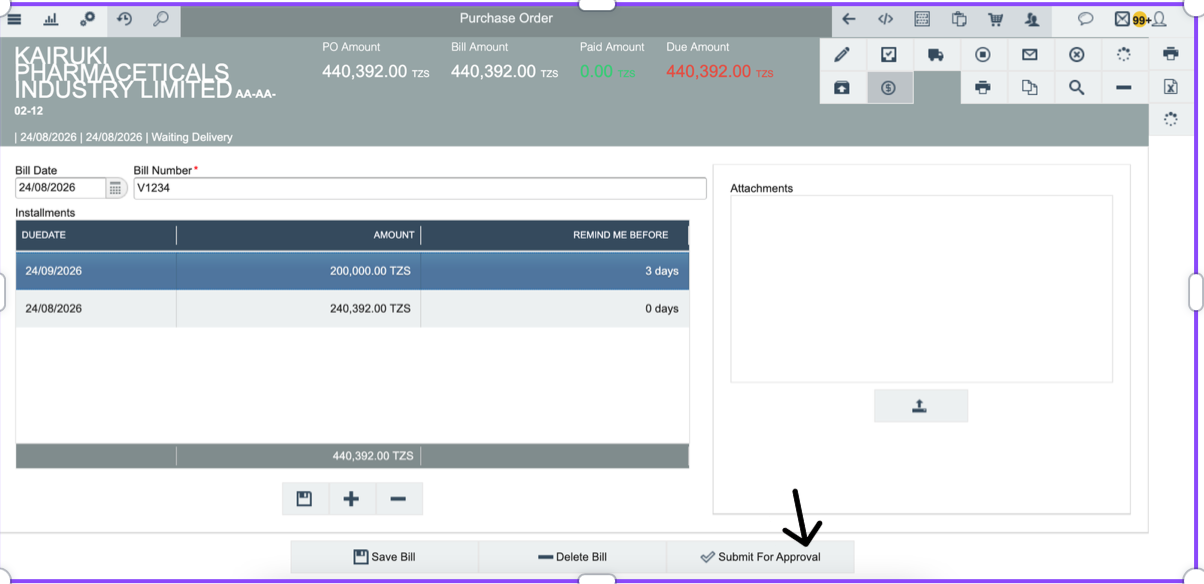
The bill will be sent to the approver for review and authorization.
Study How to Approve PO for details.
Once approved, the bill status will be updated, and the amount will appear in the Payable Aging Report.
After approval, you can:
Wait for the goods to be received (if not yet delivered)
Process payment through the Payable Aging Report
The Payment Status in the Purchase Orders list will change from "Not Billed" to "Not Paid".
6. What Happens After Saving?
SN | Action | Result | Impact |
|---|---|---|---|
1 | Bill Recorded | The bill amount is recorded against the PO | Accounts payable created |
2 | Installments Created | Installment schedule is saved with due dates | Payment plan established |
3 | PO Status Updated | Payment Status changes from "Not Billed" to "Not Paid" | PO now appears in Payable Aging Report |
4 | Bill Amount Updated | Bill Amount shows the total bill value | Financial records updated |
5 | Due Amount Updated | Due Amount shows total outstanding | Outstanding liability tracked |
6 | Notifications Set | Reminders configured for each due date | System will send alerts |
7 | Audit Trail Created | Complete record of bill creation is logged | Full audit trail established |
Complete Example — Recording Bill for KAIRUKI PHARMACEUTICALS INDUSTRY LIMITED
Scenario: KAIRUKI PHARMACEUTICALS INDUSTRY LIMITED has delivered goods worth 440,392.00 TZS. The company has agreed to pay in two installments: 240,392.00 TZS due on 24/08/2026 and 200,000.00 TZS due on 24/09/2026.
End-to-End Walkthrough
Navigate to Purchase → Purchase Order.
Search for PO AA-AA-02-12 with Payment Status = "Not Billed".
Click on the PO number to open details.
Click the Bill button.
Enter Bill Date: 24/08/2026.
Enter Bill Number: V1234.
In Installments, add the first installment: Due Date 24/08/2026, Amount 240,392.00 TZS, Remind 0 days.
Add the second installment: Due Date 24/09/2026, Amount 200,000.00 TZS, Remind 3 days.
Verify that 240,392.00 + 200,000.00 = 440,392.00 TZS (matches PO amount).
Click Save Bill.
Click Submit For Approval.
The PO STATUS changes from "Not Billed" to "Not Paid".
Before Bill Creation
PO Amount: 440,392.00 TZS
Bill Amount: 0.00 TZS
Paid Amount: 0.00 TZS
Due Amount: 0.00 TZS
Payment Status: Not Billed
After Bill Creation
PO Amount: 440,392.00 TZS
Bill Amount: 440,392.00 TZS
Paid Amount: 0.00 TZS
Due Amount: 440,392.00 TZS
Payment Status: Not Paid
Installments: 2 (240,392.00 TZS due 24/08/2026, 200,000.00 TZS due 24/09/2026)
7. Where to Find Recorded Bills
View Recorded Bills
Open Purchase → Purchase Order from the Main Menu.
Search for the PO by vendor name or PO number.
Click on the PO to open details and view the bill information.
Check the Payment Status column:
Not Billed: No bill created yet
Not Paid: Bill created, not yet paid
Full Paid: Bill created and paid in full
Partial Paid: Bill created and partially paid
View Bills in Payable Aging Report
Open Reports → Aging Reports → Payable Aging Report.
Set the "As Of" date to the end of the month when the bill was created.
The bill will appear in the appropriate aging category based on the due date.
8. Configuration Reference
8.1 PO Status Definitions
SN | STATUS | Payment Status | Meaning | Next Action |
|---|---|---|---|---|
1 | Waiting Delivery | Not Billed | PO created, goods not received, no bill | Receive goods, then create bill |
2 | Delivered | Not Billed | Goods received, no bill created | ✅ Create bill |
3 | Delivered | Not Paid | Bill created, not paid | Process payment |
4 | Delivered | Full Paid | Bill created and paid in full | No action needed |
5 | Delivered | Partial Paid | Bill created, partially paid | Process remaining payment |
8.2 Bill Settings
SN | Setting | Purpose | Where to Configure |
|---|---|---|---|
1 | Bill Date | The date the vendor issued the invoice | Bill creation screen |
2 | Bill Number | The vendor's invoice number (unique) | Bill creation screen |
3 | Installments | Payment schedule with due dates and amounts | Installments section |
4 | Remind Before | Days before due date to send notification | Each installment |
5 | Attachments | Supporting documents (invoices, receipts) | Attachments section |
9. Common Problems and Solutions
Troubleshooting
Cannot find PO — Error: PO not showing in list. Cause: PO not created or user lacks permission. Solution: Check if PO exists in Purchase Orders list. Contact system administrator for permissions.
Cannot create bill — Error: "The details entered are invalid." Cause: The bill number must be filled in.
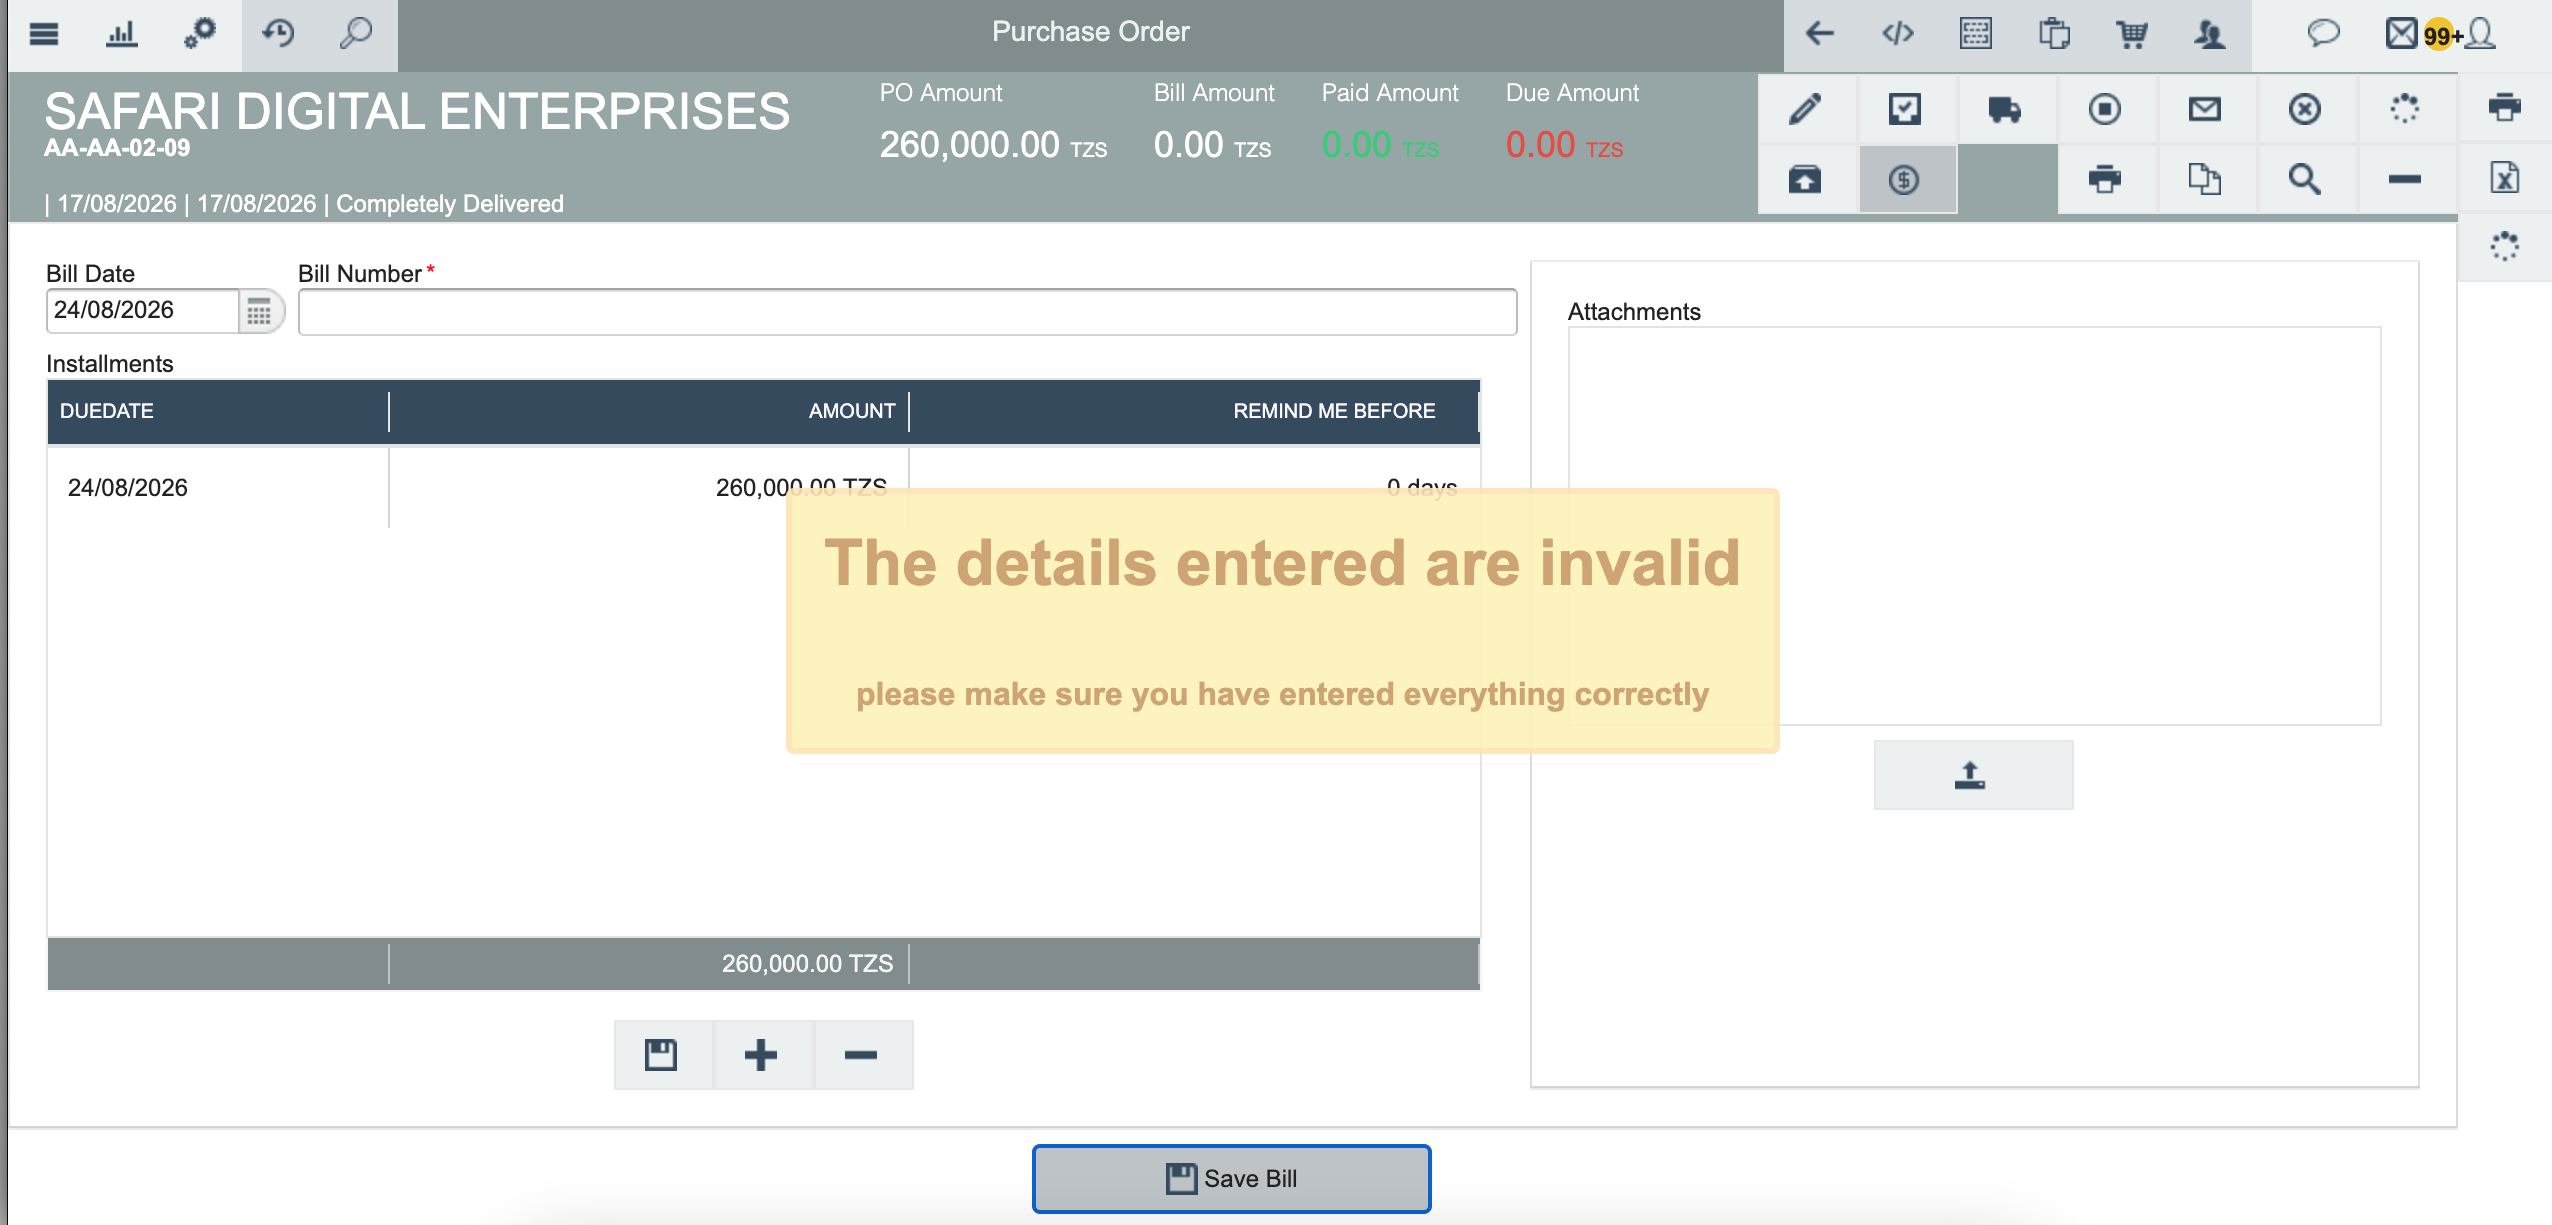
Save Bill button not appearing — Button missing from screen. Cause: Total installment amount does not match PO amount. Solution: Verify that the sum of all installments equals the total PO amount.
10. Quick Reference
10.1 Checklist Before Recording a Bill
☐ | Check |
|---|---|
☐ | Purchase Order exists and is approved |
☐ | Goods have been received (GRN created) |
☐ | Payment Status is "Not Billed" |
☐ | Vendor invoice is available with bill number |
☐ | Bill Date is correctly entered |
☐ | Bill Number is correctly entered |
☐ | Installment totals match the PO amount |
☐ | Remind Before days are set correctly |
☐ | User has permission to create bills |
10.2 Quick Step Reference
Bill Recording at a Glance
Navigate to Purchase → Purchase Order.
Search for the PO with Payment Status = "Not Billed".
Click on the PO number to open details.
Click the Bill button.
Enter Bill Date and Bill Number.
Set up Installments (single or multiple).
Verify total installment amount equals PO amount.
Click Save Bill.
Click Submit For Approval.
Verify Payment Status changed to "Not Paid".
10.3 Key Terms
SN | Term | Definition |
|---|---|---|
1 | Purchase Order (PO) | Document authorizing the purchase of goods or services from a vendor |
2 | Bill | Vendor invoice recorded against a PO, creating a financial obligation |
3 | Not Billed | PO status meaning no bill has been created yet |
4 | Not Paid | PO status meaning a bill exists but payment has not been made |
5 | Full Paid | PO status meaning the bill has been paid in full |
6 | Partial Paid | PO status meaning the bill has been partially paid |
7 | Installment | A partial payment of the total bill amount due on a specific date |
8 | Remind Before | Number of days before the due date to send a notification |
9 | Bill Date | The date the vendor issued the invoice |
10 | Bill Number | The vendor's unique invoice number |
11 | Due Date | The date by which an installment payment must be made |
12 | GRN (Goods Receipt Note) | Document confirming receipt of goods into the facility |