How to Completely Configure a Manufacturing Item
1. Overview
The Manufacturing module in Inaya enables healthcare facilities and organizations to produce items internally by combining raw materials through a defined production process. Unlike standard purchased items, manufactured items represent goods your organization produces internally — such as cement bricks, blended flour, assembled medical kits, or compounded medications.
This module handles the complete manufacturing workflow, from defining the product recipe to executing production runs, while maintaining accurate inventory records and full batch traceability.
2. Why Manufacturing Items Matter
Aspect | Importance |
|---|---|
Cost Control | Tracks exactly what goes into each finished unit for accurate costing |
Inventory Management | Automatically deducts raw materials and adds finished goods to inventory |
Batch Traceability | Assigns unique batch names for quality control and recall purposes |
Expiry Monitoring | Sets shelf lives on manufactured goods to prevent waste |
Audit Trail | Every production run is logged for compliance and financial auditing |
Efficiency | Standardizes the production process and automates stock updates |
3. Requirements Before You Start
Prerequisites Checklist
Items Catalog: Both the finished goods and every raw material must already exist as items. Configure in Items module → Add Items.
Stores: Stores must exist for both raw materials and finished goods. Configure in Stores module → Add Store.
Stock Receipt: Raw materials must be received into the source store before manufacturing. Configure in Items → Receive tab.
User Permissions: The user performing the manufacturing run must have permission to manufacture items. Configure via System Administrator.
4. Scenarios and Examples
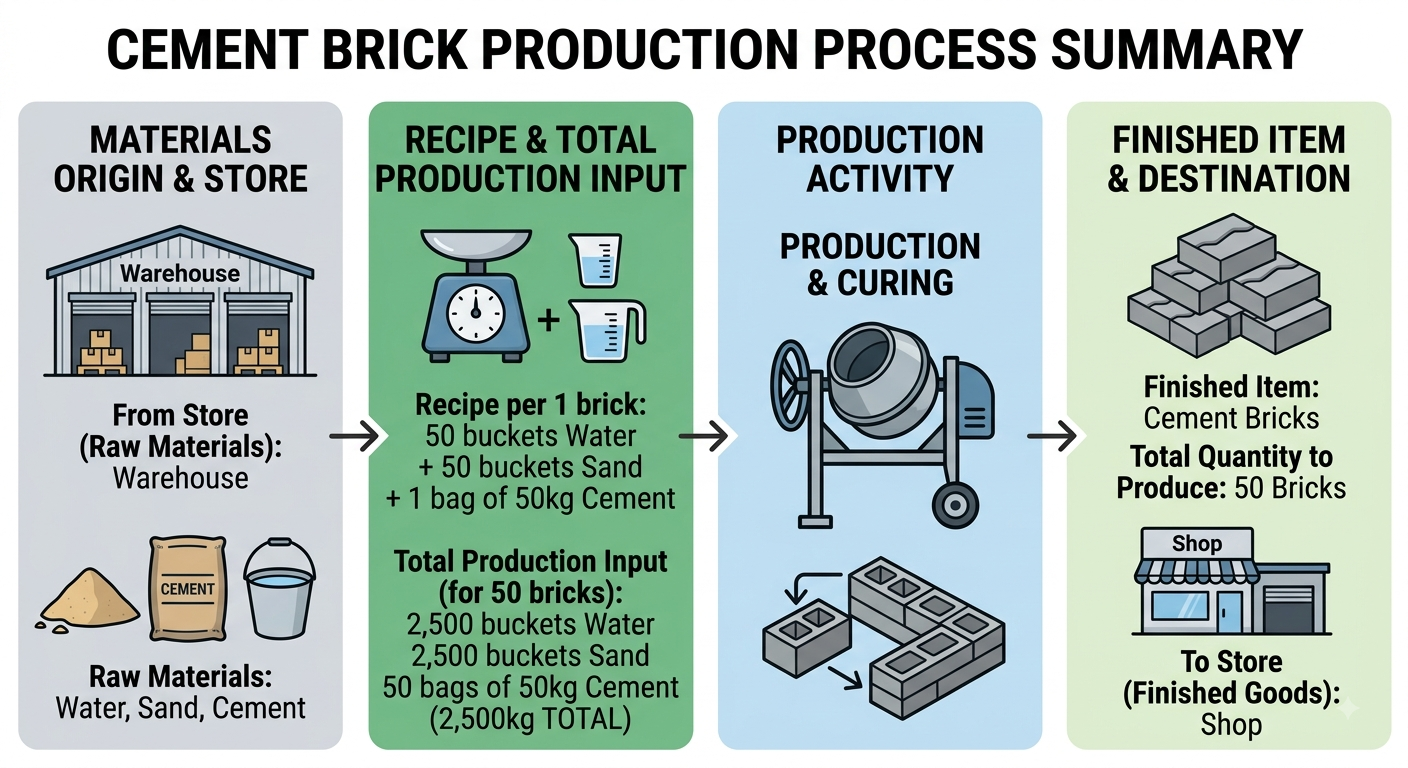
Scenario 1 — Manufacturing Cement Bricks
Field | Value |
|---|---|
Finished Item | Cement bricks |
Raw Materials | Water, Sand, Cement |
Recipe (per 1 unit) | 50 buckets Water + 50 buckets Sand + 1 bag (50 kg) Cement |
From Store (Raw Materials) | Warehouse |
To Store (Finished Goods) | Shop |
Quantity to Produce | 50 bricks |
Batch Name | BRICK-BATCH-AUG-04 |
Scenario 2 — Manufacturing Blended Flour
Field | Value |
|---|---|
Finished Item | Blended Flour 1kg |
Raw Materials | Wheat Flour, Corn Flour, Vitamin Premix |
Recipe (per 1 unit) | 700 g Wheat Flour + 250 g Corn Flour + 50 g Vitamin Premix |
From Store (Raw Materials) | Raw Materials Store |
To Store (Finished Goods) | Production Store |
Quantity to Produce | 500 units |
Batch Name | FLOUR-BATCH-2026-001 |
5. Step-by-Step Guide: Configuring a Manufacturing Item
Follow the procedures below in order, from registering raw materials to executing your first production run.
Step 1 — Register Raw Materials as Items
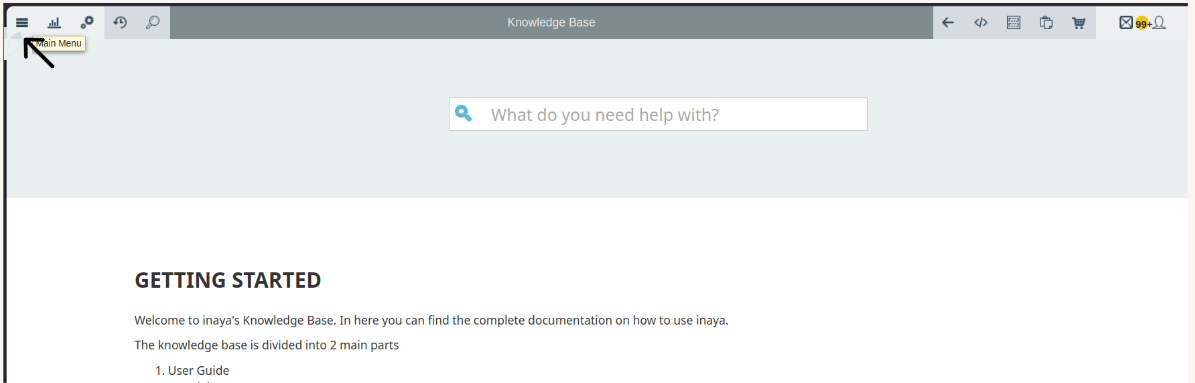
Log in to Inaya and open the Main Menu.
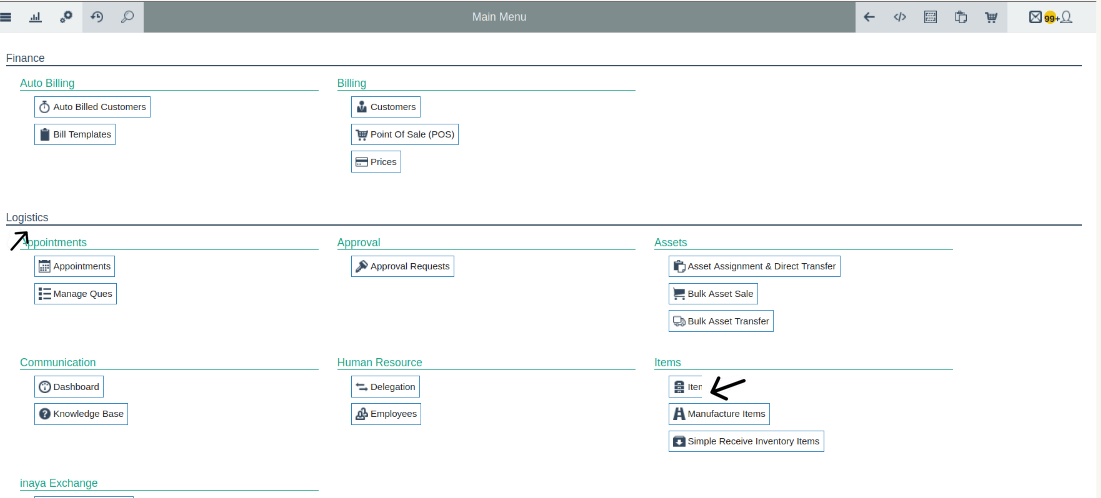
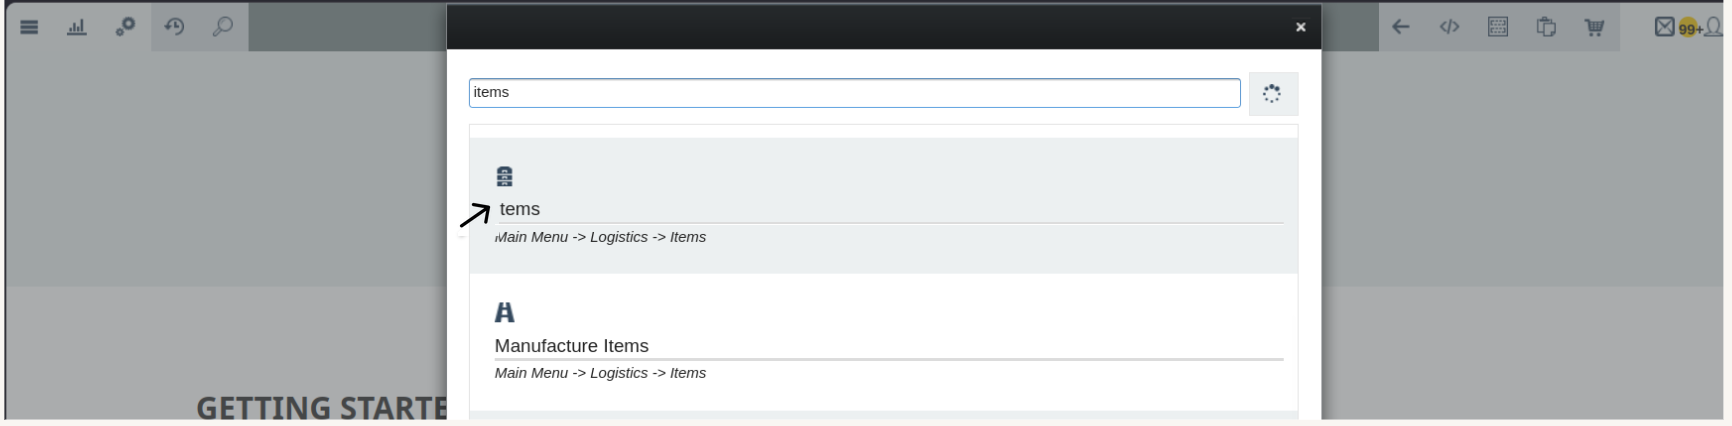
Scroll down to Logistics, then select Items to open the Items page.
Alternatively, click the Search icon in the top-left corner, type
Itemsinto the search box, and select Items from the results.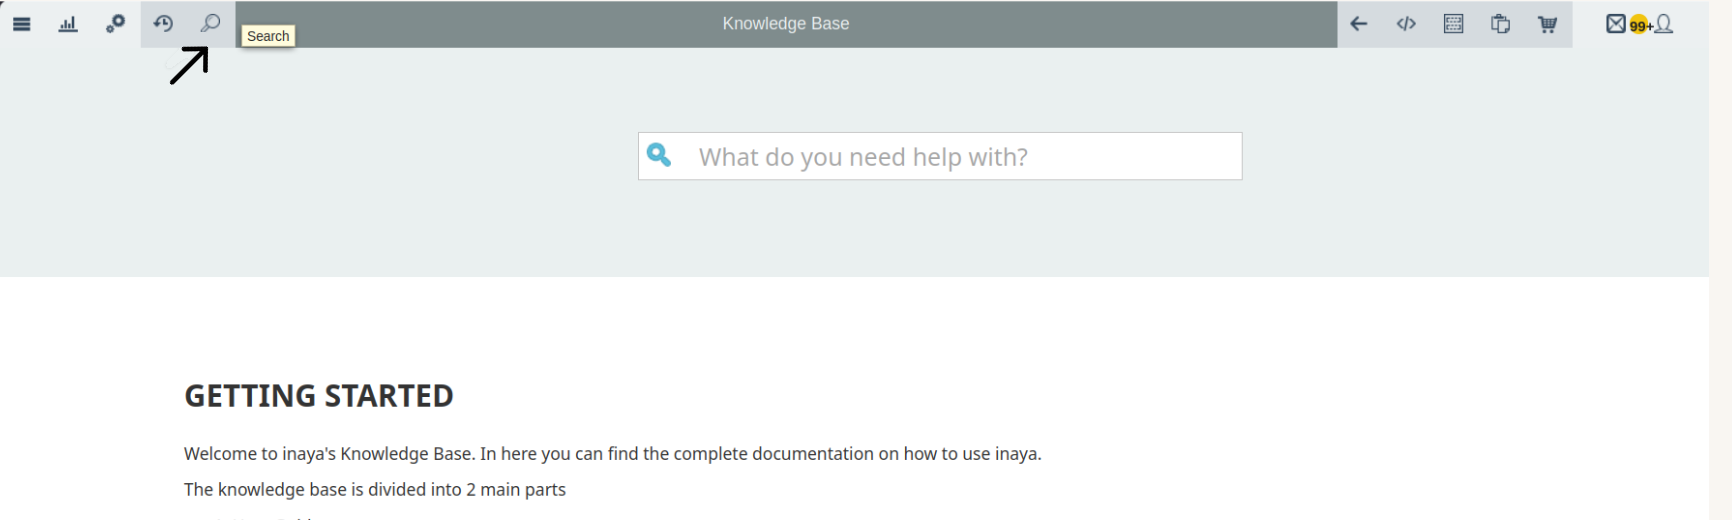
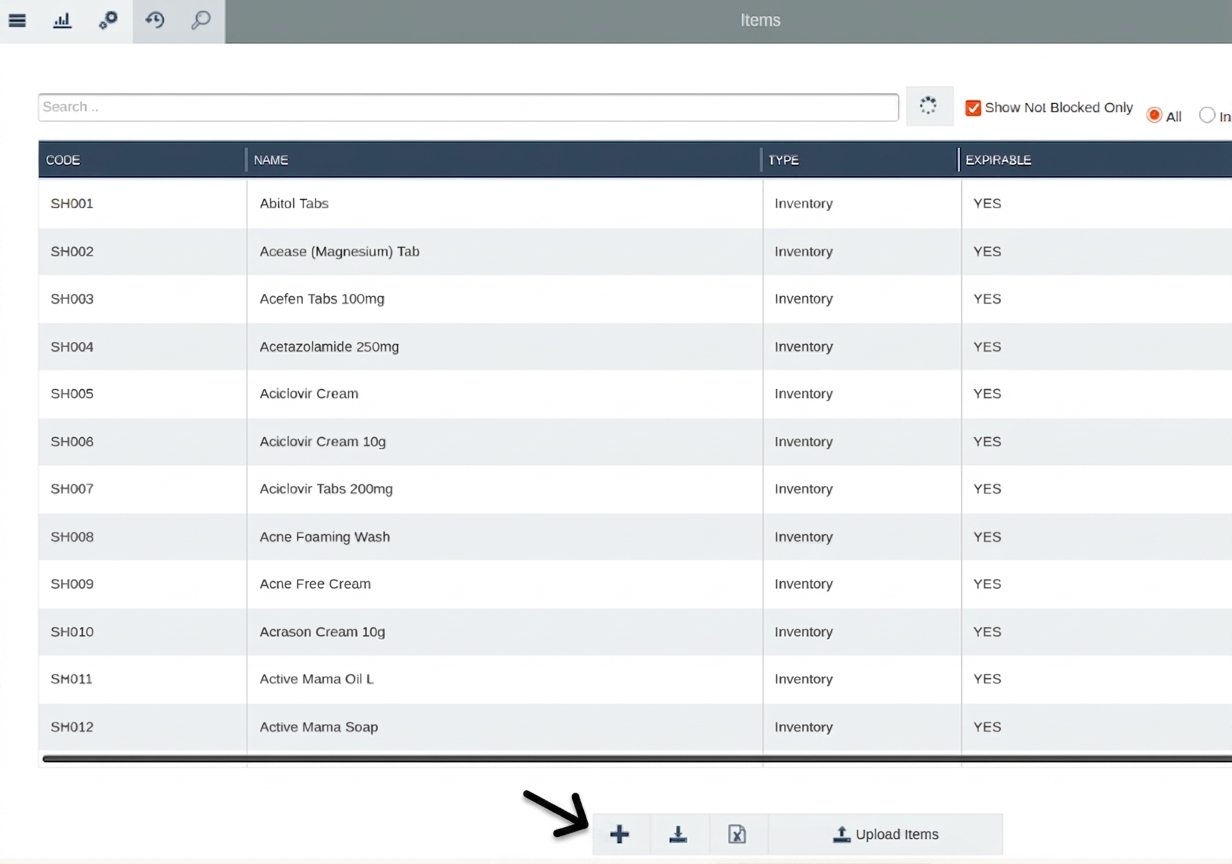
In the Items section, click the + (Plus) button to start registering a new item. The Registration section will open.
In the Registration section, enter the item details:
Code: A unique code that identifies the item.
Name: The name of the item. Each item should have its own name.
Type: Select Inventory for items that are sold or kept as stock.
Category: Select the appropriate category for the item.
About to Expire Reminder Days: Enable via the checkbox, then set the number of days before expiry you want to be reminded. Use only for items with an expiry date.
Description: Optional additional information about the item.
Under Item Units, select the unit used to manage the item (e.g., Tablets, Boxes, Bottles).
Under Display Units, select the unit you want displayed for the item. This can match the Item Unit.
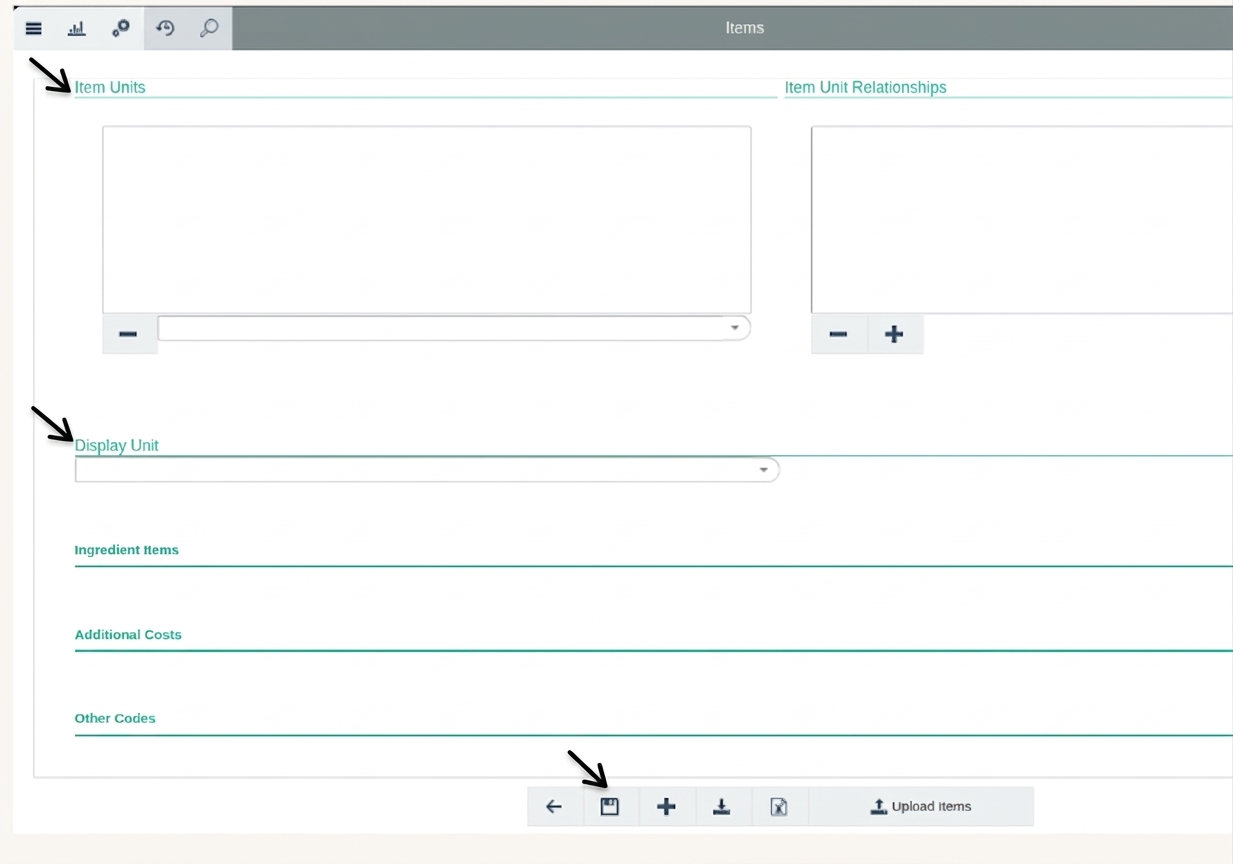
Click Save at the bottom center of the panel.
Verify: Confirm the item now appears in the Items list and is available for further configuration and inventory activities.
Example — registering raw materials for the Cement Bricks scenario:
Code | Name | Type |
|---|---|---|
WTR-001 | Water | Inventory |
SND-001 | Sand | Inventory |
CMT-001 | Cement | Inventory |
Step 2 — Add Raw Materials to Stores
For each raw material item, navigate to its Receive tab to add stock to the store.
Enter the receiving details:
Field
Value
Store
Warehouse
Item
Water
Quantity
1000
Unit
bucket(s)
Batch Number
WTR-2026-001
Repeat this process for every remaining raw material (Sand, Cement, etc.) and confirm each has sufficient stock.
For more detail on receiving stock, see: How to receive Items from another store
Step 3 — Create the Finished Product Item
Repeat the registration process from Step 1 to create the finished product (e.g., Cement bricks).
The only difference: finished manufacturing items must also have their Ingredient Items defined — these are the raw materials configured in Steps 1–2.
Step 4 — Define the Recipe (Ingredients) — CRITICAL STEP
Open the finished item (e.g., Cement bricks) and go to the Registration tab. Scroll down to the Ingredient Items section.
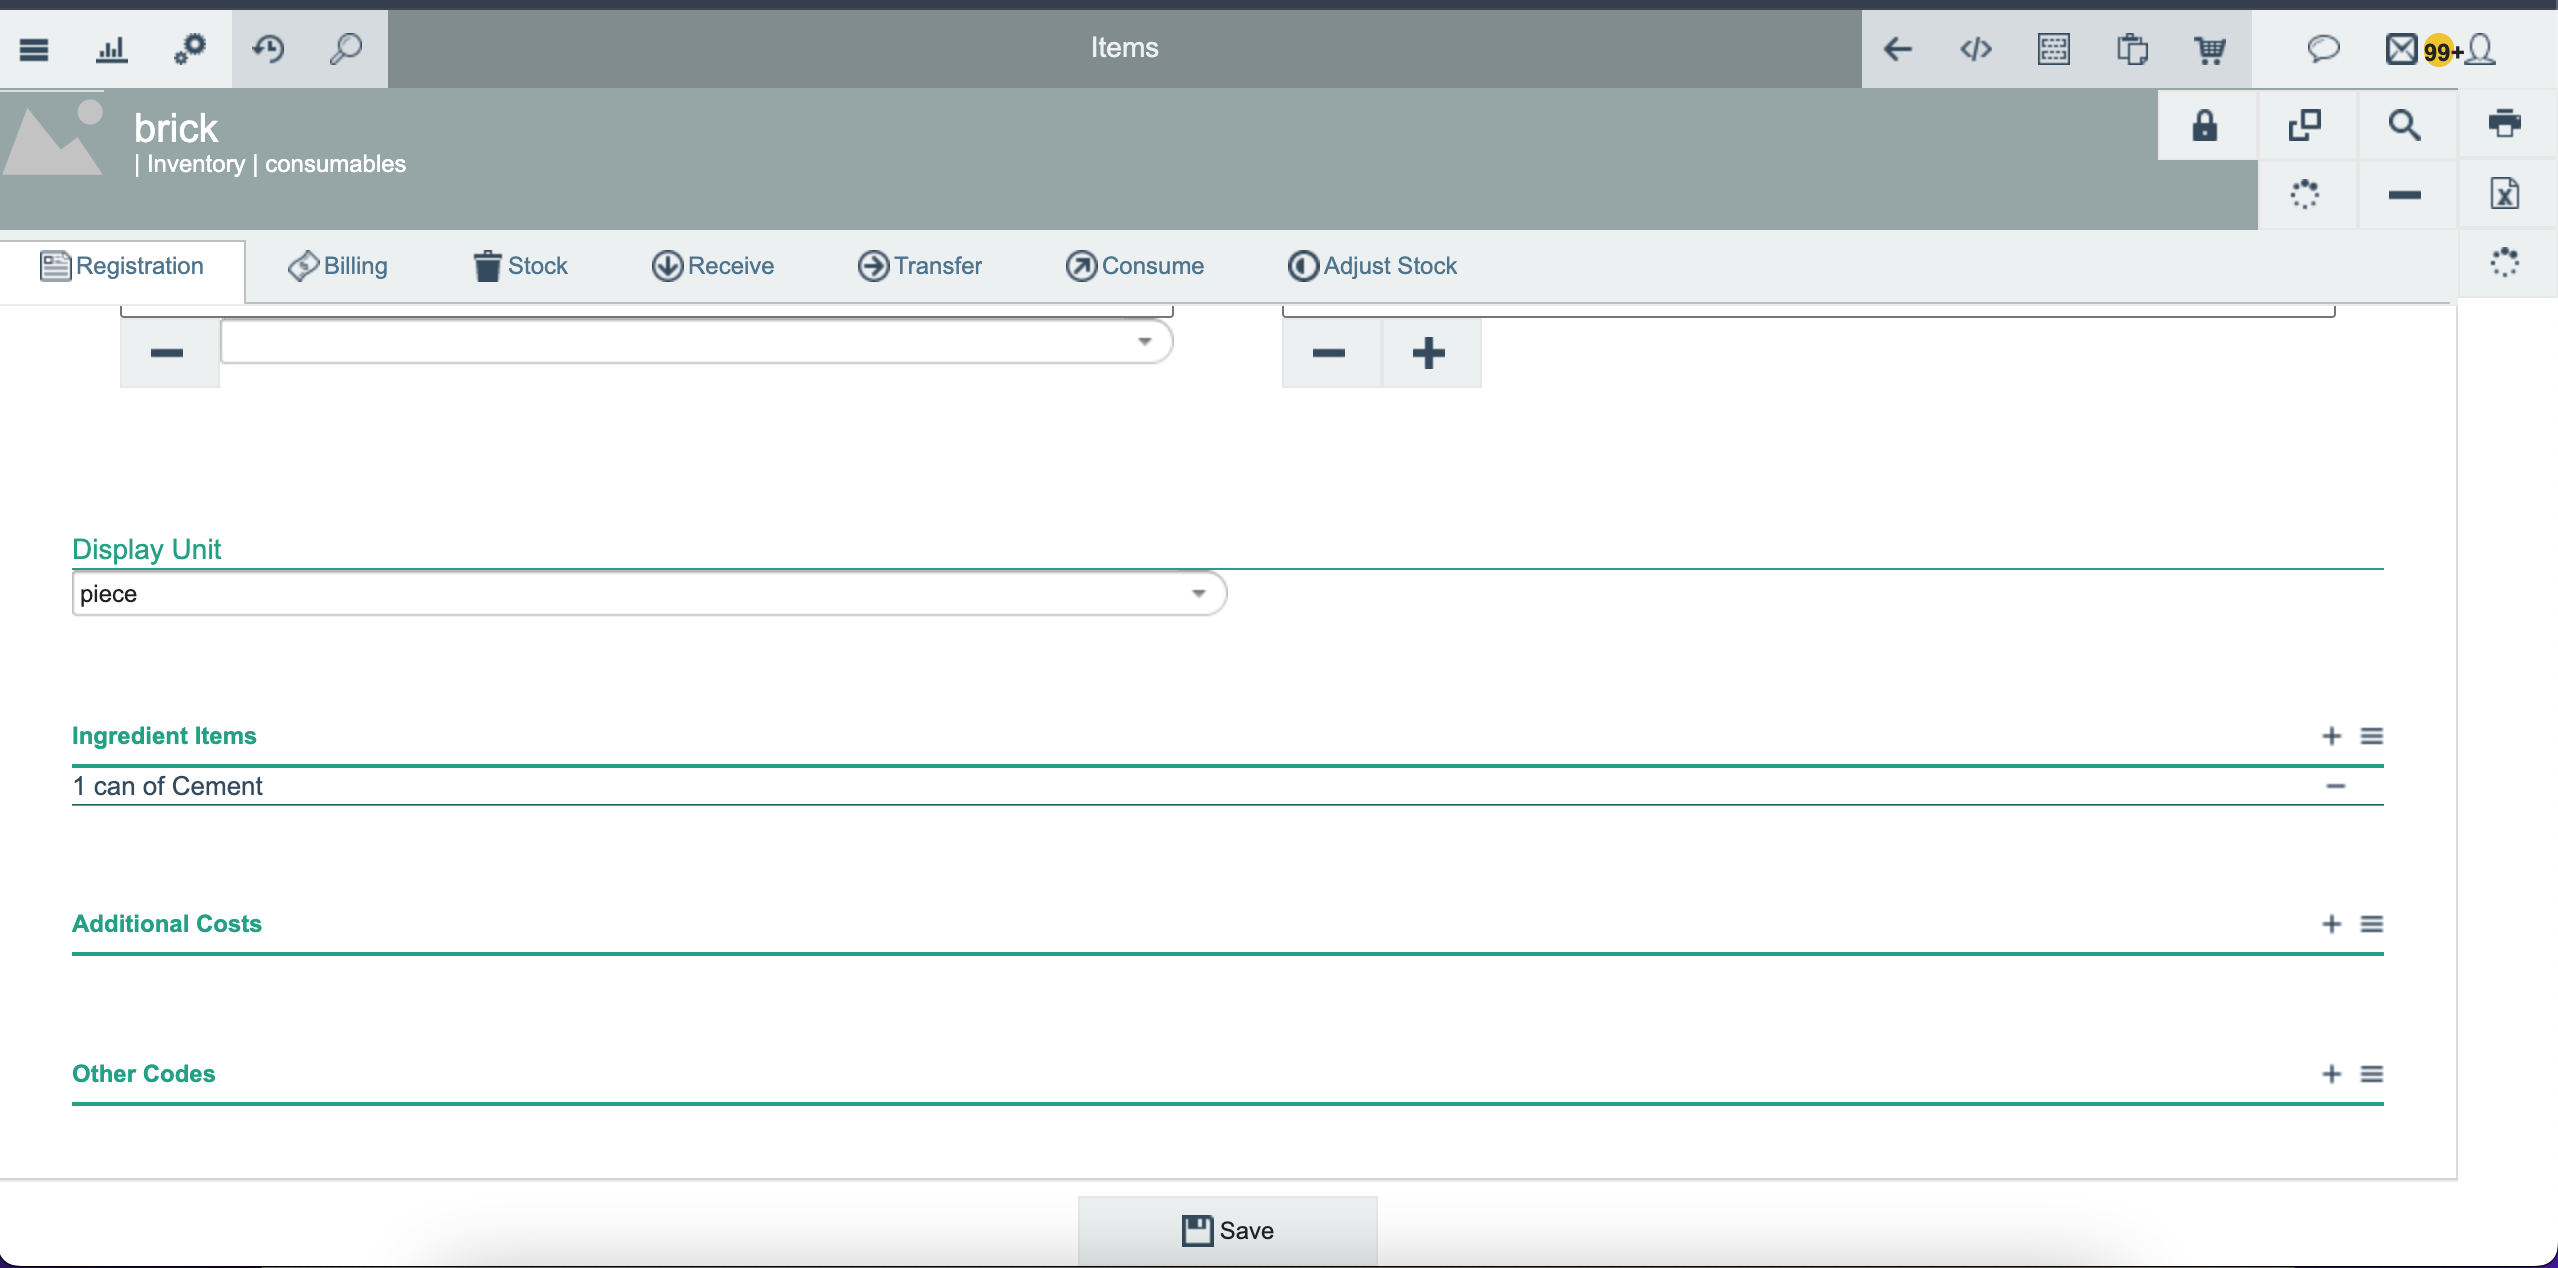
Select Item: Choose a raw material from the dropdown. It must already exist as a registered item.
Enter Quantity: Enter the amount of that raw material needed to make 1 unit of the finished product.
Select Unit: Choose the measurement unit for that quantity.
Add more rows: Click the + button to add each additional ingredient.
Click Save.
Example recipe for Cement Bricks (per 1 unit):
Item | Quantity | Unit |
|---|---|---|
Water | 1 | bucket(s) |
Sand | 1 | bucket(s) |
Cement | 1 | kg |
Step 5 — Navigate to Manufacture Items
Return to the Main Menu.
Under the Items section, click Manufacture Items.
Step 6 — Configure the Transaction Header
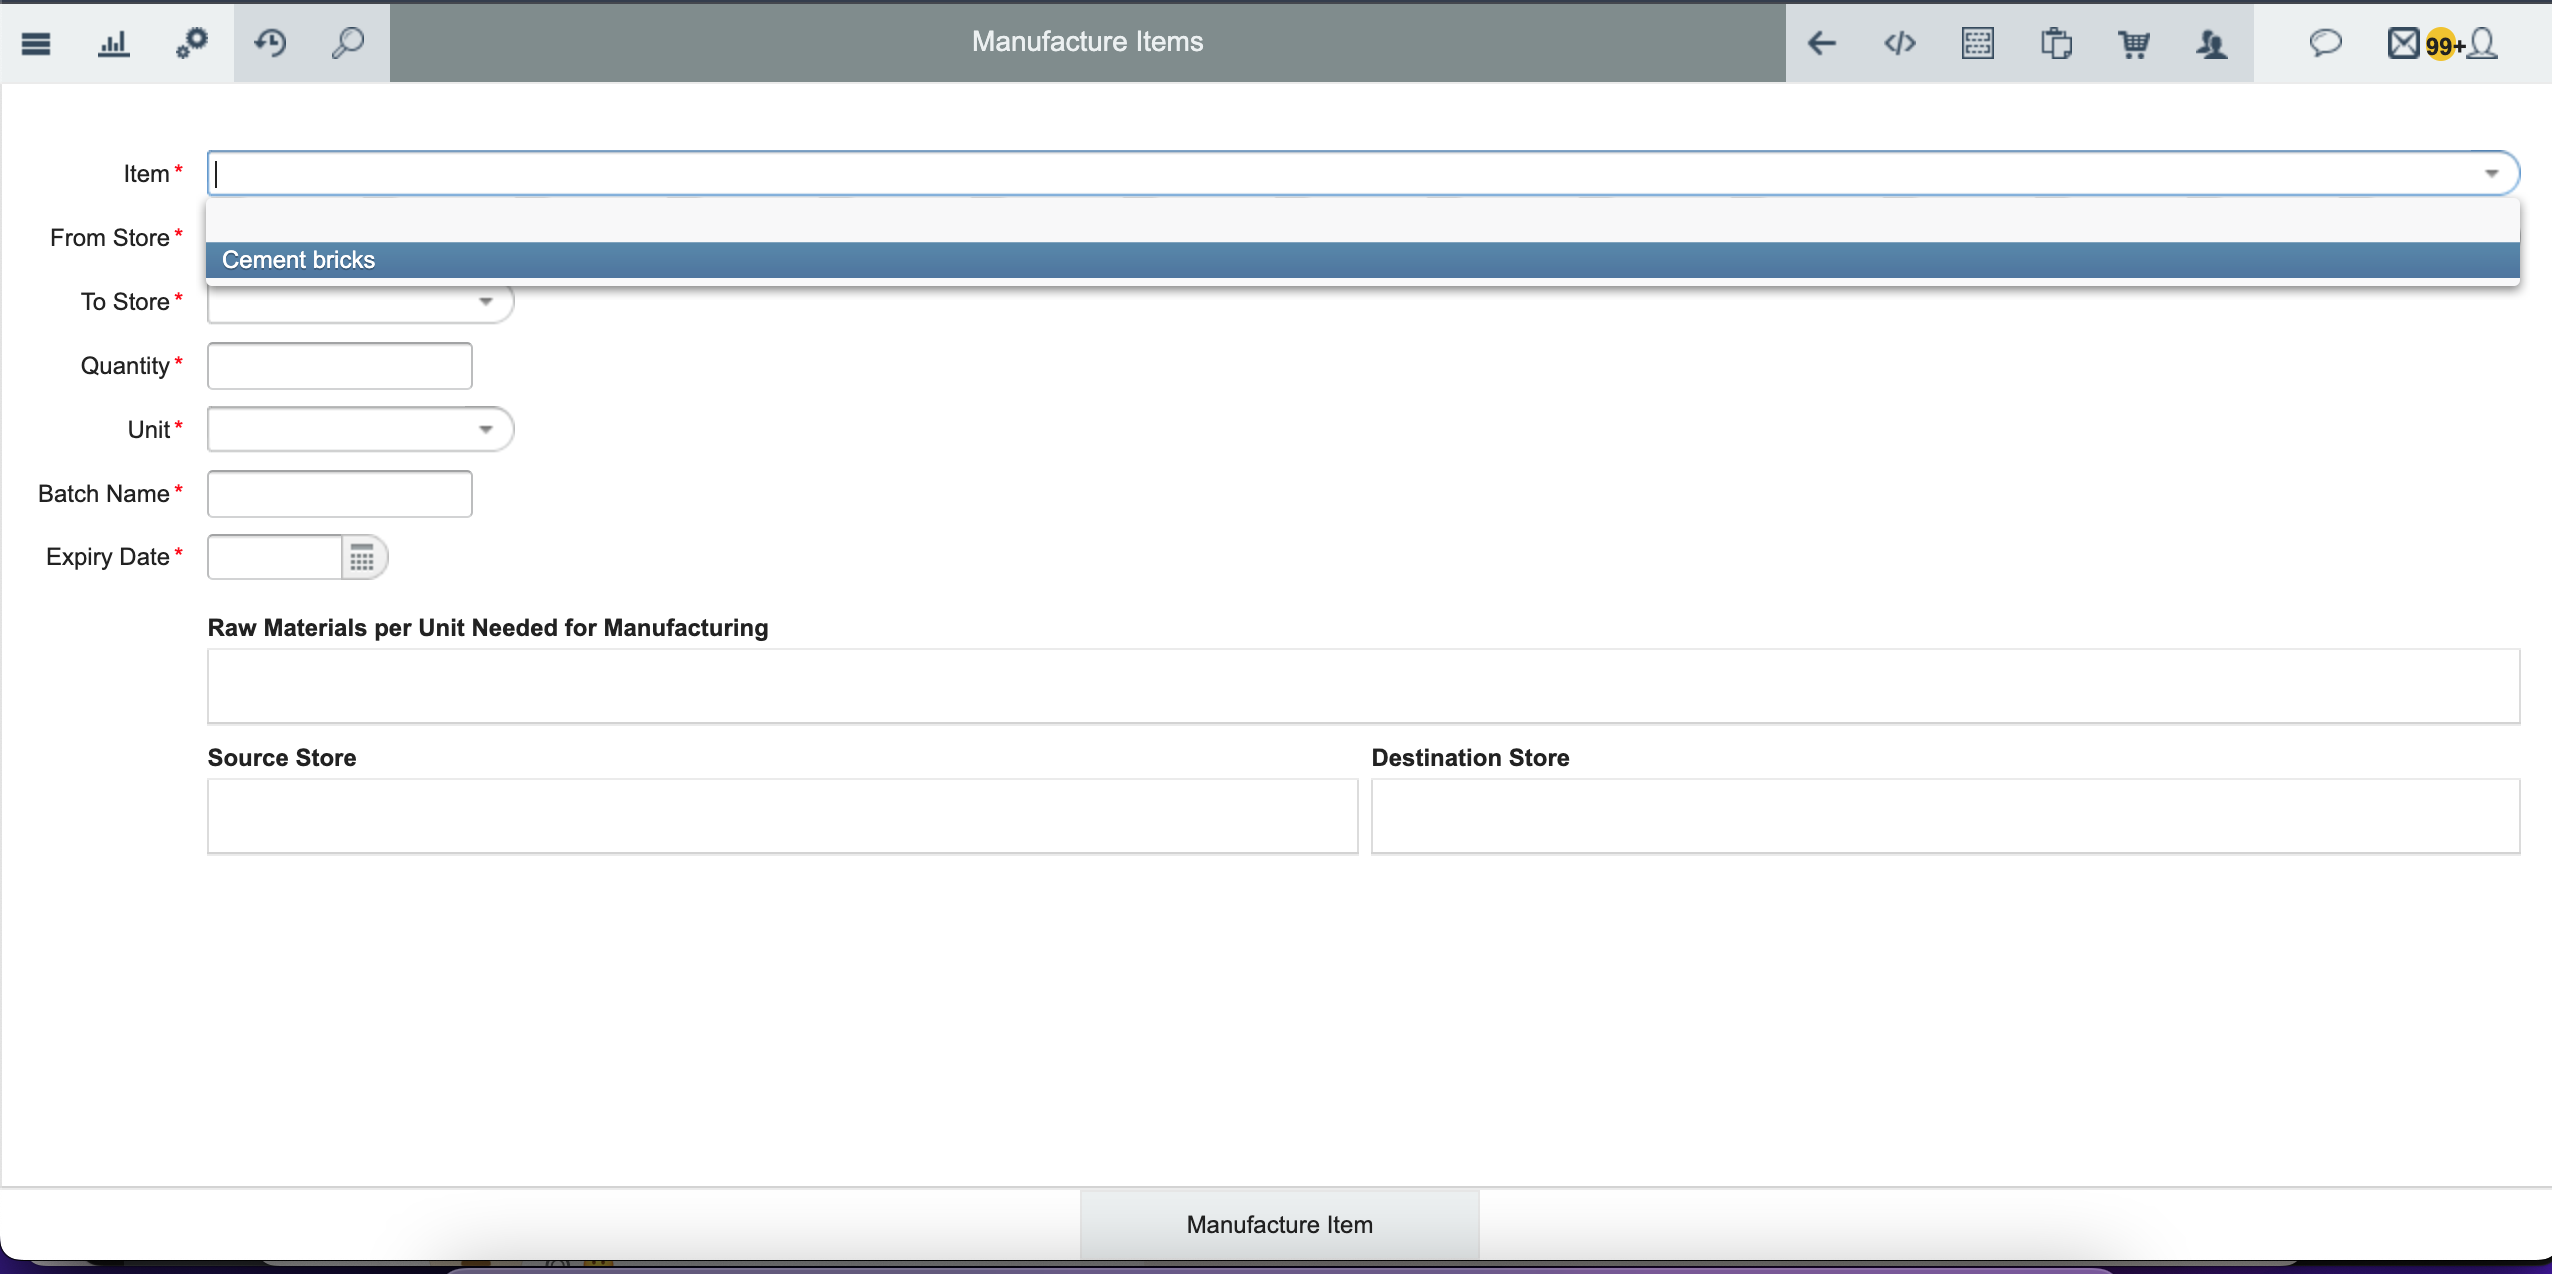
Item: Select the finished product. Only items with a saved recipe appear here. Example: Cement bricks.
From Store: Select the store where raw materials are currently held. Example: Warehouse.
To Store: Select the store where the finished goods will be placed. Example: Shop.
Quantity: Enter the total number of finished units to produce in this run. Example: 2.
Unit: Select the unit of measure for the finished product. Example: piece.
Batch Name: Enter a unique identifier for traceability. Example: BRICK-BATCH-AUG-04.
Expiry Date: Enter an expiration date, if applicable. Example: 01/01/2028.
Step 7 — Validate Raw Materials
Once you select the From Store, the system automatically checks stock availability for every ingredient in the recipe.
Scenario A — Success (stock available): Ingredients appear in green text, and the Source Store panel shows the Present Quantity for each material.
Step 8 — Complete the Manufacturing Run
Review the Left Panel: the raw materials that will be deducted from the From Store.
Review the Right Panel: the finished goods that will be added to the To Store.
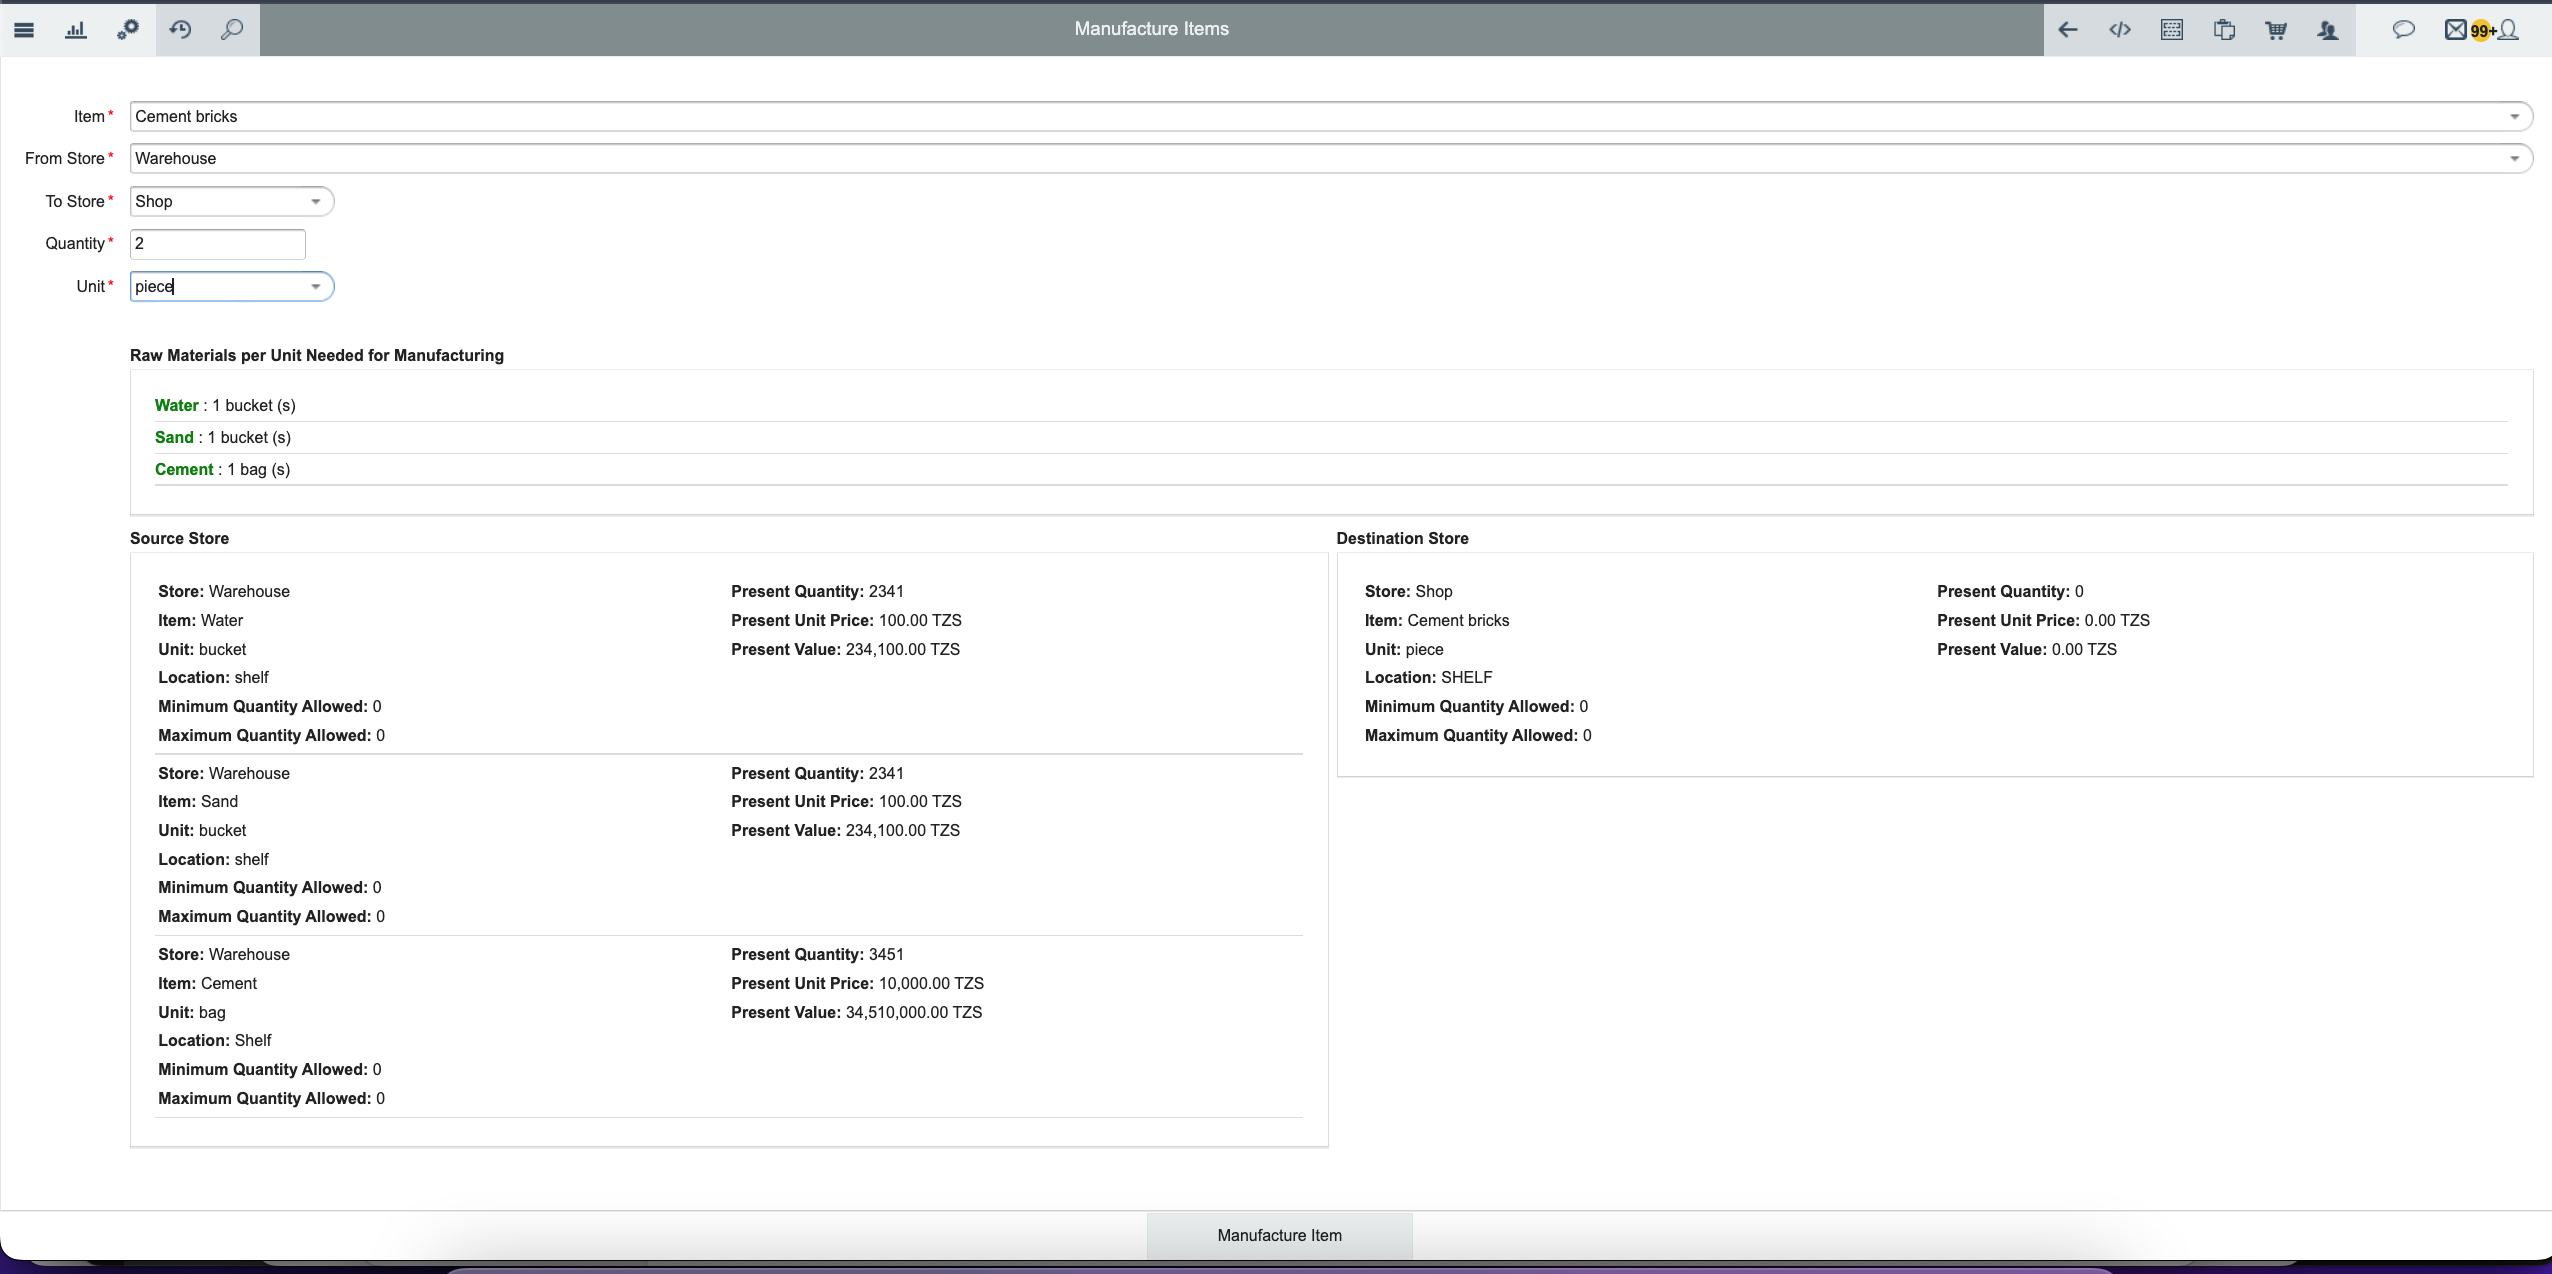
Click the Manufacture Item button at the bottom of the screen to execute the production run.
6. What Happens After Manufacturing?
SN | Action | Result | Impact |
|---|---|---|---|
1 | Raw Materials Deducted | Quantity decreases in From Store | Inventory levels updated |
2 | Finished Goods Added | Quantity increases in To Store | Inventory levels updated |
3 | Batch Record Created | Unique batch name assigned | Traceability established |
4 | Transaction Logged | Production run recorded | Full audit trail |
5 | Report Available | Appears in manufacturing reports | Reporting and analysis |
Complete Example — Manufacturing Cement Bricks
End-to-End Walkthrough
Main Menu → Items: Navigate to the items list.
Create the finished item: Code
CBRICK-001, NameCement bricks.Register raw materials: Water, Sand, Cement as items.
Receive raw materials: receive each into Warehouse with the correct quantities.
Define the recipe: Water 1 bucket, Sand 1 bucket, Cement 1 bag.
Main Menu → Manufacture Items: open the manufacturing panel.
Configure the header: Item: Cement bricks, From: Warehouse, To: Shop, Qty: 2.
Validate stock: confirm all raw materials are available (green text).
Click Manufacture Item to execute production.
Before Manufacturing
Water: 2341 buckets (Warehouse)
Sand: 2341 buckets (Warehouse)
Cement: 3451 bags (Warehouse)
Cement bricks: 0 pieces (Shop)
After Manufacturing
Water: 2339 buckets (Warehouse) — 2 deducted
Sand: 2339 buckets (Warehouse) — 2 deducted
Cement: 3449 bags (Warehouse) — 2 deducted
Cement bricks: 2 pieces (Shop) — added
Batch: BRICK-BATCH-AUG-04 recorded
7. Manufacturing vs. Other Transactions
Transaction | Description | Is This Manufacturing? |
|---|---|---|
Purchasing items | Buying finished goods from suppliers | ❌ No — this is Purchase |
Transferring items | Moving items between stores | ❌ No — this is Transfer |
Consuming items | Using items internally | ❌ No — this is Consumption |
Selling items | Selling to customers | ❌ No — this is Sale |
Combining raw materials | Creating new products internally | ✅ Yes — this is Manufacturing |
Assembling kits | Combining components into kits | ✅ Yes — this is Manufacturing |
Compounding medications | Mixing ingredients for medicine | ✅ Yes — this is Manufacturing |
8. Where to Find Manufacturing Reports
View Manufacturing Reports
Open Reports from the Main Menu.
Select Inventory & Assets.
Click Manufacturing.
9. Common Problems and Solutions
Troubleshooting
Raw material not in dropdown — Error: "Item not showing in ingredient list". Cause: raw material not registered as an item. Solution: create the raw material as an item first.
Finished item not showing — Error: "Item not in Manufacture Items dropdown". Cause: no ingredients defined. Solution: add ingredients in the Registration tab.
Insufficient stock — Error: "No stock of (Item) configured". Cause: raw materials not received in store. Solution: receive raw materials into the From Store.
Greyed-out button — The Manufacture Item button is disabled. Cause: missing required fields. Solution: fill in all header fields.
Red text warnings — Items shown in red. Cause: insufficient stock in the From Store. Solution: restock raw materials.
Can't find recipe — Item appears without ingredients. Cause: recipe not saved properly. Solution: edit the item and save the ingredients again.
Batch not recorded — No batch appears in history. Cause: batch name left empty. Solution: the system auto-generates one, but you should manually enter a batch name for traceability.
10. Quick Reference
10.1 Manufacturing Workflow Checklist
☐ | Step |
|---|---|
☐ | 1. Finished product registered as item |
☐ | 2. Raw materials registered as items |
☐ | 3. Raw materials received into store |
☐ | 4. Recipe defined in Registration tab |
☐ | 5. Manufacture Items panel opened |
☐ | 6. From Store and To Store selected |
☐ | 7. Quantity and Batch Name entered |
☐ | 8. Stock validated (green text) |
☐ | 9. Manufacture Item button clicked |
10.2 Key Terms
SN | Term | Definition |
|---|---|---|
1 | Manufacturing Item | A product created internally by combining raw materials |
2 | Raw Material | An ingredient used in manufacturing; must be registered as an item first |
3 | Recipe (BOM) | The list of ingredients and quantities needed to produce 1 unit |
4 | From Store | The store where raw materials are consumed from |
5 | To Store | The store where finished goods are added to |
6 | Batch Name | A unique production run identifier for traceability |
7 | Bill of Materials (BOM) | Complete list of raw materials and quantities required |