How to Create and Track Approval for a New Inventory Requisition
1. Overview
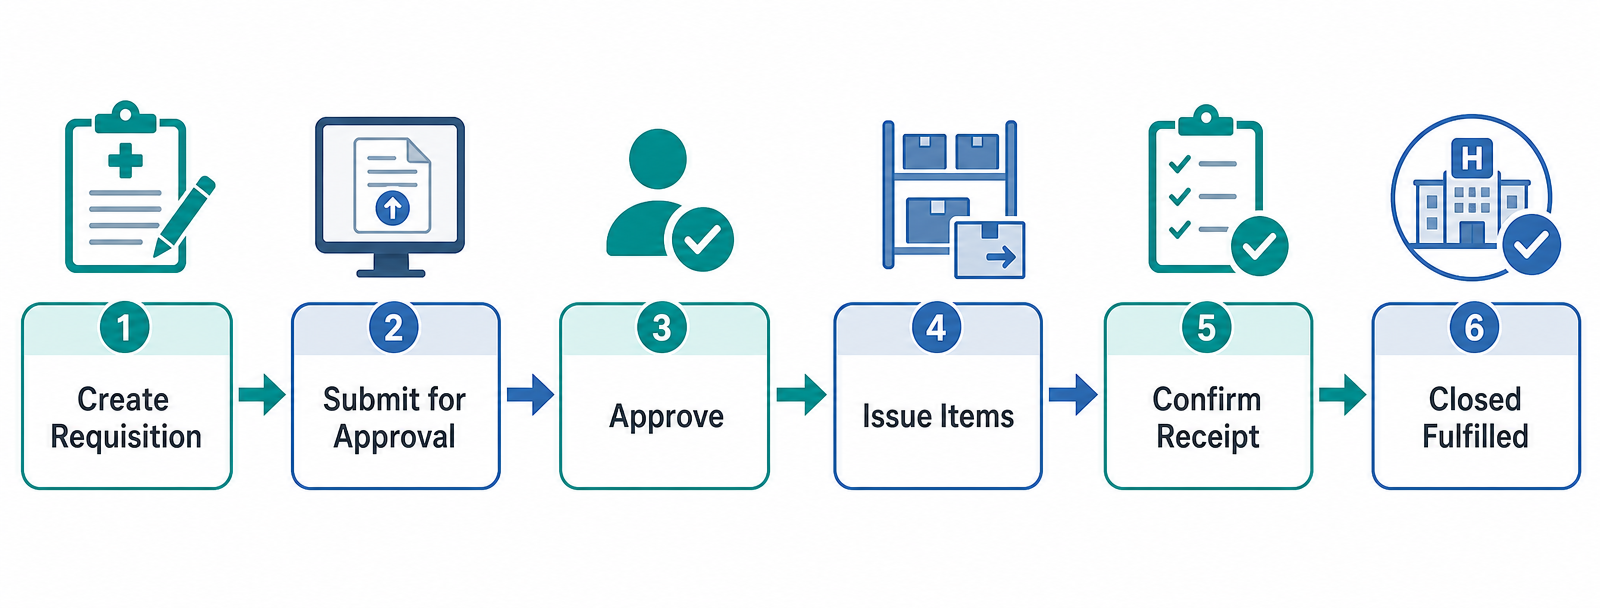
The Inventory Requisition module in Inaya is a logistics management tool that lets healthcare facilities request and transfer inventory items between different stores or departments. It handles the full cycle — requesting, approving, issuing, and confirming — while keeping a complete record of who did what and when.
2. Why Is It Important to Use Inventory Requisitions?
Aspect | Importance |
|---|---|
Stock Control | Prevents stockouts and overstocking by keeping proper inventory levels across stores |
Accountability | Tracks who requested, approved, issued, and received the items |
Audit Trail | Every step is logged, which supports compliance and financial auditing |
Efficiency | Standardizes the request-and-approval process so nothing gets delayed unnecessarily |
Patient Care | Ensures medical supplies move to where they're needed, on time |
3. Requirements Before You Start
Prerequisites Checklist
Stores: All stores involved (e.g., Main, Pharmacy) must already exist.
Approval Strategy: Each store needs an In and/or Out approval strategy.
Items Catalog: All items that can be requested must already be in the catalog.
Approvers: Users must be added to the approval strategy, or they will not see approval requests.
4. Scenarios and Examples
Scenario 1 — Pharmacy Requesting Items from Main Store
Field | Value |
|---|---|
Origin (requesting store) | Pharmacy |
Destination (issuing store) | Main |
Items requested | Abitol Tabs (13 tablets), Aciclovir Tabs 200mg (1 tablet) |
Due date | 11/08/2026 |
Approval required | Out Approval Strategy on Main |
Scenario 2 — Ward Requesting Emergency Items
Field | Value |
|---|---|
Origin (requesting store) | Ward A |
Destination (issuing store) | Pharmacy |
Items requested | Emergency drugs |
Approval required | Both In and Out strategies |
5. Step-by-Step Guide: Creating and Approving a Requisition
Step 1 — Navigate to Inventory Requisitions
Open the Main Menu and find the Logistics section.
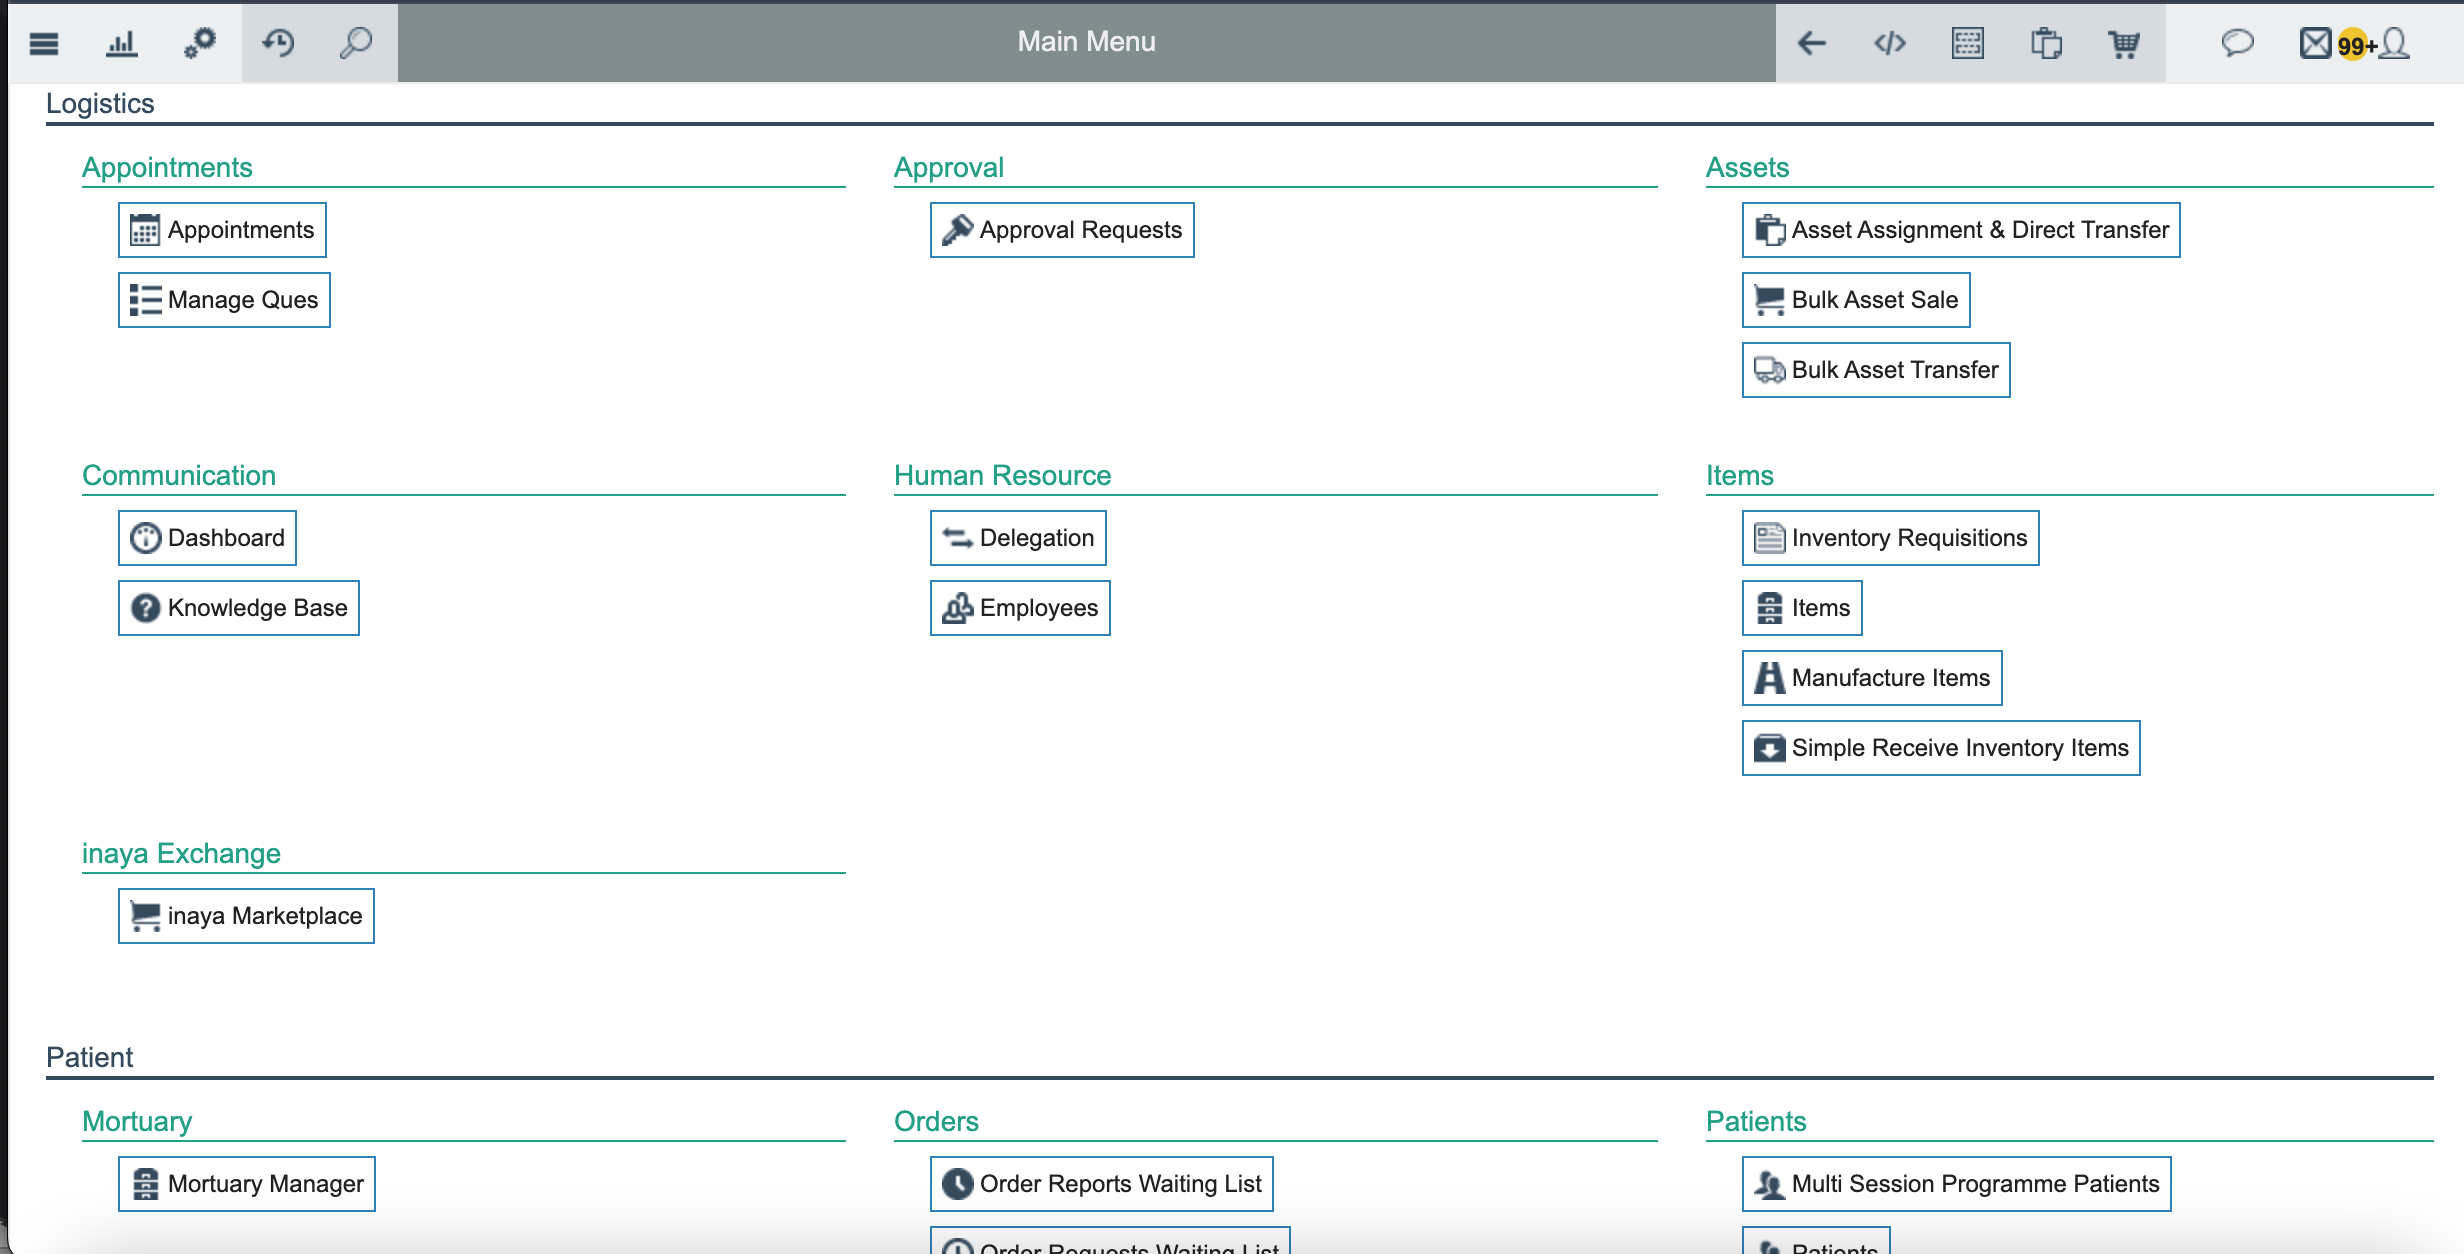
Under Items, click Inventory Requisitions.
The requisitions list opens, split into Inbox and Outbox, filterable by date and status.
Step 2 — Create a New Requisition
On the Inventory Requisitions list, click the + button at the bottom.
A new requisition form opens.
Step 3 — Fill in Requisition Details
Due Date: Enter when the items are needed.
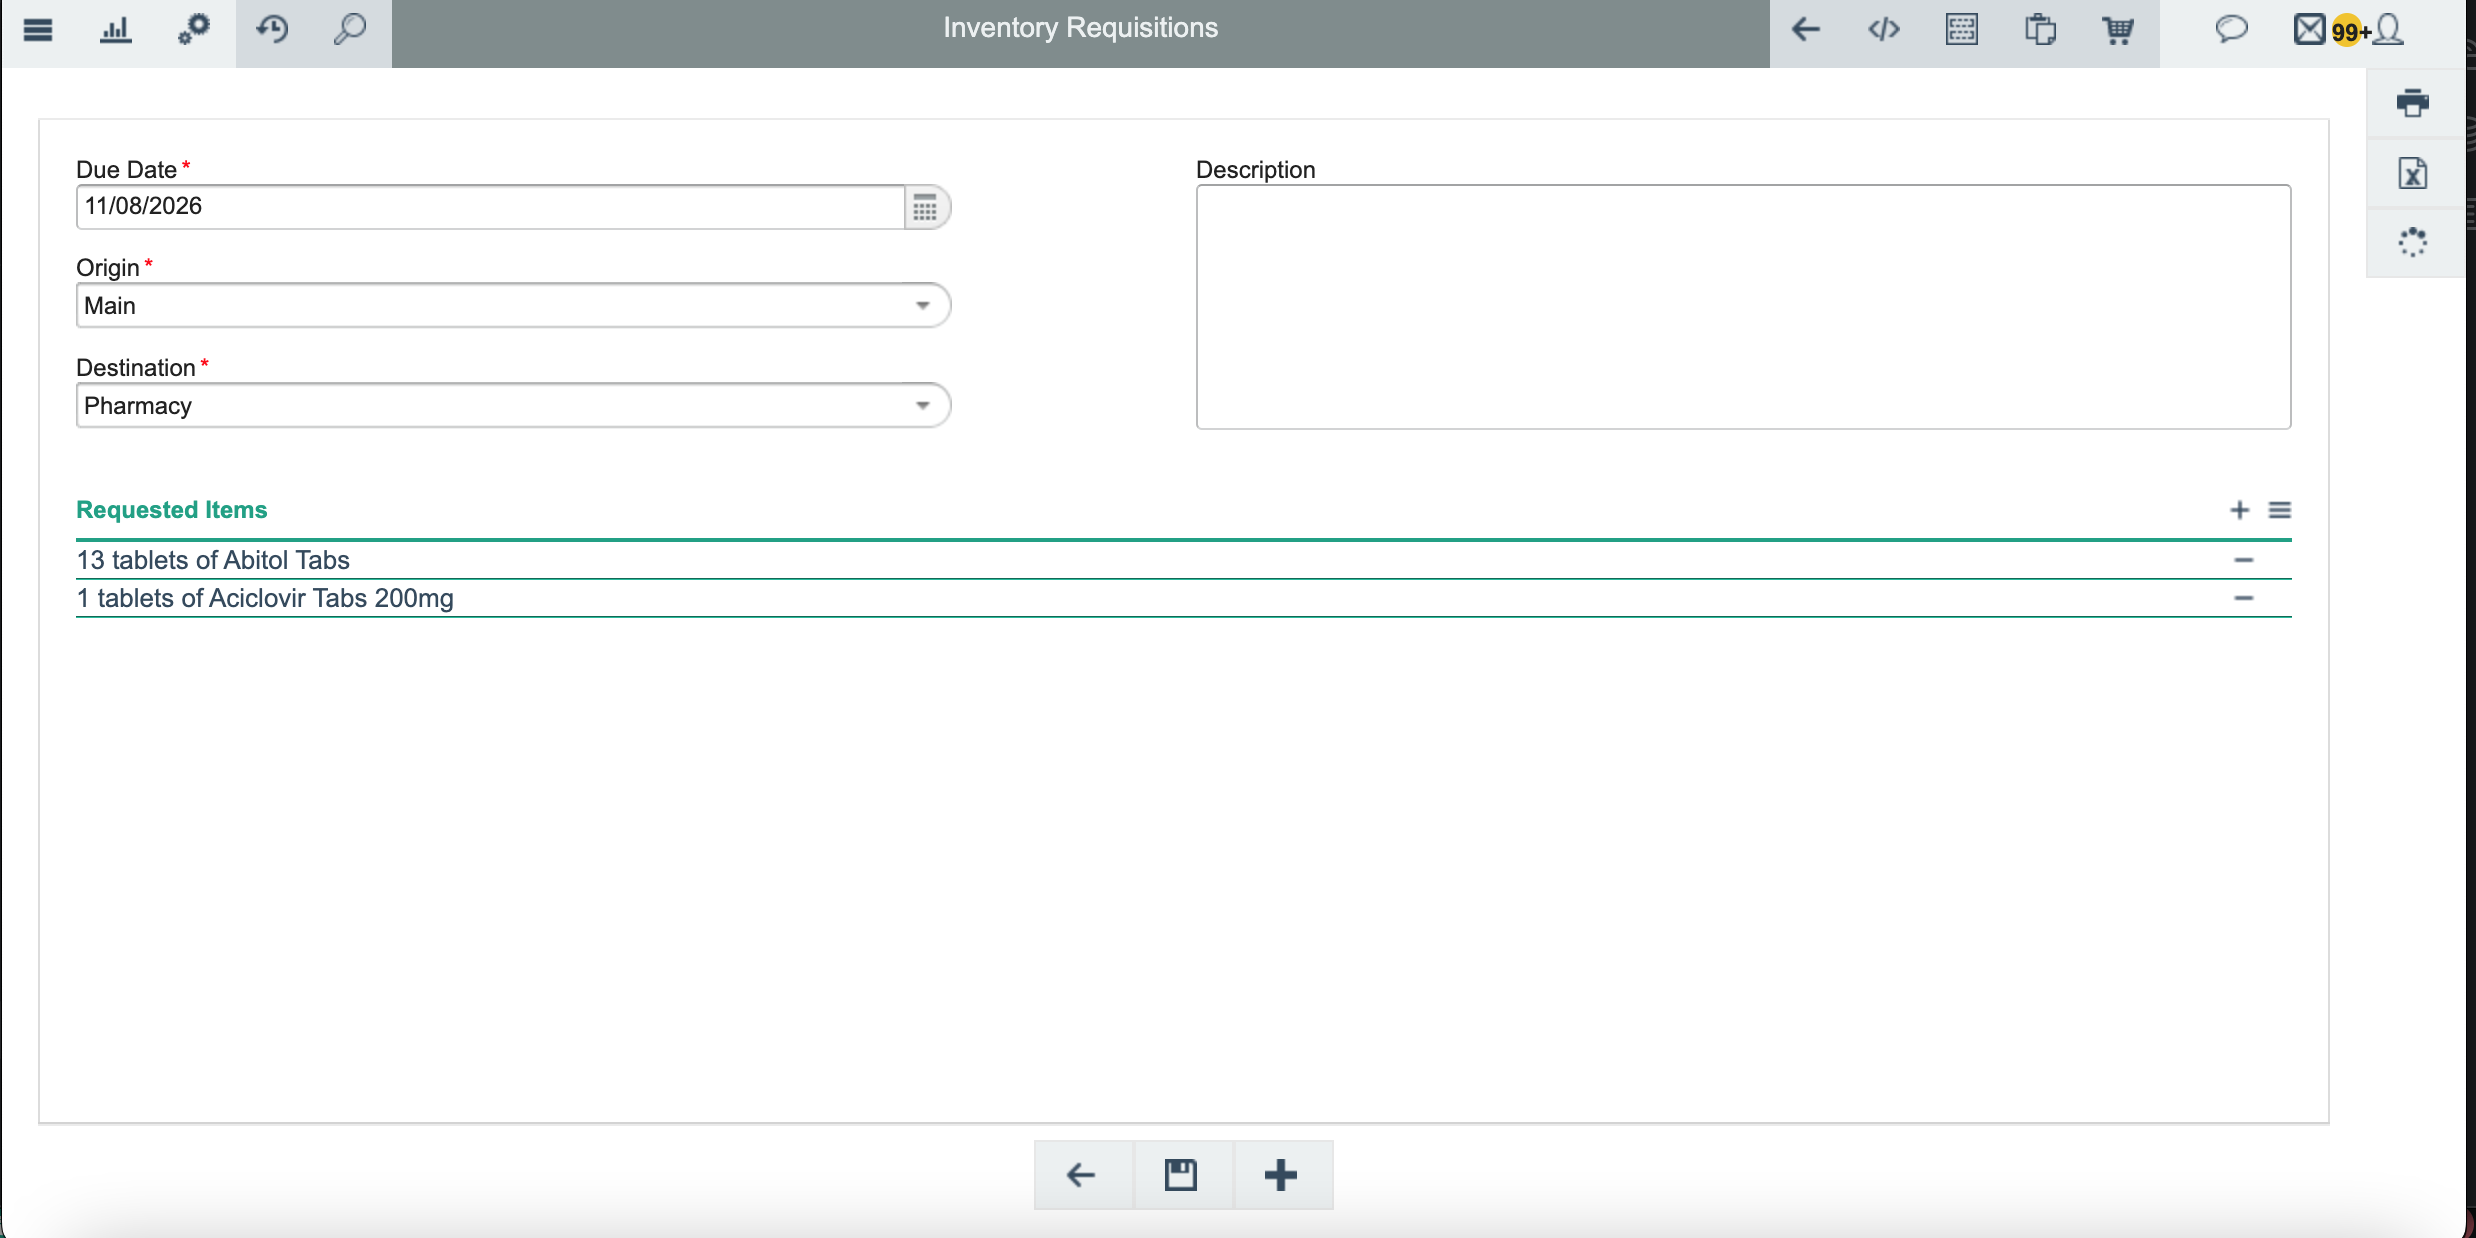
Origin: Select the store requesting the items.
Destination: Select the store that will issue the items.
Description: Optionally add additional notes.
Step 4 — Add Requested Items
Under Requested Items, click Add (the + icon). A search field opens.
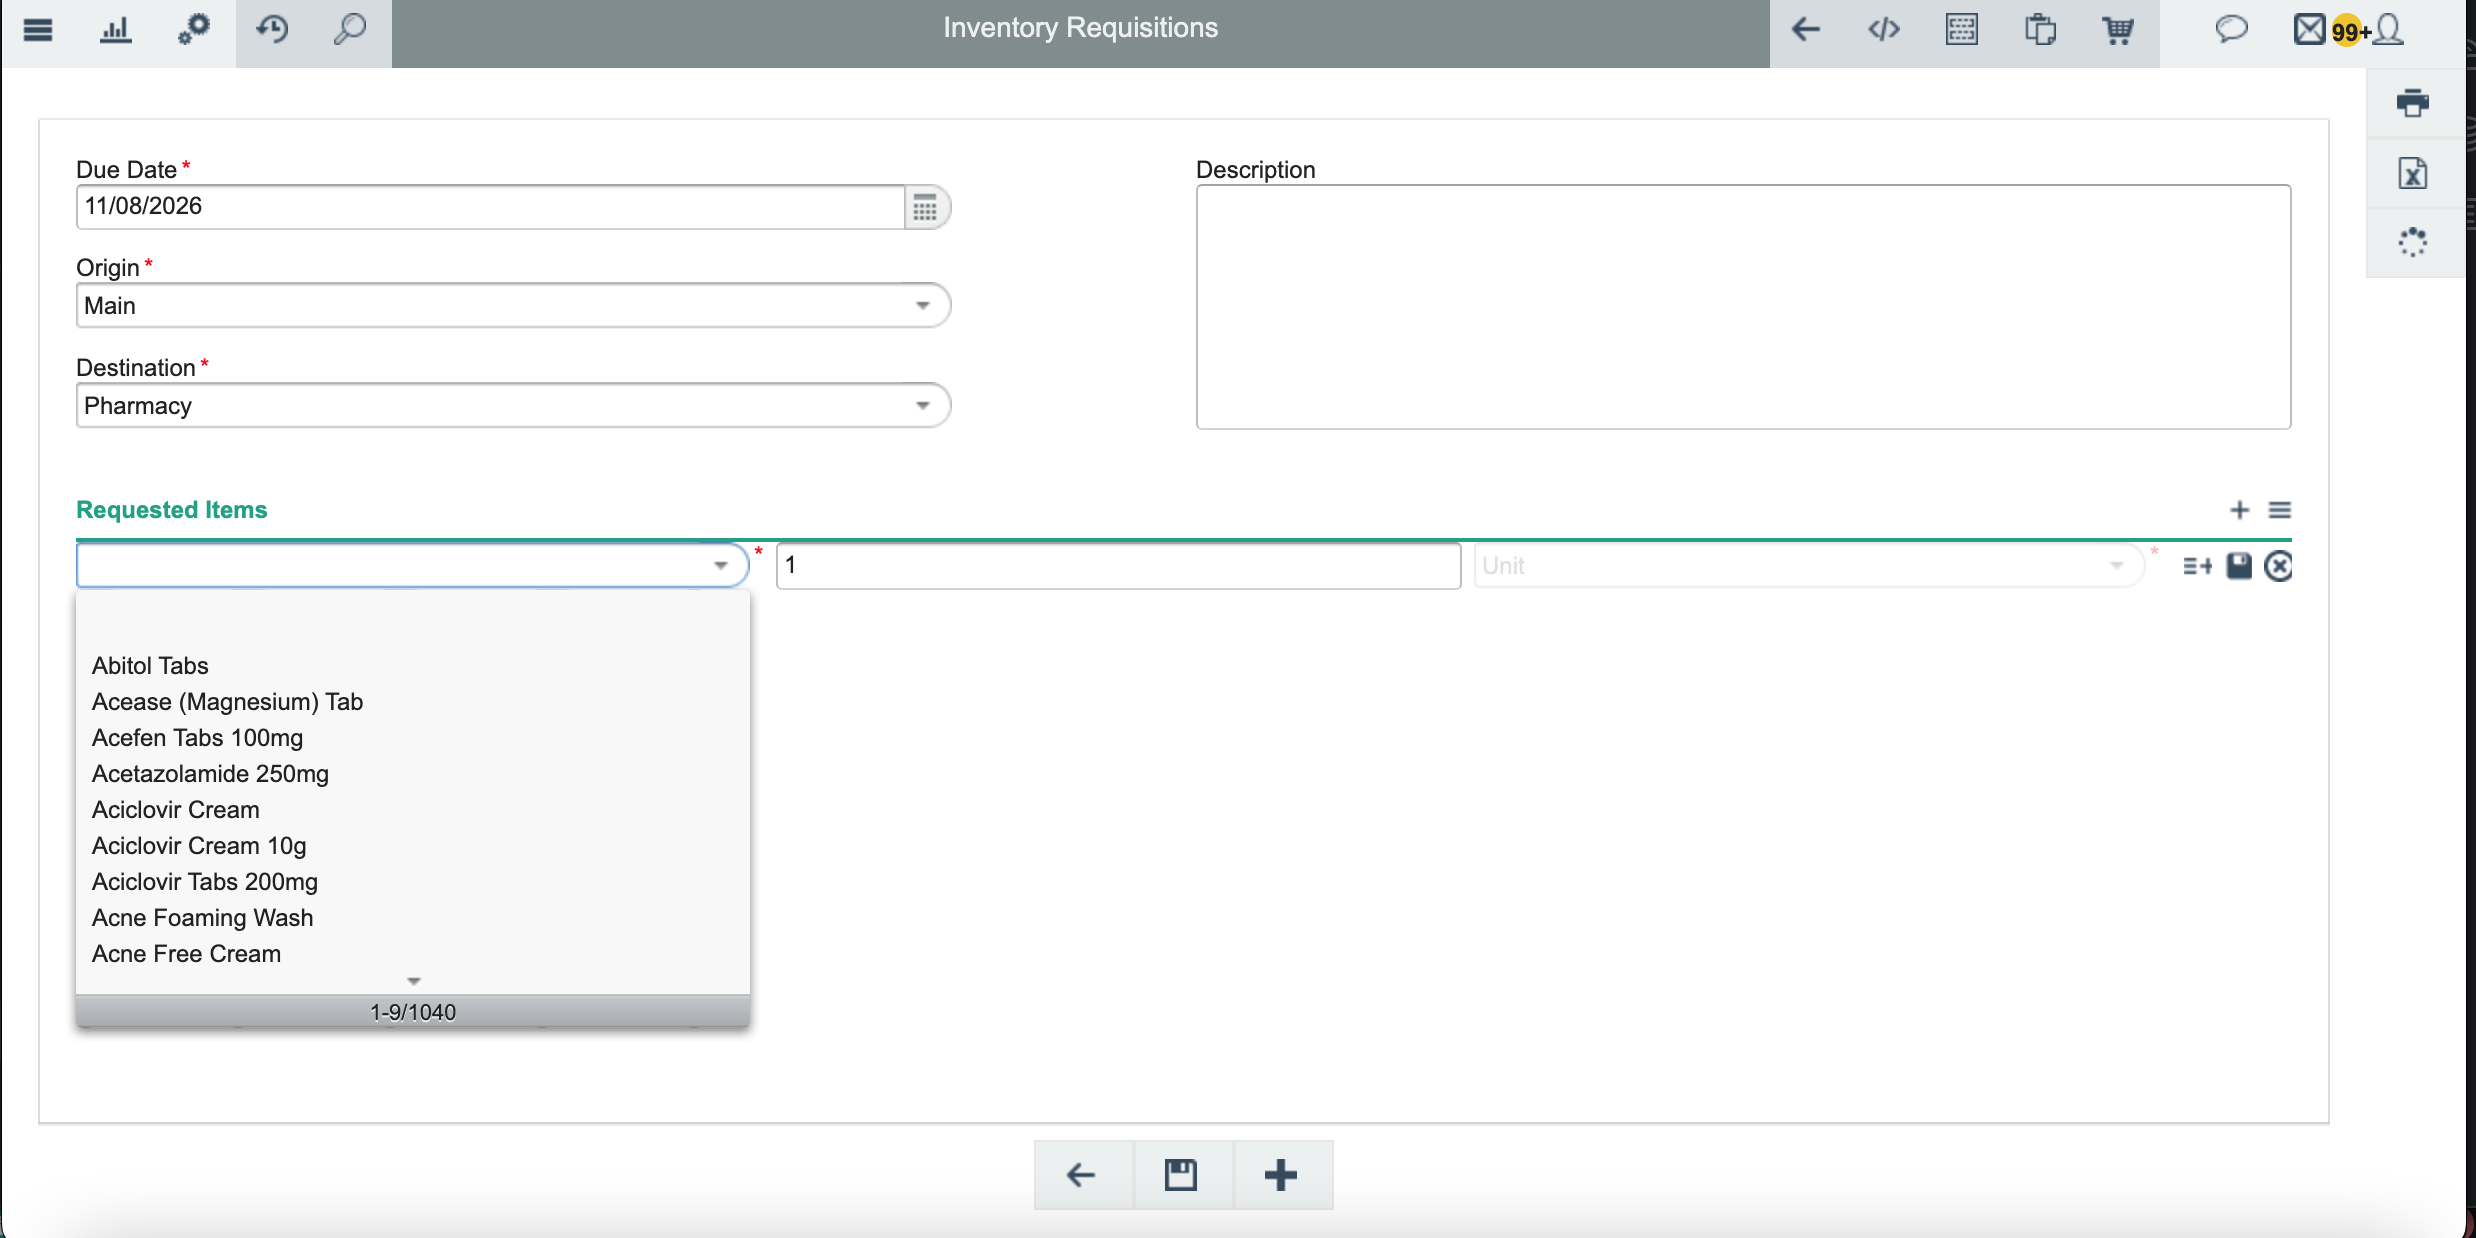
Type the item name to search, then select the item from the results.
Enter the quantity and select the unit.
Click Save and Add to save this item and keep the interface open for adding more, or click Save to save this item and close the interface.
Option | What It Does | When to Use |
|---|---|---|
Save and Add | Saves the item and keeps the interface open | Adding several items in a row |
Save | Saves the item and closes the interface | You're done adding items |
Step 5 — Submit for Approval
Review everything on the requisition.
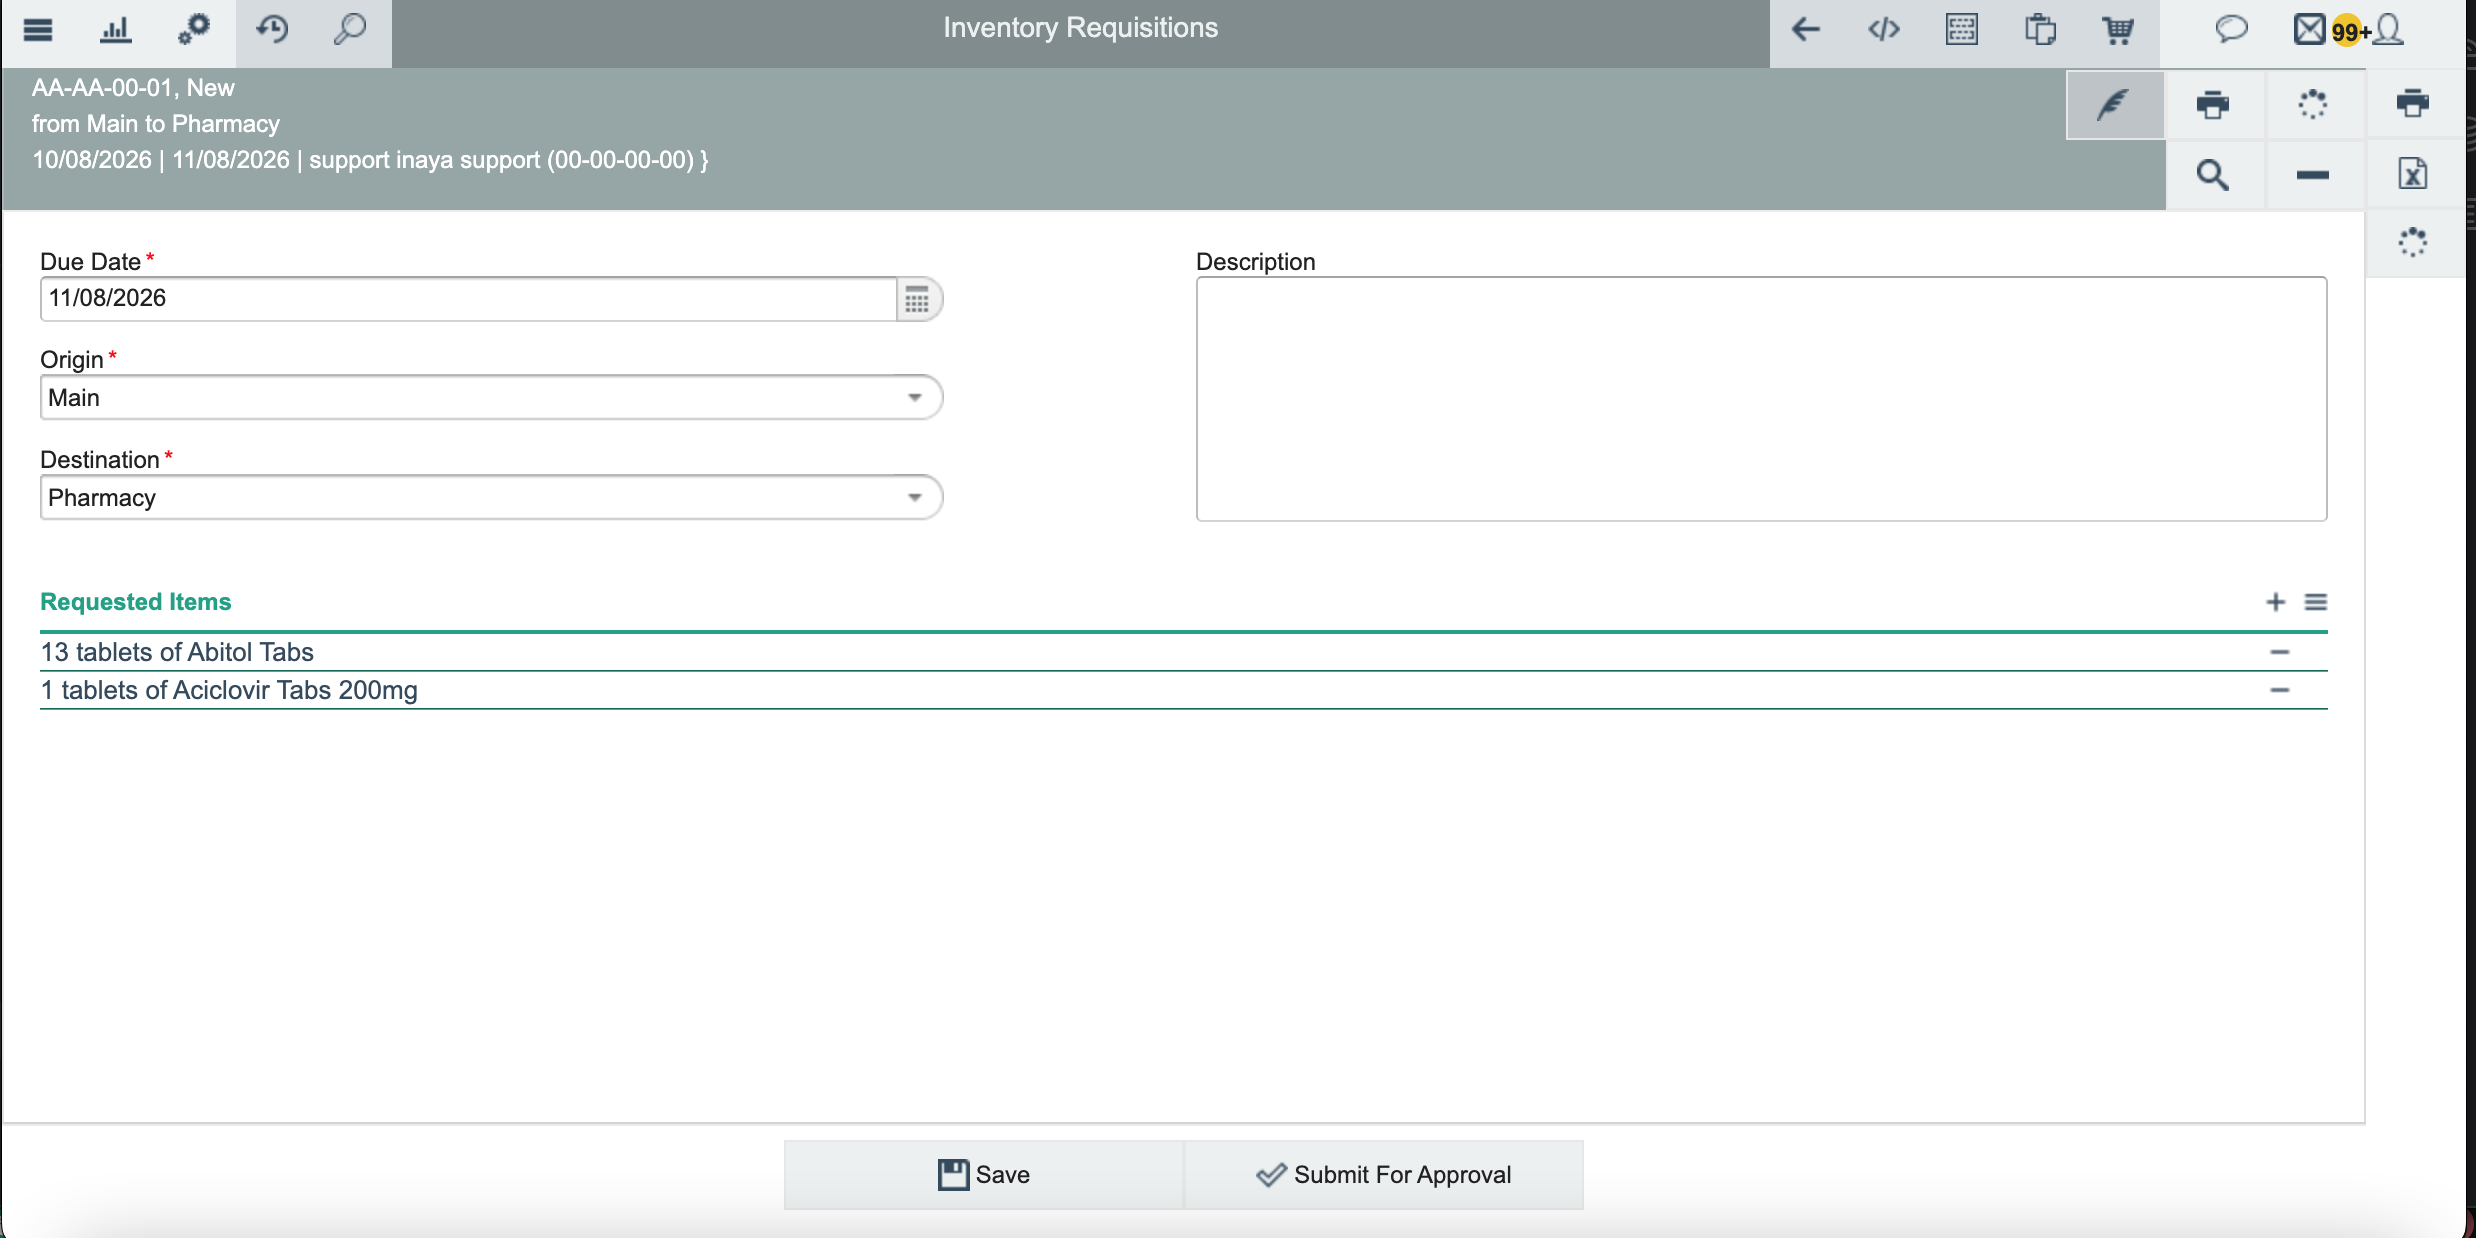
Click Save to keep it as a draft, or click Save and then Submit for Approval to send it forward.
Once submitted, the status changes to Waiting Confirmation and approvers are notified.
Step 6 — Handle an Approval Strategy Error (If You See One)
If you see the error below, no approval strategy has been configured yet for the store.
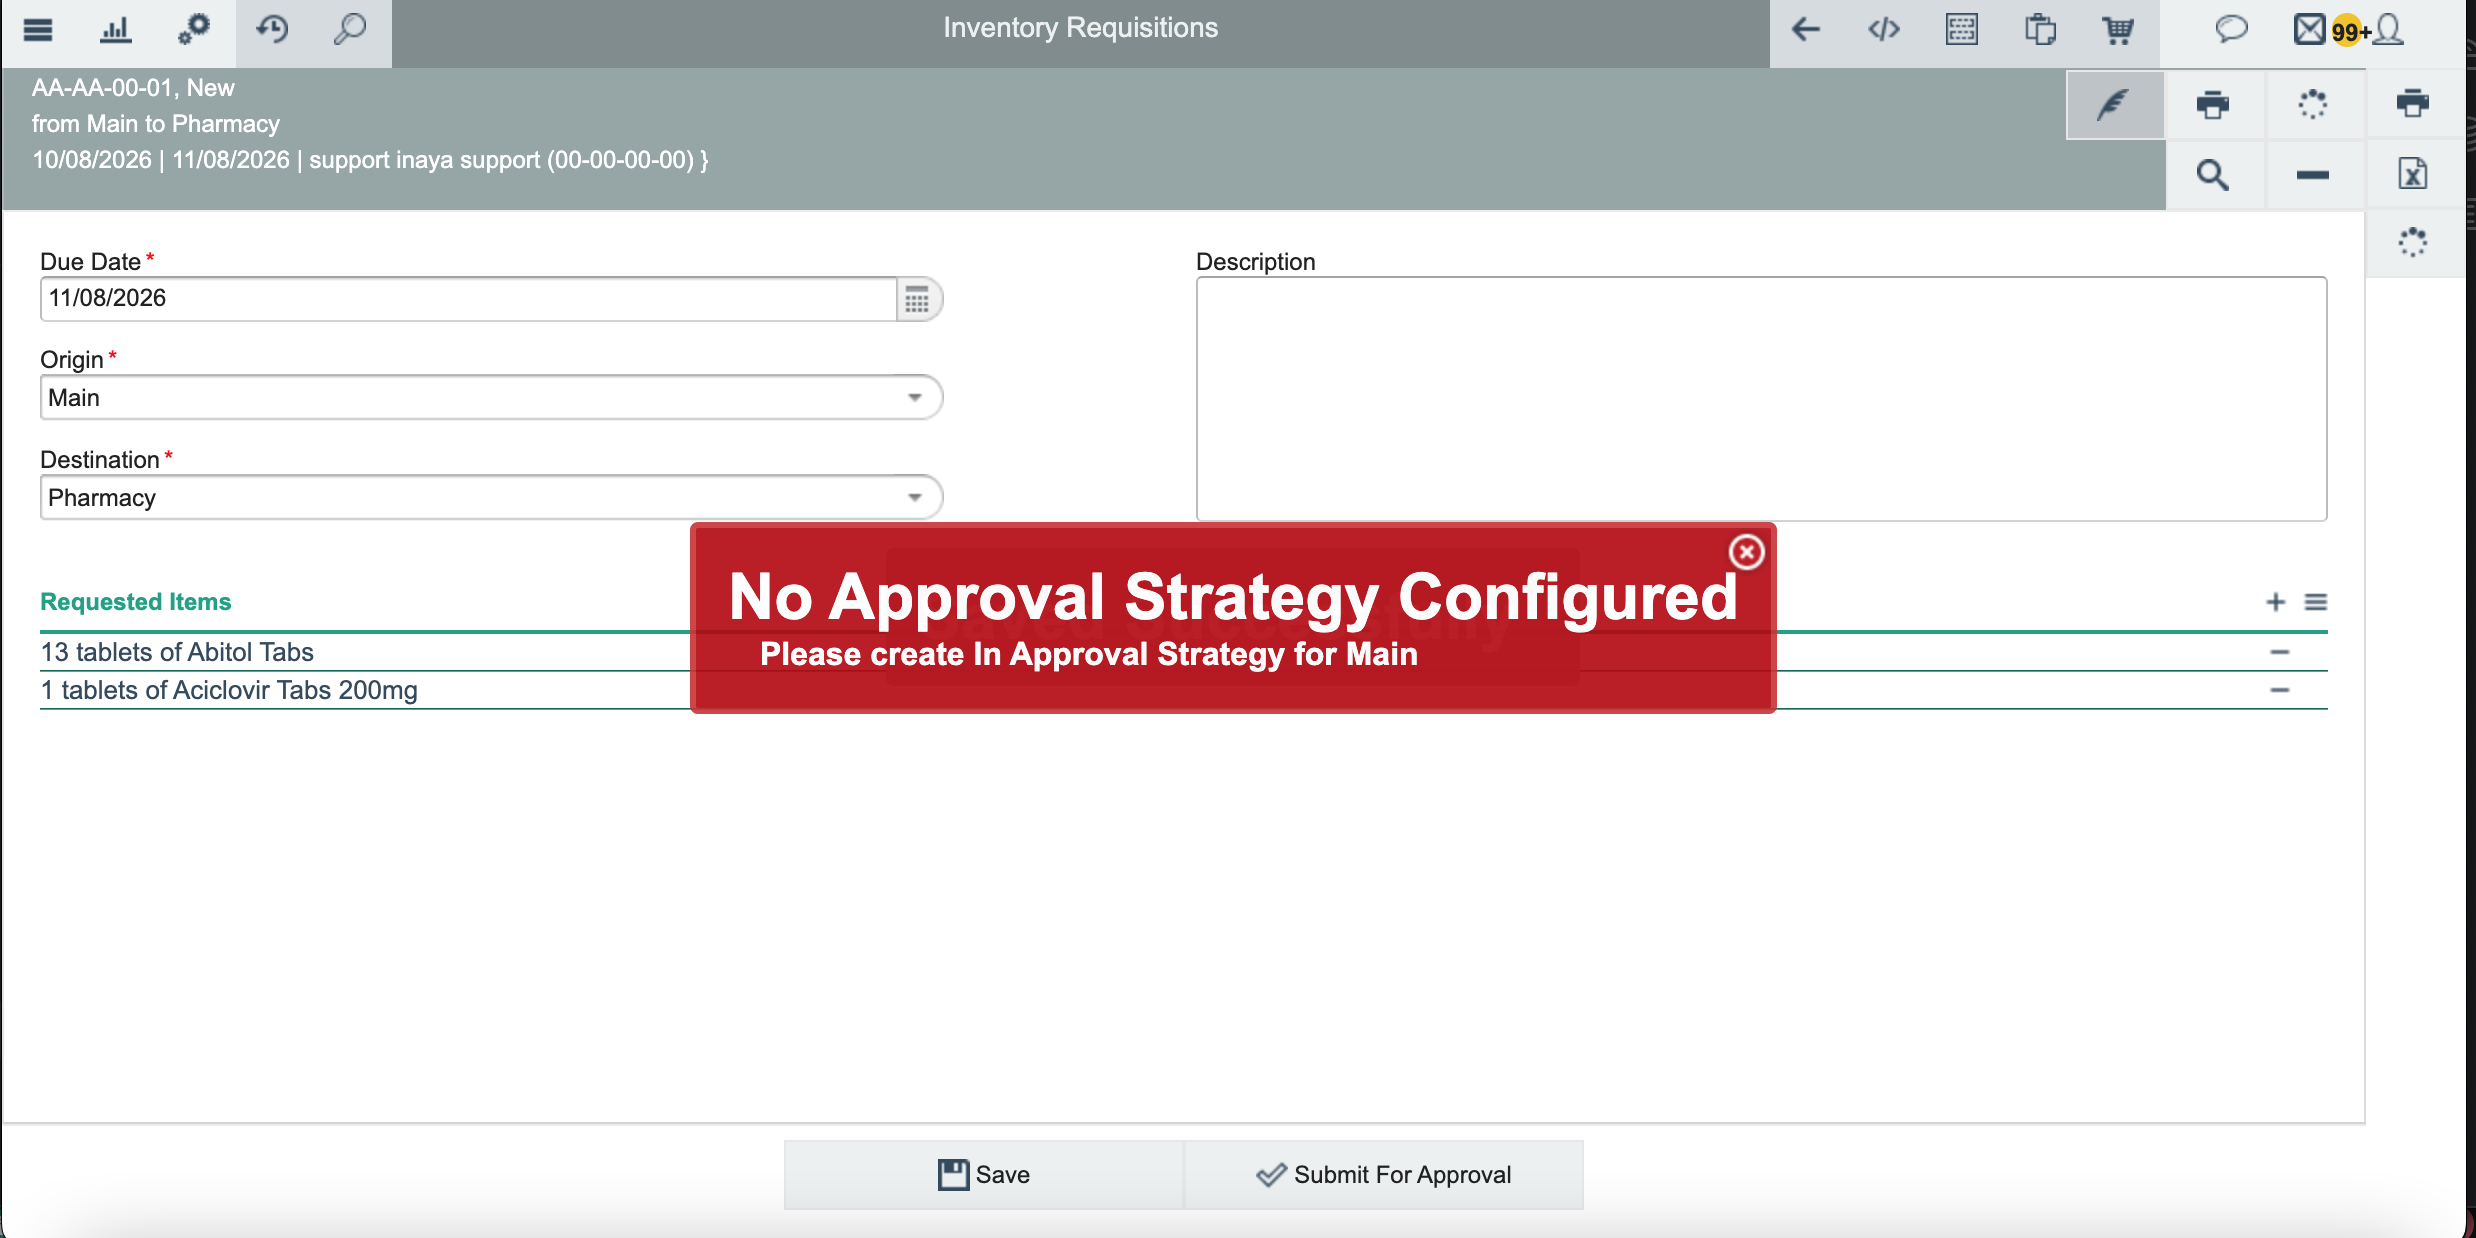
Go to Step 7 to configure the store's approval strategy, then return and resubmit the requisition.
Step 7 — Configure a Store's Approval Strategy
Open Configure from the Main Menu.
Go to Stock.
Select Stores, then choose the store and set its In and/or Out Approval Strategy.
Step 8 — Approve the Requisition
Open the Main Menu and click Approval.
Click Approval Requests, then open the Pending tab.
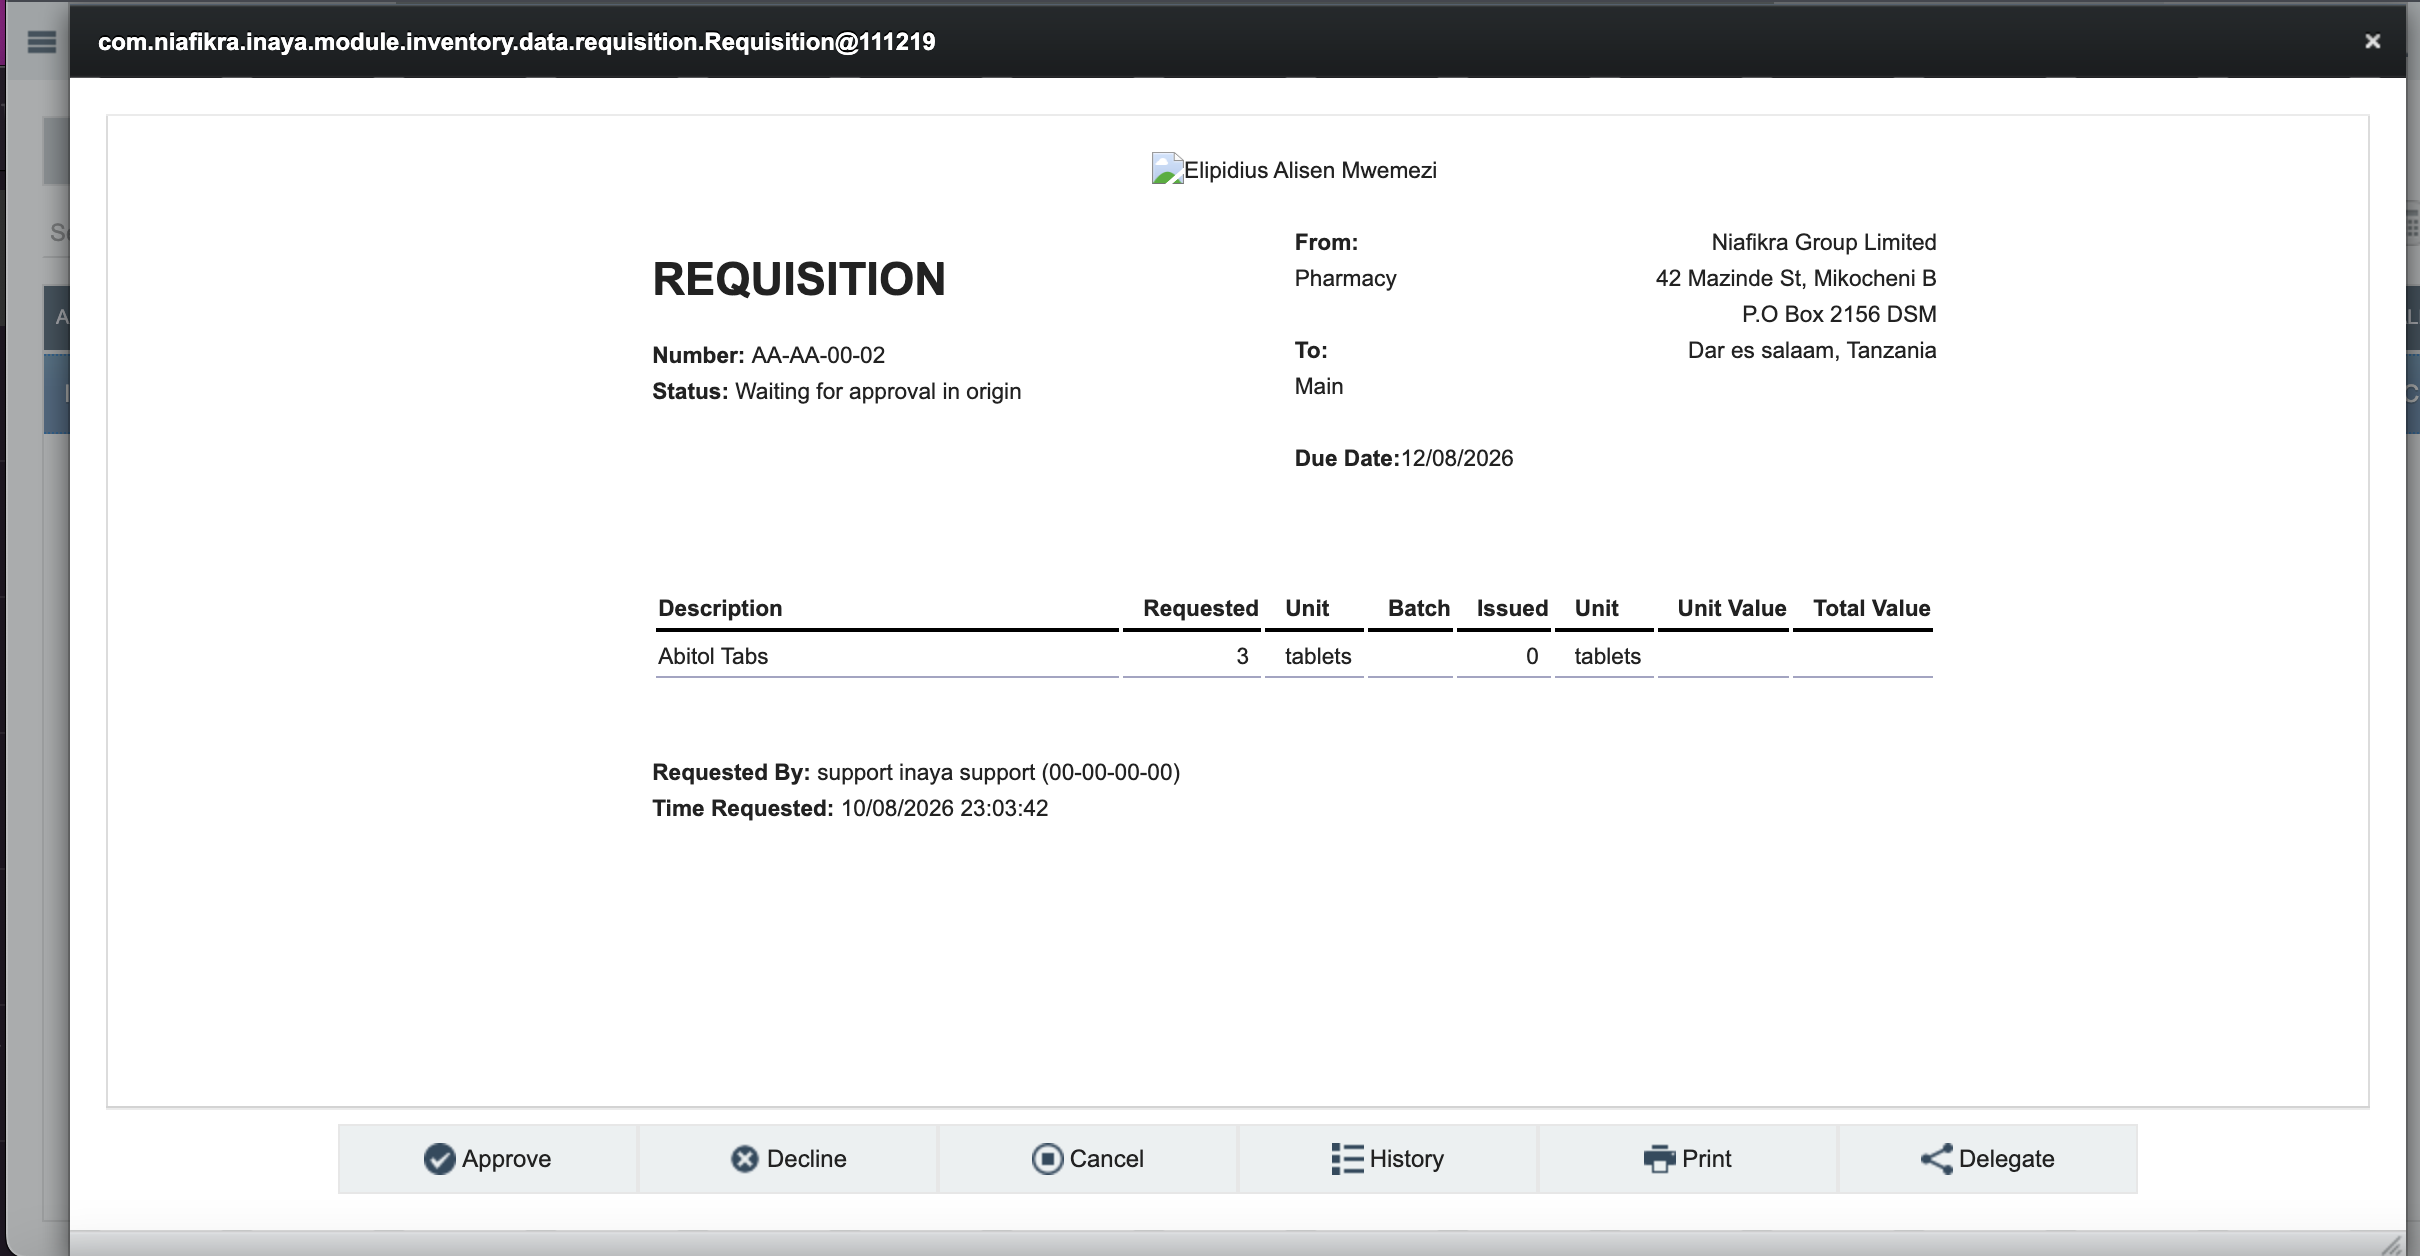
Choose an action for the requisition: Approve, Decline, Cancel, view History, Print, or Delegate.
Button | Action |
|---|---|
Approve | Approves the requisition |
Decline | Rejects it, with an optional reason |
Cancel | Exits without taking action |
History | Shows the approval history |
Prints the requisition | |
Delegate | Hands off approval to another user |
Step 9 — Issue the Items (Destination Store Operator)
Once approved, the status changes to Waiting to be issued.
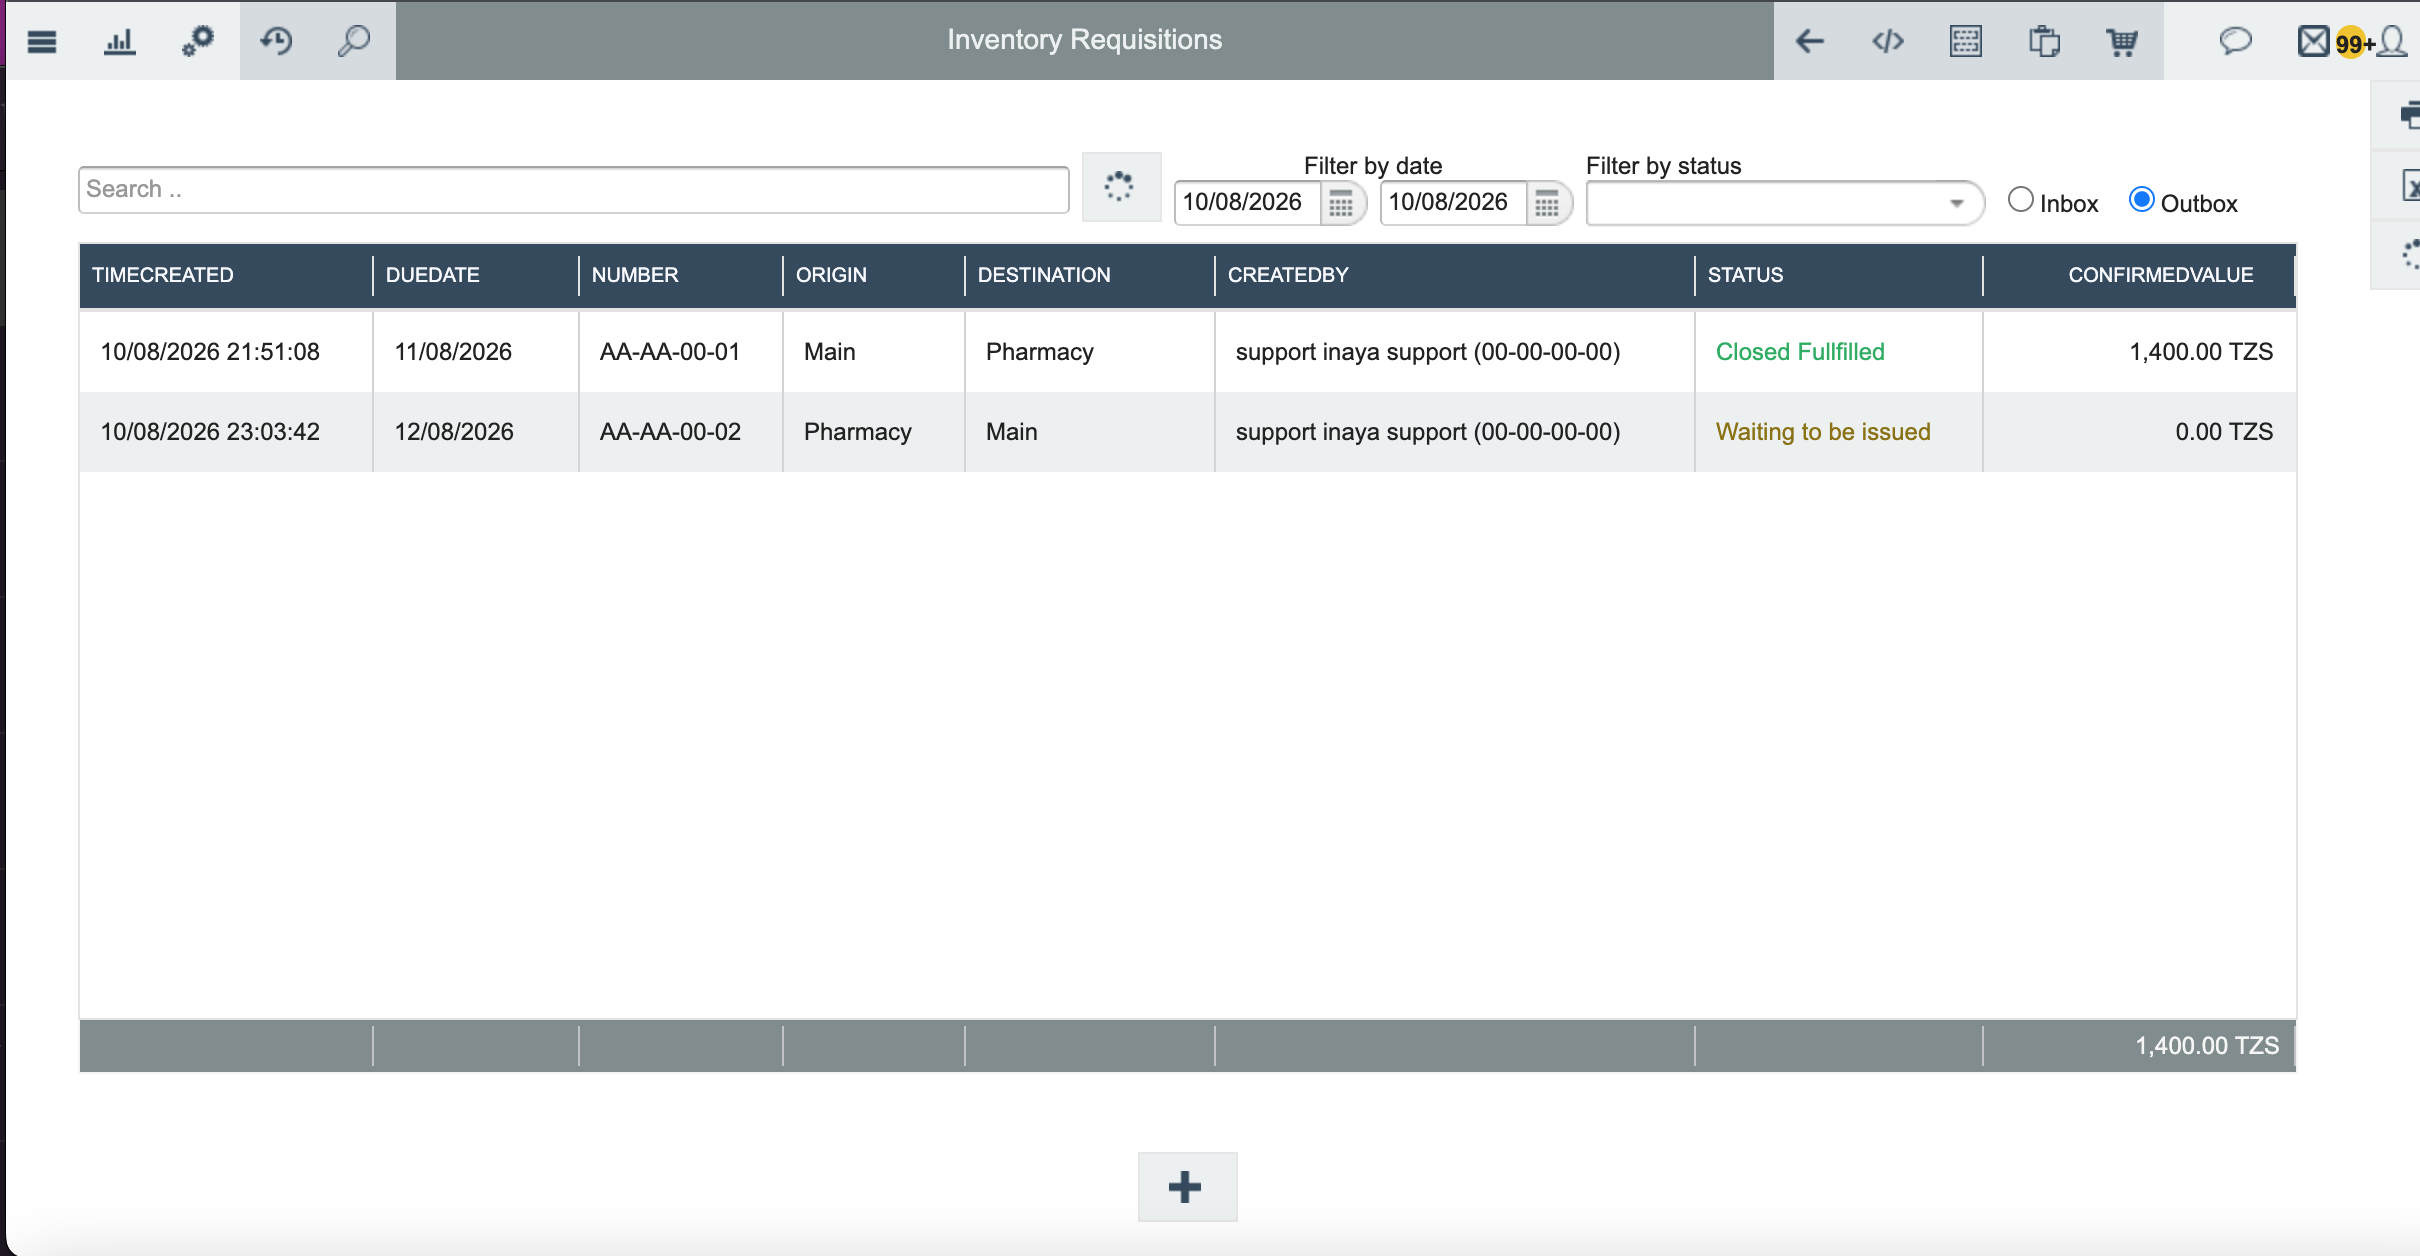
The destination store operator logs in, opens Inventory Requisitions, finds the requisition with that status, and opens it.
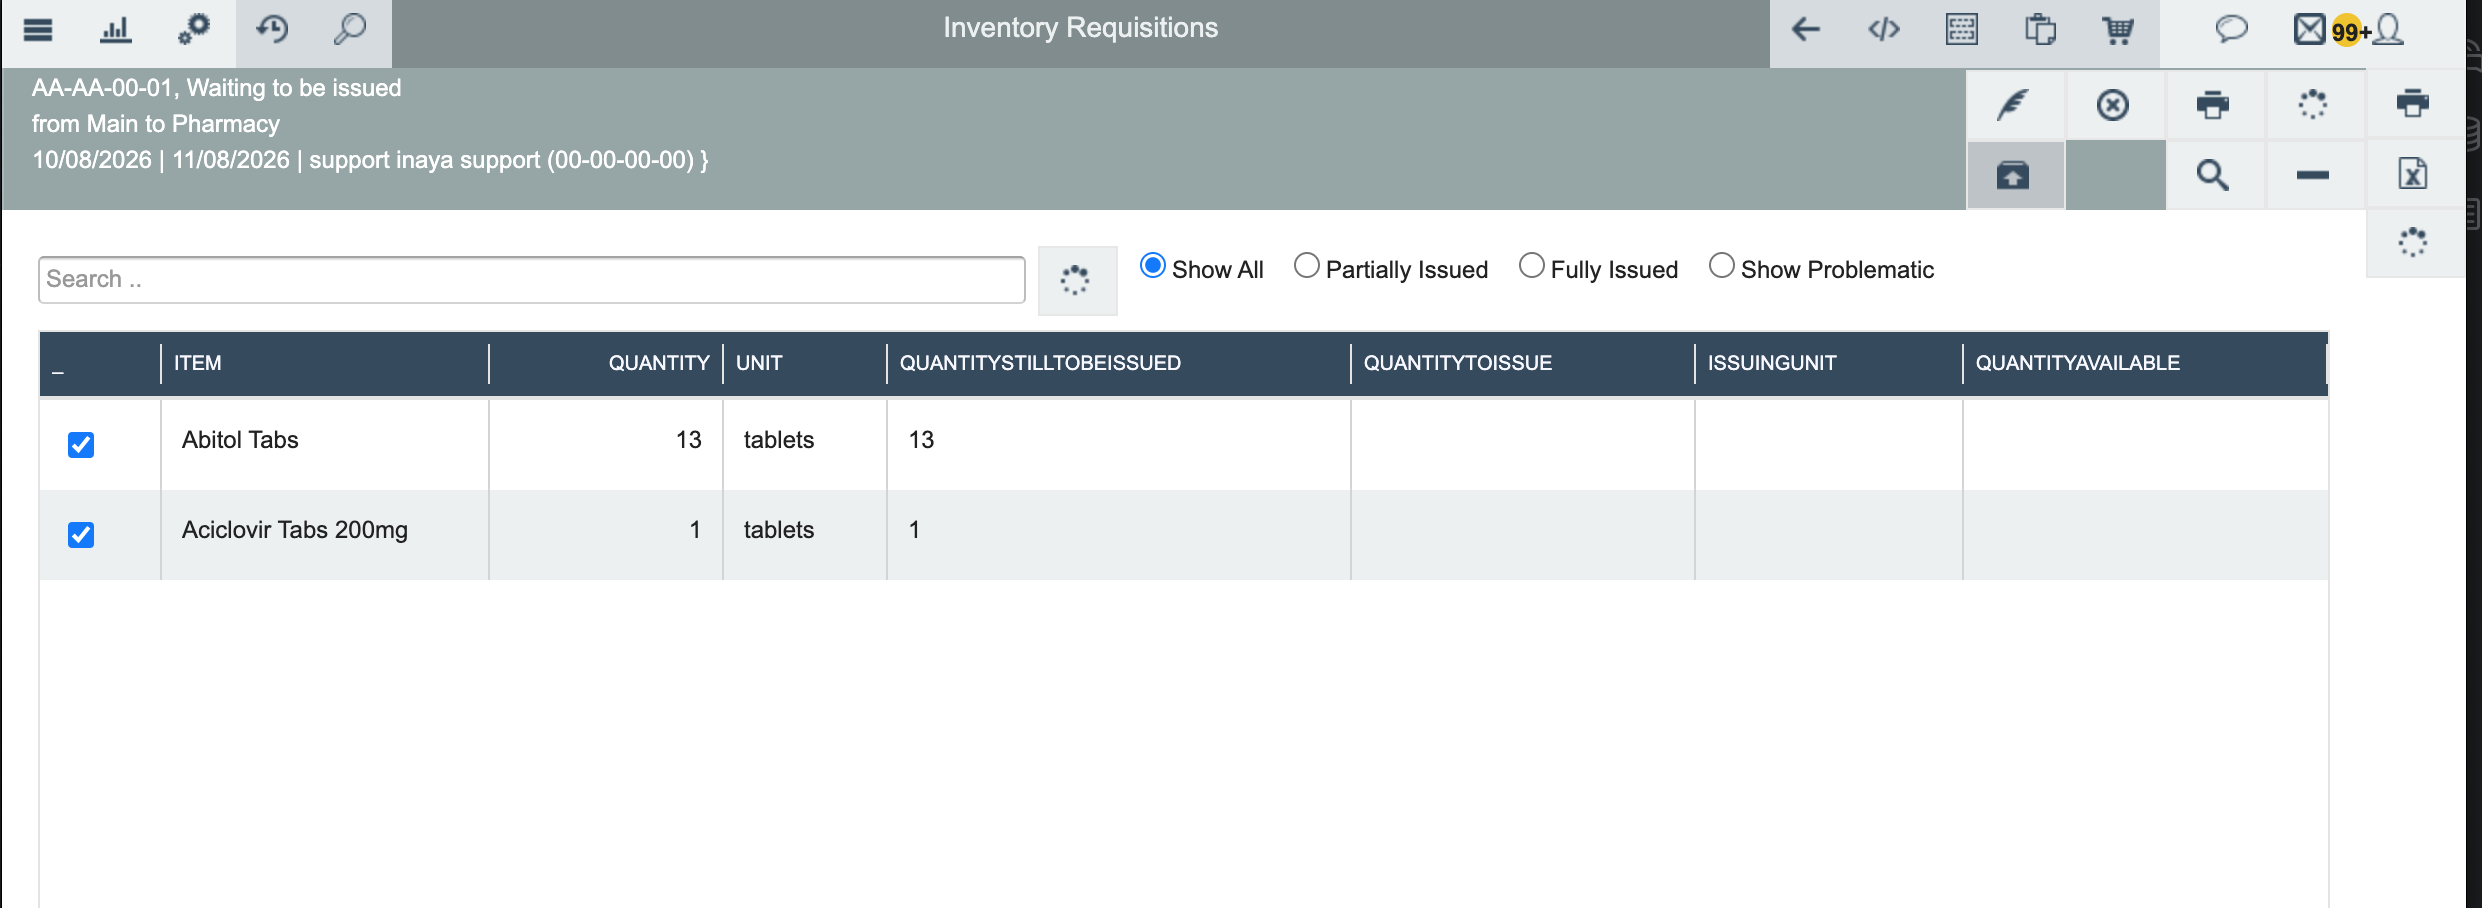
Click Issue Items, then choose Out Issue to issue from general stock, or select a specific batch to issue from.
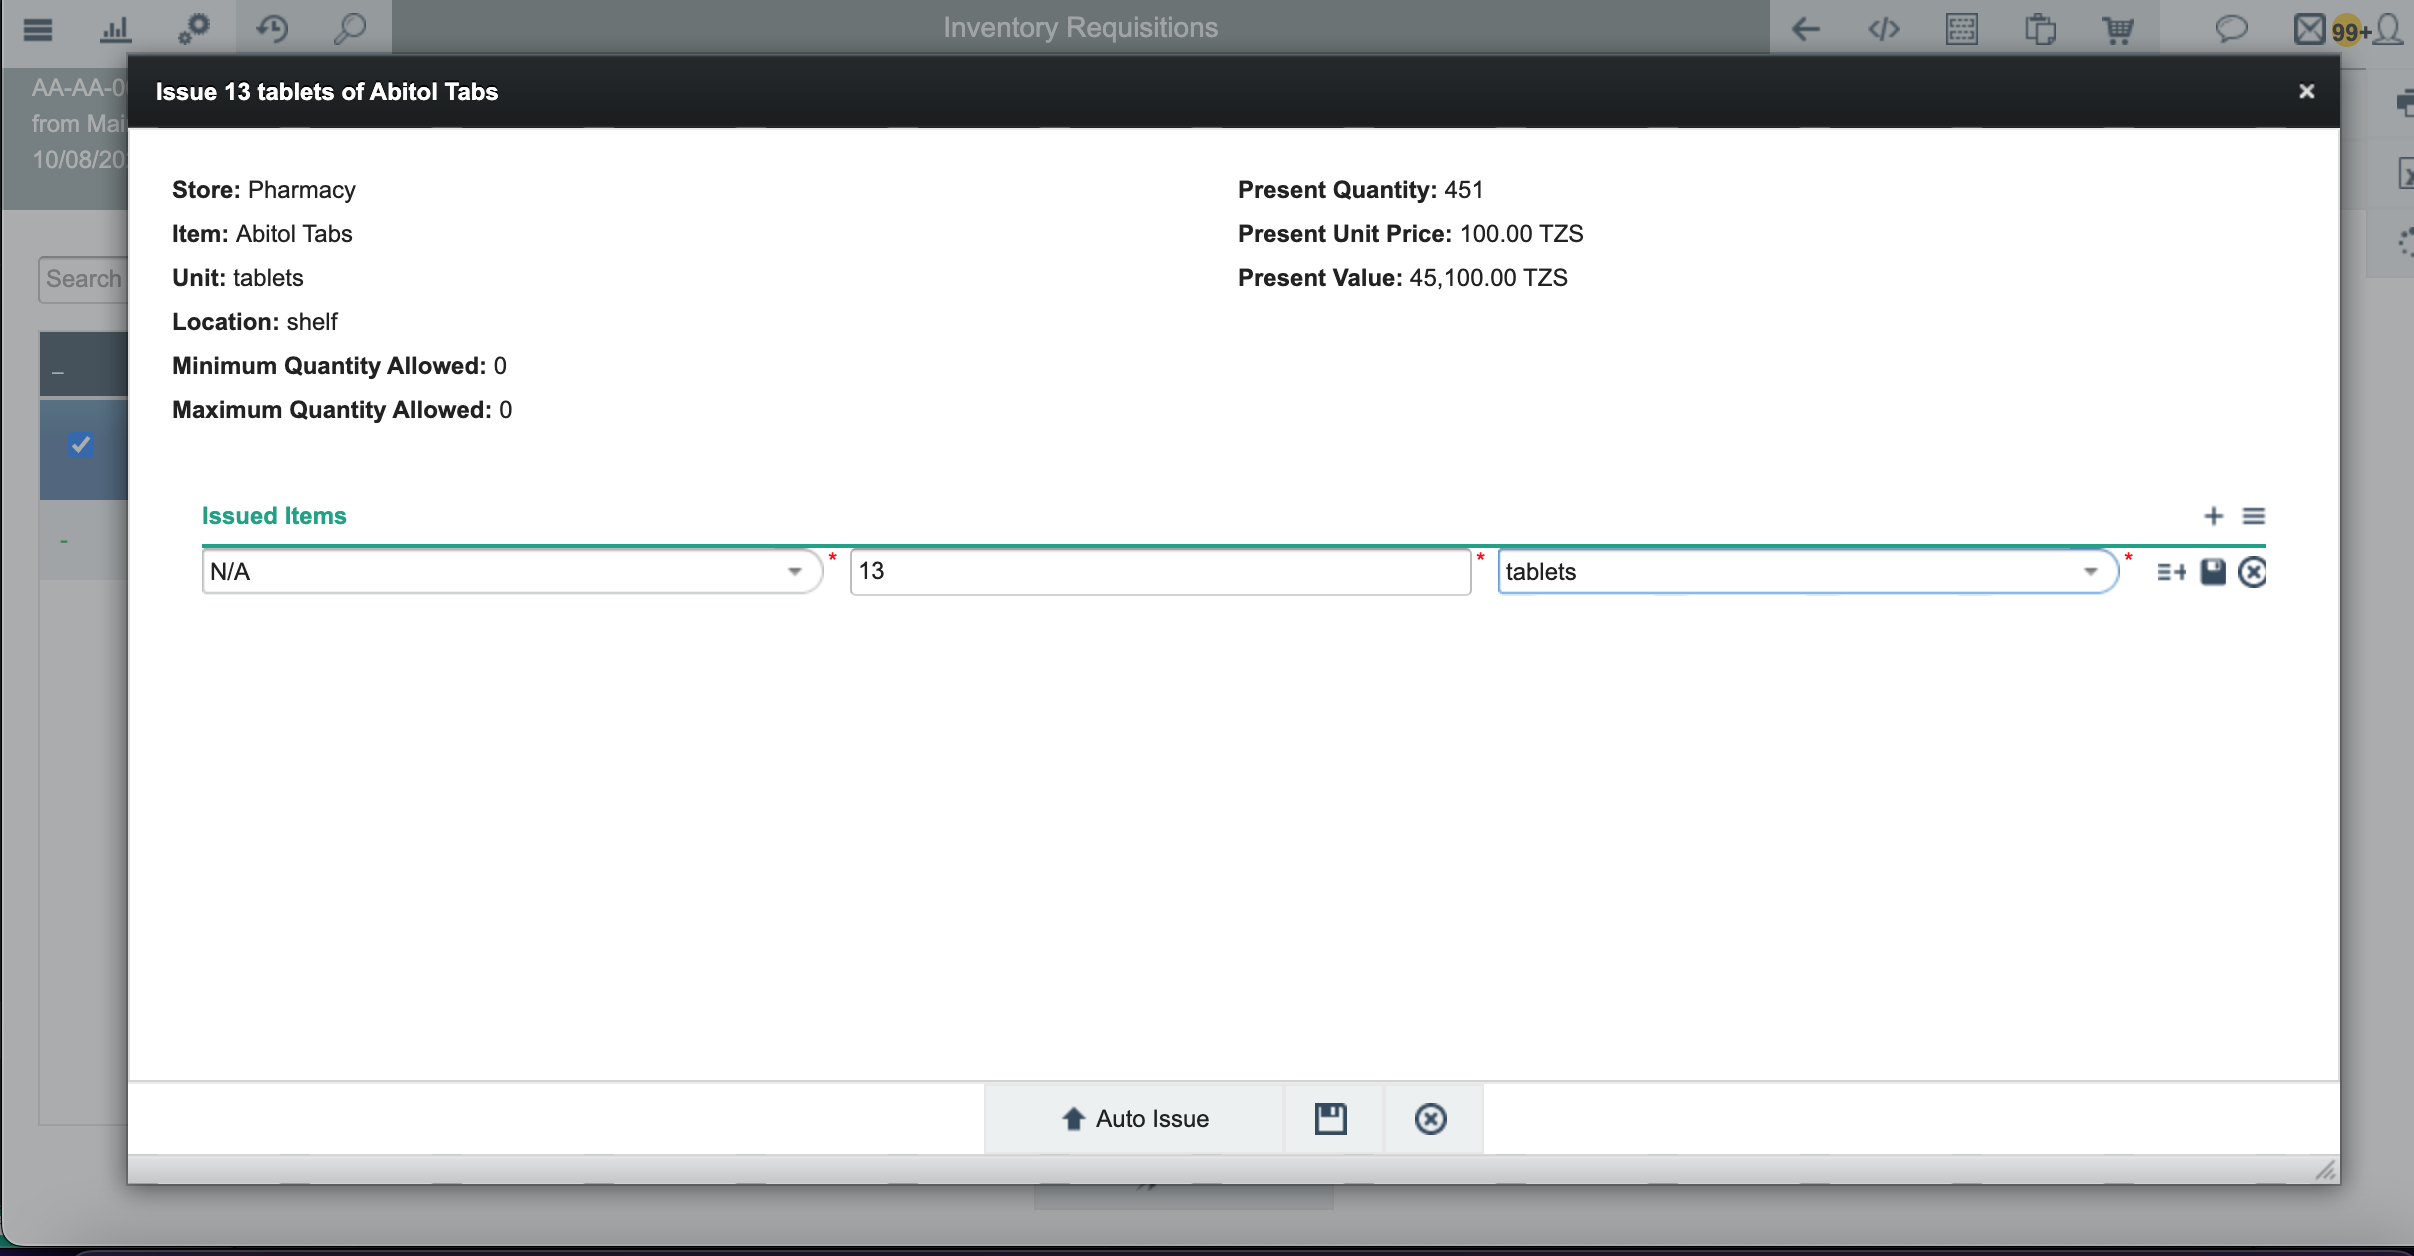
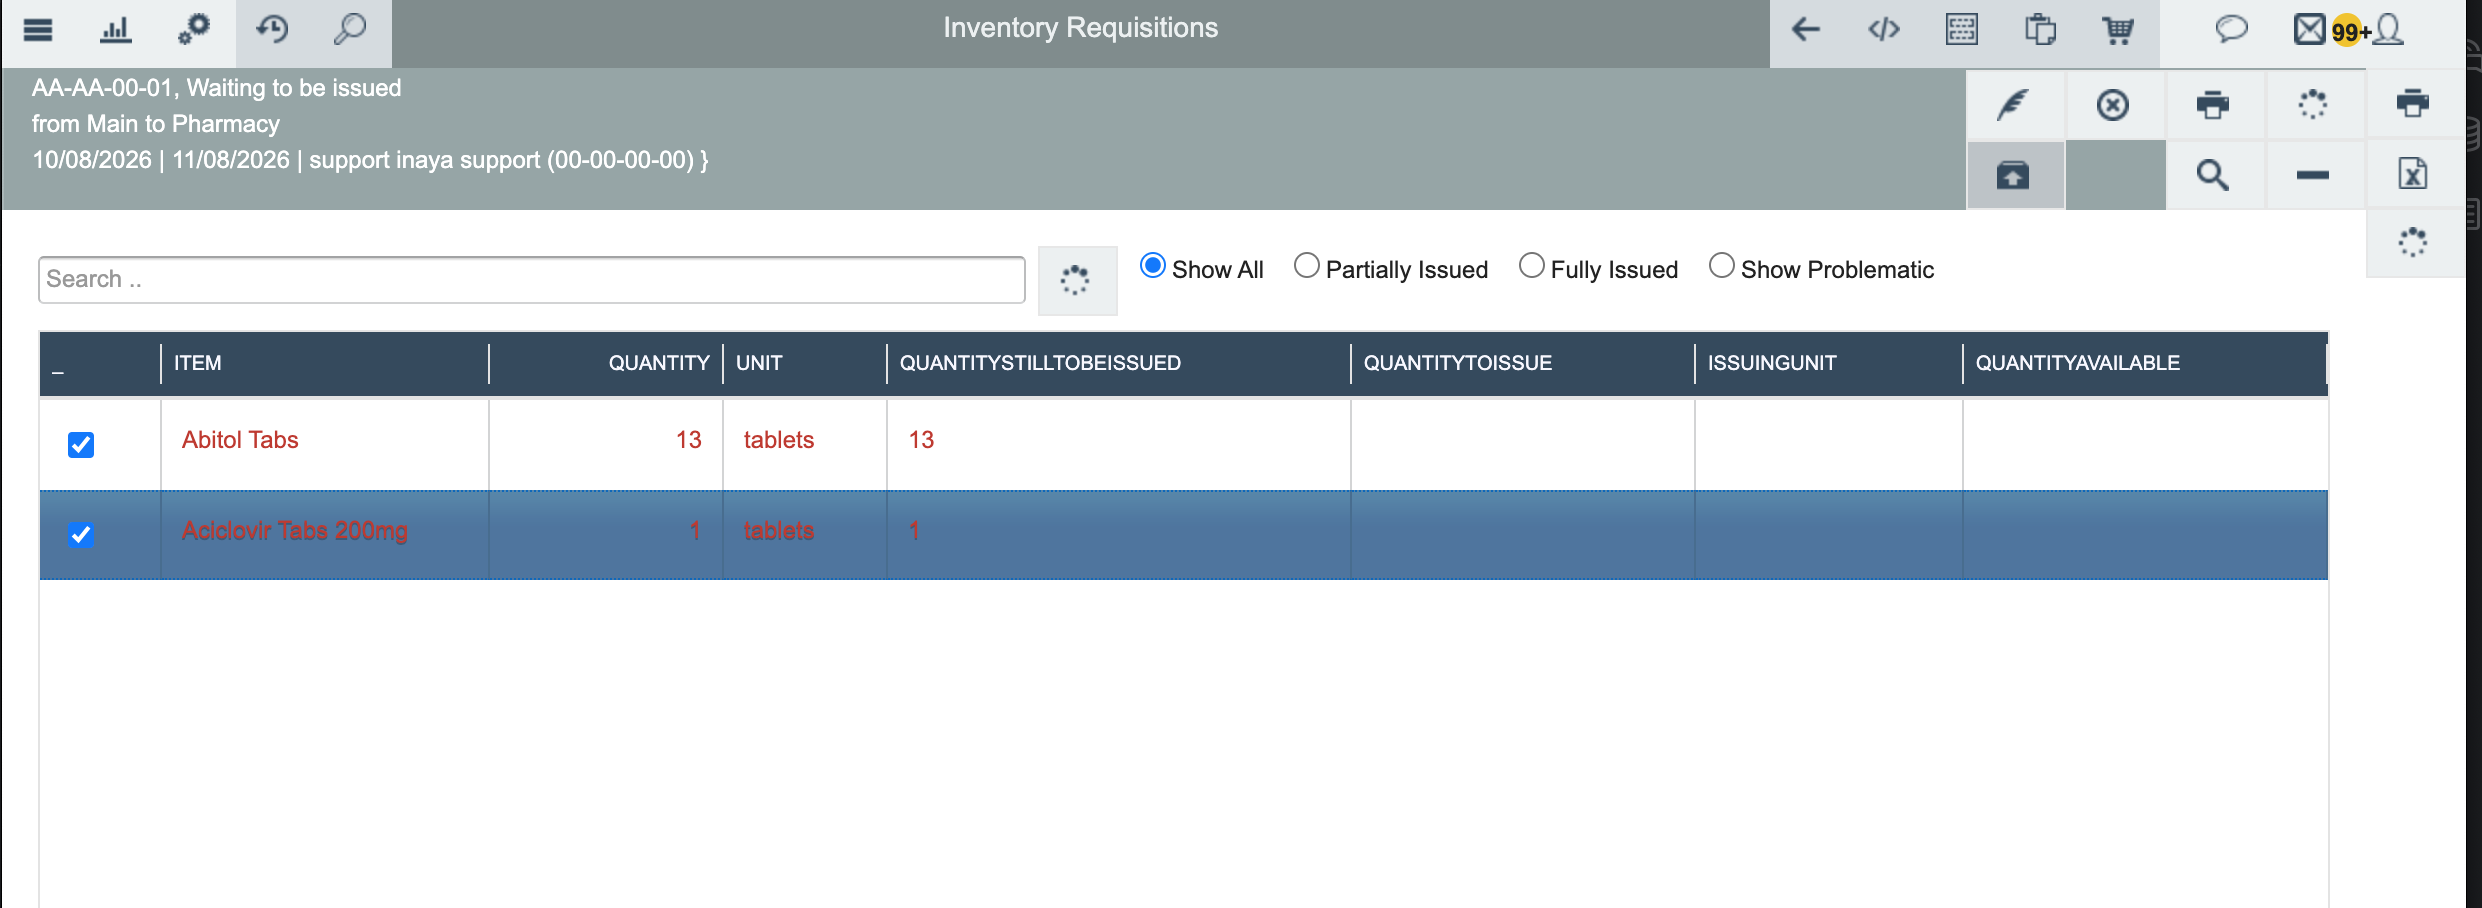
Enter the quantity to issue for each item and click Issue.
Step 10 — Confirm Received Items (Origin Store Operator)
Once items are issued, the status changes to Waiting confirmation.
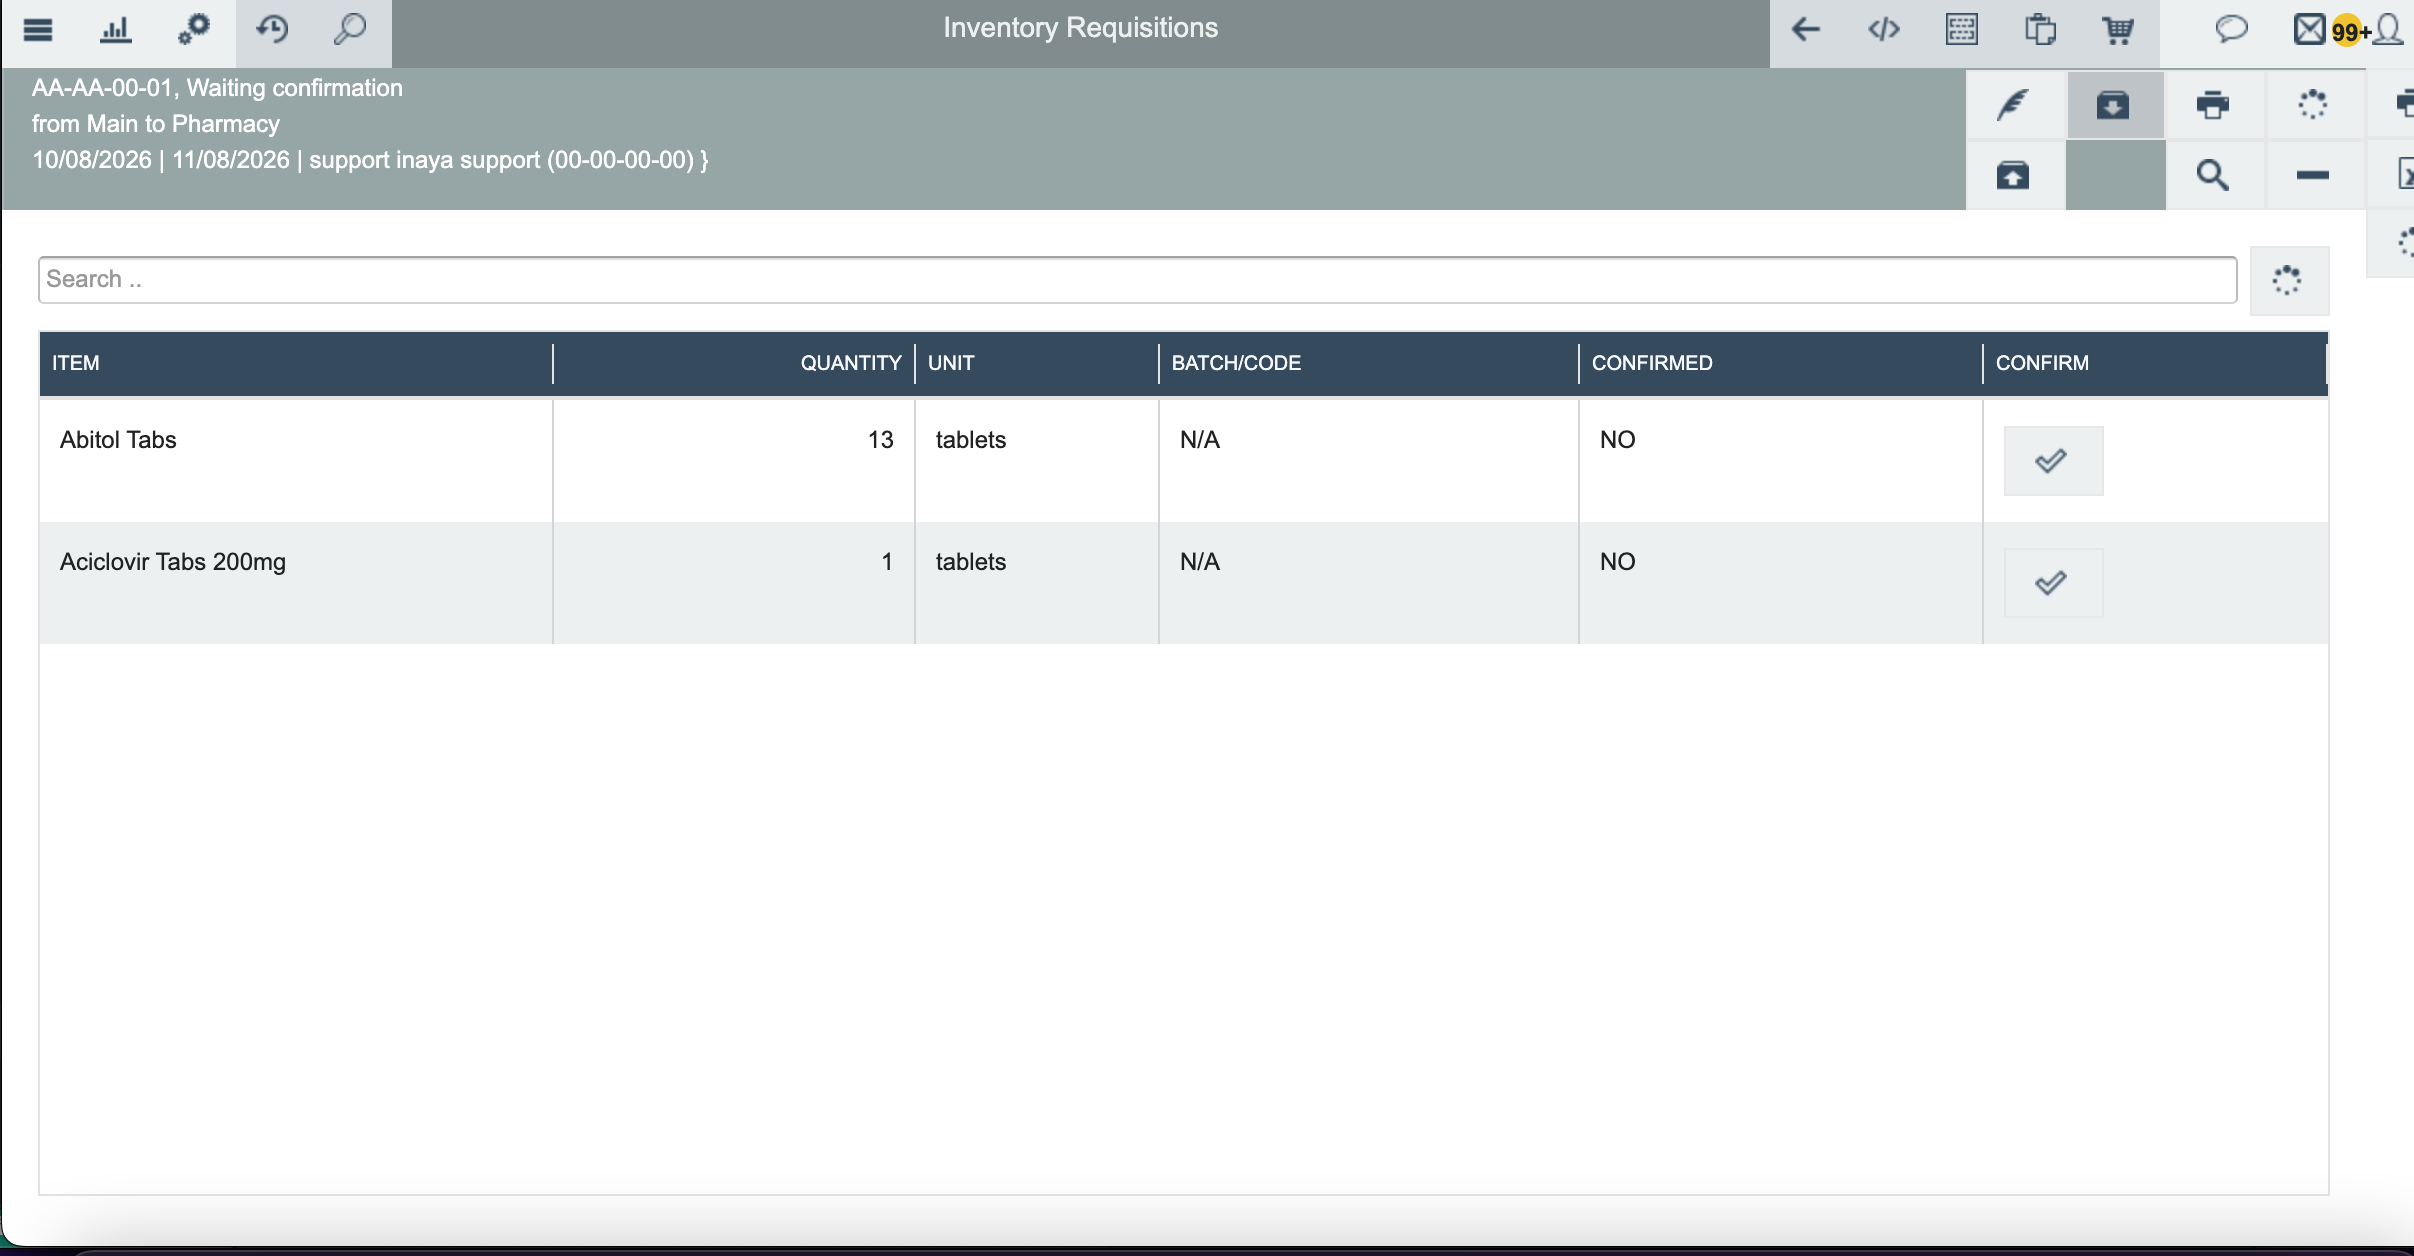
The origin store operator logs in and opens Inventory Requisitions.
Finds the requisition awaiting confirmation and opens it.
Confirms the items received and clicks the checkmark to confirm.
6. What Happens After Saving?
SN | Action | Status | Result | Next Step |
|---|---|---|---|---|
1 | Save Draft | New | Saved, not yet submitted | Edit or submit for approval |
2 | Submit for Approval | Waiting Confirmation | Approval request created | Approver(s) review it |
3 | All Approvers Approve | Waiting to be Issued | Ready for fulfillment | Destination store issues items |
4 | Partial Issuance | Partially Issued | Some items issued | Issue the rest, or close |
5 | Complete Issuance | Waiting Confirmation | All items issued | Origin store confirms receipt |
6 | Confirmation | Closed Fulfilled | Requisition complete | Requisition closed, inventory updated |
7 | Rejection | Declined | Requisition rejected | Requester edits and resubmits |
7. Configuration Reference
7.1 Approval Strategy Settings
SN | Setting | Description | Example |
|---|---|---|---|
1 | Single Approver | One person must approve | Pharmacy Manager |
2 | Multiple Approvers | Two or more must approve | Store Manager + Inventory Controller |
3 | Sequential Approval | Approvers act in a set order | Manager → Director |
4 | Parallel Approval | Approvers can act in any order | Any order, all must approve |
7.2 Store Configuration
SN | Field | Purpose |
|---|---|---|
1 | Name | Store name (e.g., Main, Pharmacy) |
2 | Parent Store | Defines the store hierarchy |
3 | In Approval Strategy | Who approves items coming into this store |
4 | Out Approval Strategy | Who approves items going out of this store |
8. Common Problems and Solutions
Troubleshooting
No Approval Strategy — Error: "No Approval Strategy Configured". Cause: the store has no strategy set. Solution: go to Stores → select the store → configure the In/Out Approval Strategy.
Can't see a request — Error: "No pending requests". Cause: you're not added as an approver. Solution: check the approval strategy and add yourself or the user to the approver list.
Out of stock — Item shown in red. Cause: not enough stock at the destination store. Solution: check inventory, then reduce the quantity or restock.
Can't issue — Error: "Quantity exceeds available stock". Cause: requested more than what's available. Solution: reduce the issue quantity.
Can't confirm — The Confirm button is disabled. Cause: the requisition isn't in "Waiting confirmation" status yet. Solution: wait for the correct status.
Stuck on "Waiting" — Status doesn't change. Cause: not all approvers have approved yet. Solution: check who's still pending and follow up.
9. Quick Reference
9.1 Quick Step Reference
Requisition at a Glance
Main Menu → Logistics → Items → Inventory Requisitions.
Click + to create a new requisition.
Set Due Date, Origin, and Destination.
Add requested items with quantity and unit.
Save, then Submit for Approval.
Approver(s) review and approve.
Destination store issues the items.
Origin store confirms receipt.
Requisition closes as Closed Fulfilled.
9.2 Key Terms
SN | Term | Definition |
|---|---|---|
1 | Origin | The store requesting the items |
2 | Destination | The store issuing the items |
3 | In Strategy | Approval required for items coming in |
4 | Out Strategy | Approval required for items going out |
5 | Waiting Confirmation | Awaiting approval or awaiting receipt confirmation |
6 | Waiting to be Issued | Approved, ready for the destination store to issue |
7 | Closed Fulfilled | Requisition completed successfully |